• Skip to primary navigation
  • Skip to content
  • Skip to primary sidebar
  • Skip to footer

Eatentions

Organic * Local * Sustainable

  • Home
  • About Us
  • Recipes
  • Culinary Socials
  • CSM – Community Sourced Meals
  • Contact
  • Nav Social Menu

    • Facebook
    • Instagram
    • Pinterest
    • RSS
    • Snapchat
    • Twitter

parsley

Artichokes Al Ajillo

April 28, 2016 by Michelle Michelotti-Martinez


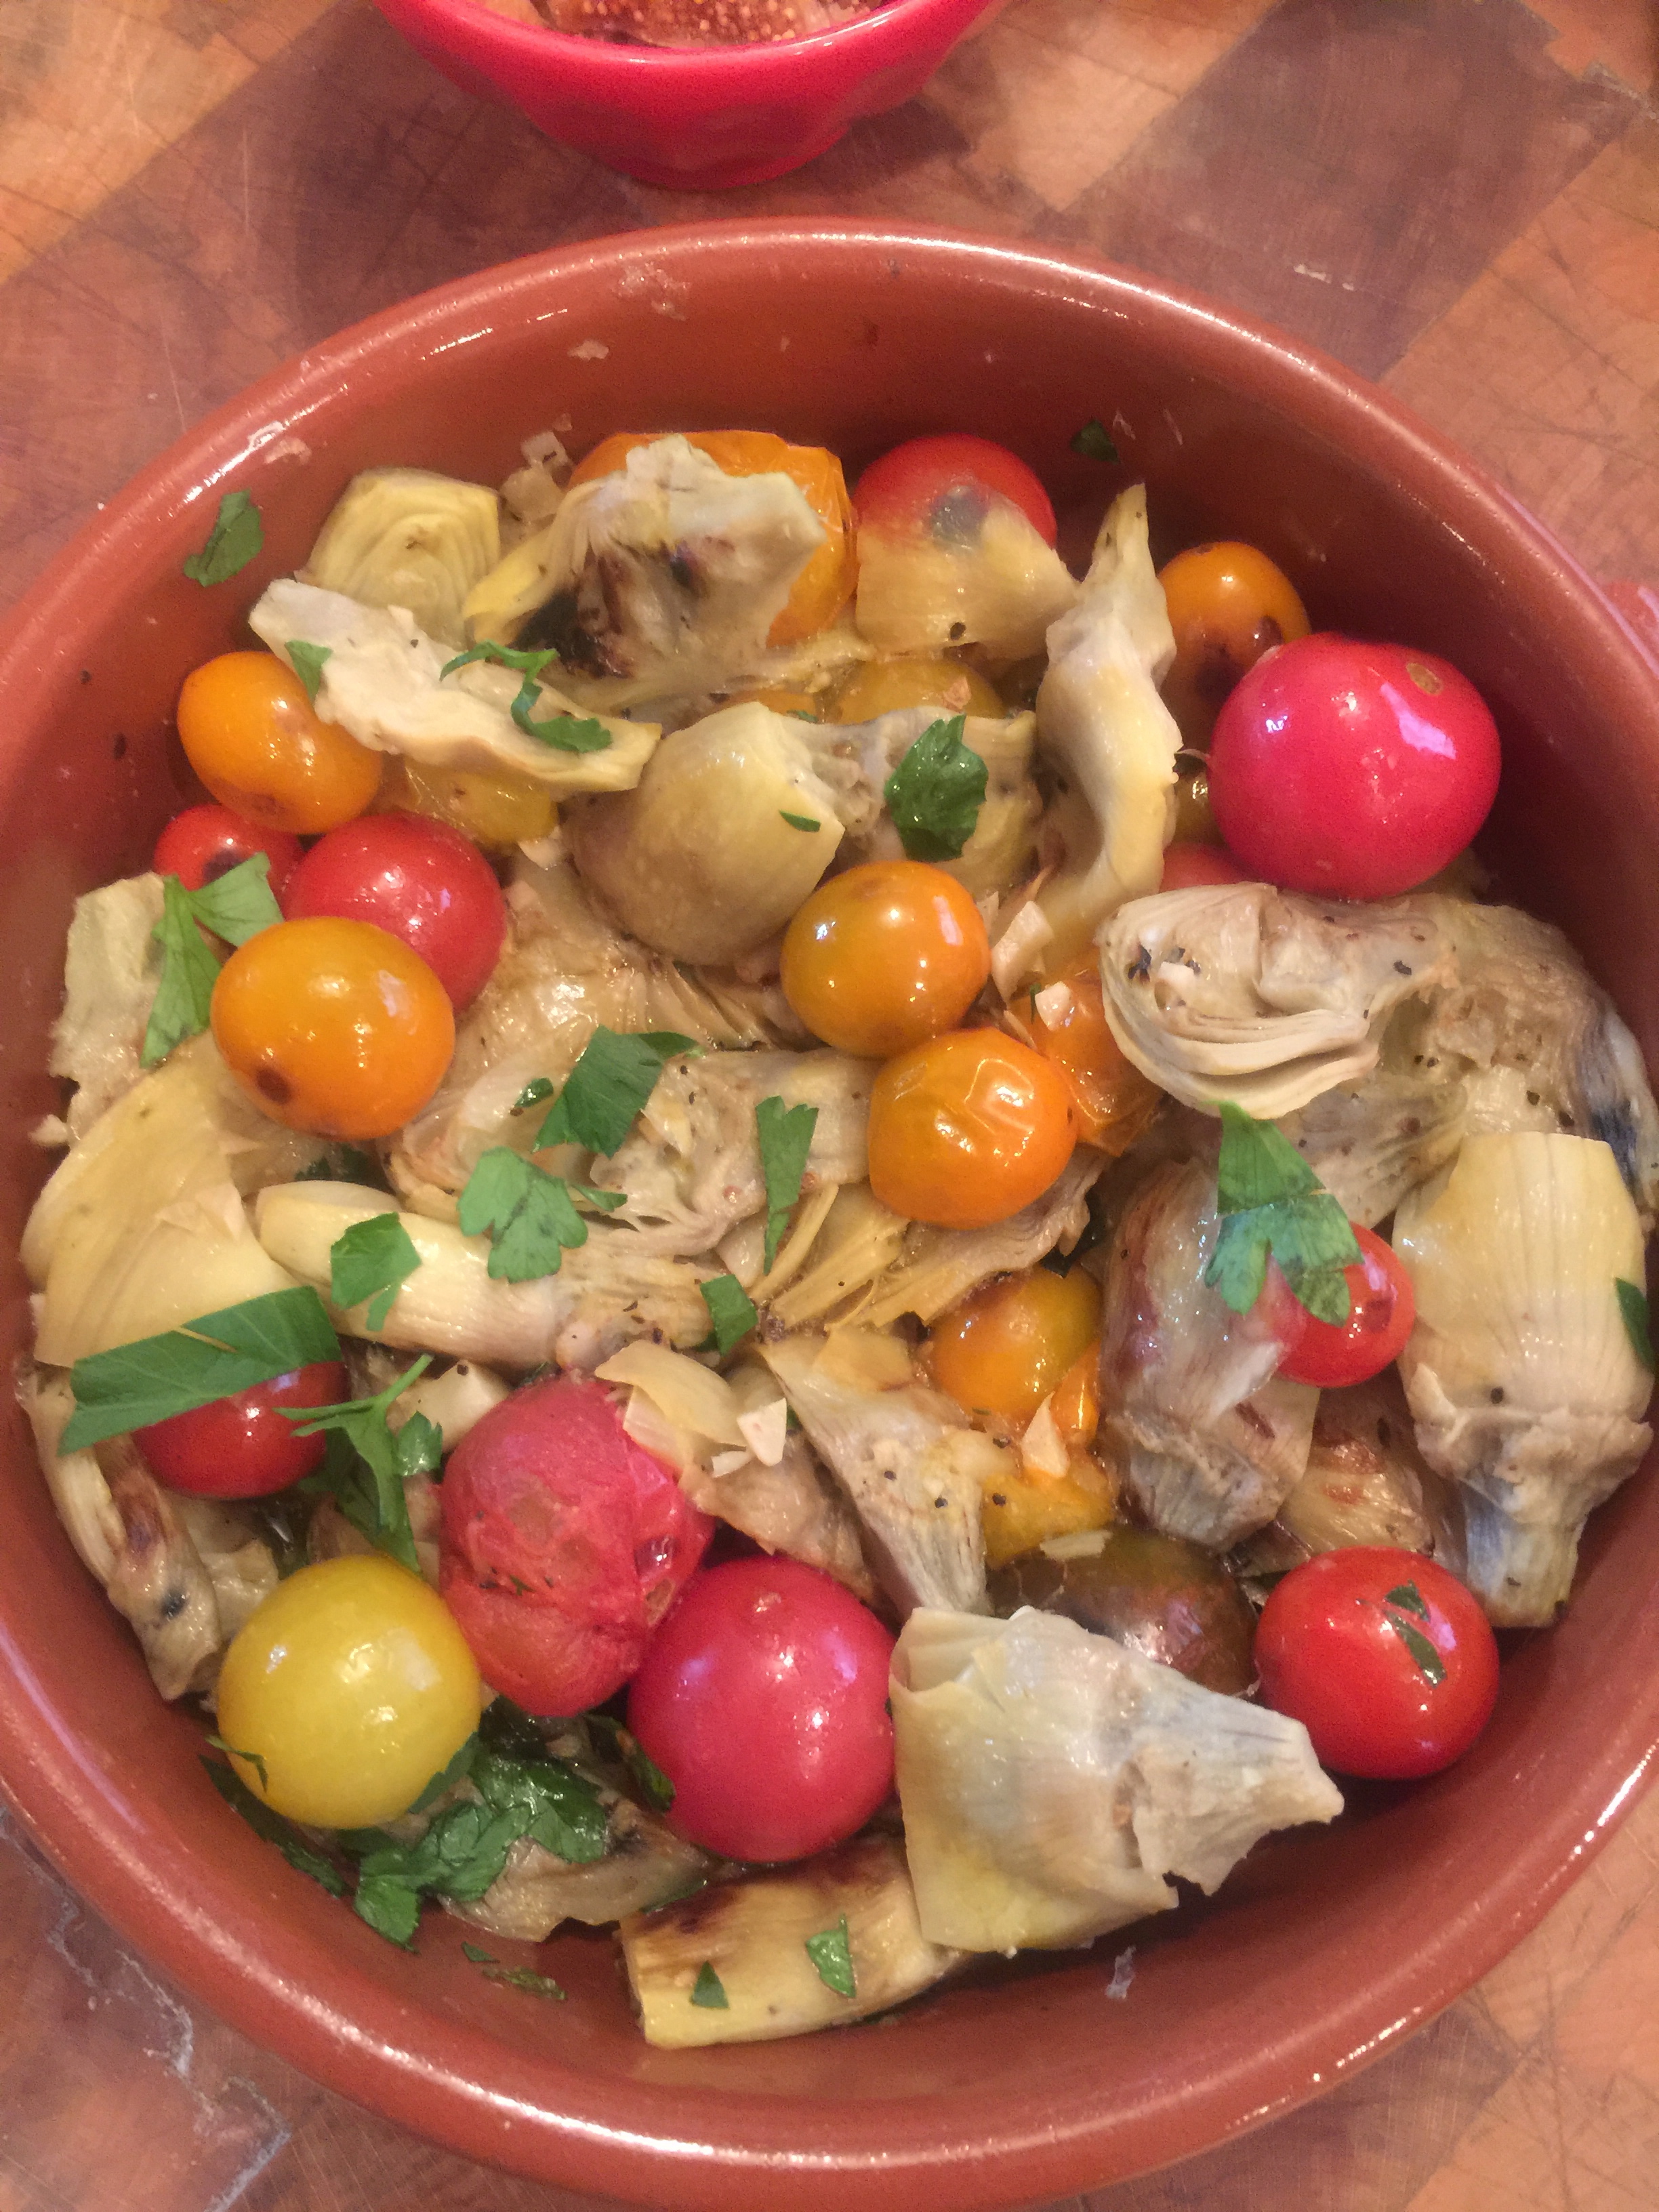
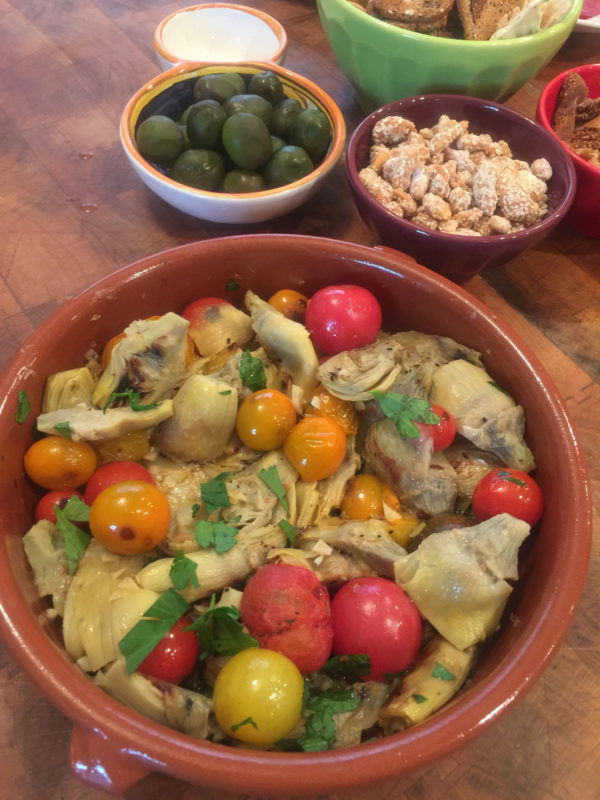
Who doesn’t love artichokes + tomatoes + olive oil + garlic? I know I do, I really do.

Artichokes Al Ajillo

But first, I have this story to tell you. About 2 months ago, I got this AMAZING butcher block from my friend, I mean AMAZING butcher block. It is an antique, about 30x30x14 with a GORGEOUS dove-tail pattern and beautiful carved wooden legs with wheels I can move around. It sits smack dab in the middle of our kitchen for the world to see and everyday I ask myself one simple question, “What I HONESTLY did without it for all my life? What???“

So, I came to the conclusion that I truly can’t answer those particular questions but I do know one thing…..I am OVER THE MOON that I have it now!!!! OMG LIKE OVER THE MOON!!!! Thank you to my sister chick Kelly!

Now you are probably thinking to yourself “Why is she explaining this to me? What on God’s green earth does this have to do with artichokes, tomatoes, olive oil, and garlic? What does this have to do with anything?” LOL…..Well, let me explain.

The reason is simple…..since this butcher block is in the middle of my kitchen floor it has quickly become my gathering table to serve EVERYONE who comes over! We eat, we talk, we hang out. Beside all those awesome bonuses, everything LOOKS prettier on my new block so now we eat, gather, talk, and look good (including the food)….I’d say that life just stepped up a notch on the scale of awesomeness!

Okay back to the other reason for this post well really should be the main reason for this post which is the recipe of “artichokes al ajillo or artichokes cooked in garlic. “ This is one of the EASIEST and TASTIEST tapas you can make. It plays off the traditional shrimp cooked in garlic which is also completely delicious but much more common. Switching it up using the basic sauce just creates something everyone thinks is new AND will think you are a creative genuis (isn’t that what we want anyway?) LOL

Now there really isn’t a trick to this recipe other than whether you purchase a frozen pack of artichokes, a can, or fresh (when in season) just make sure you grill them and be sure to blister the tomatoes. The charred flavor of the artichokes and the smoky flavor of the tomatoes brings such depth to this dish that the layers of flavor are simply magical.

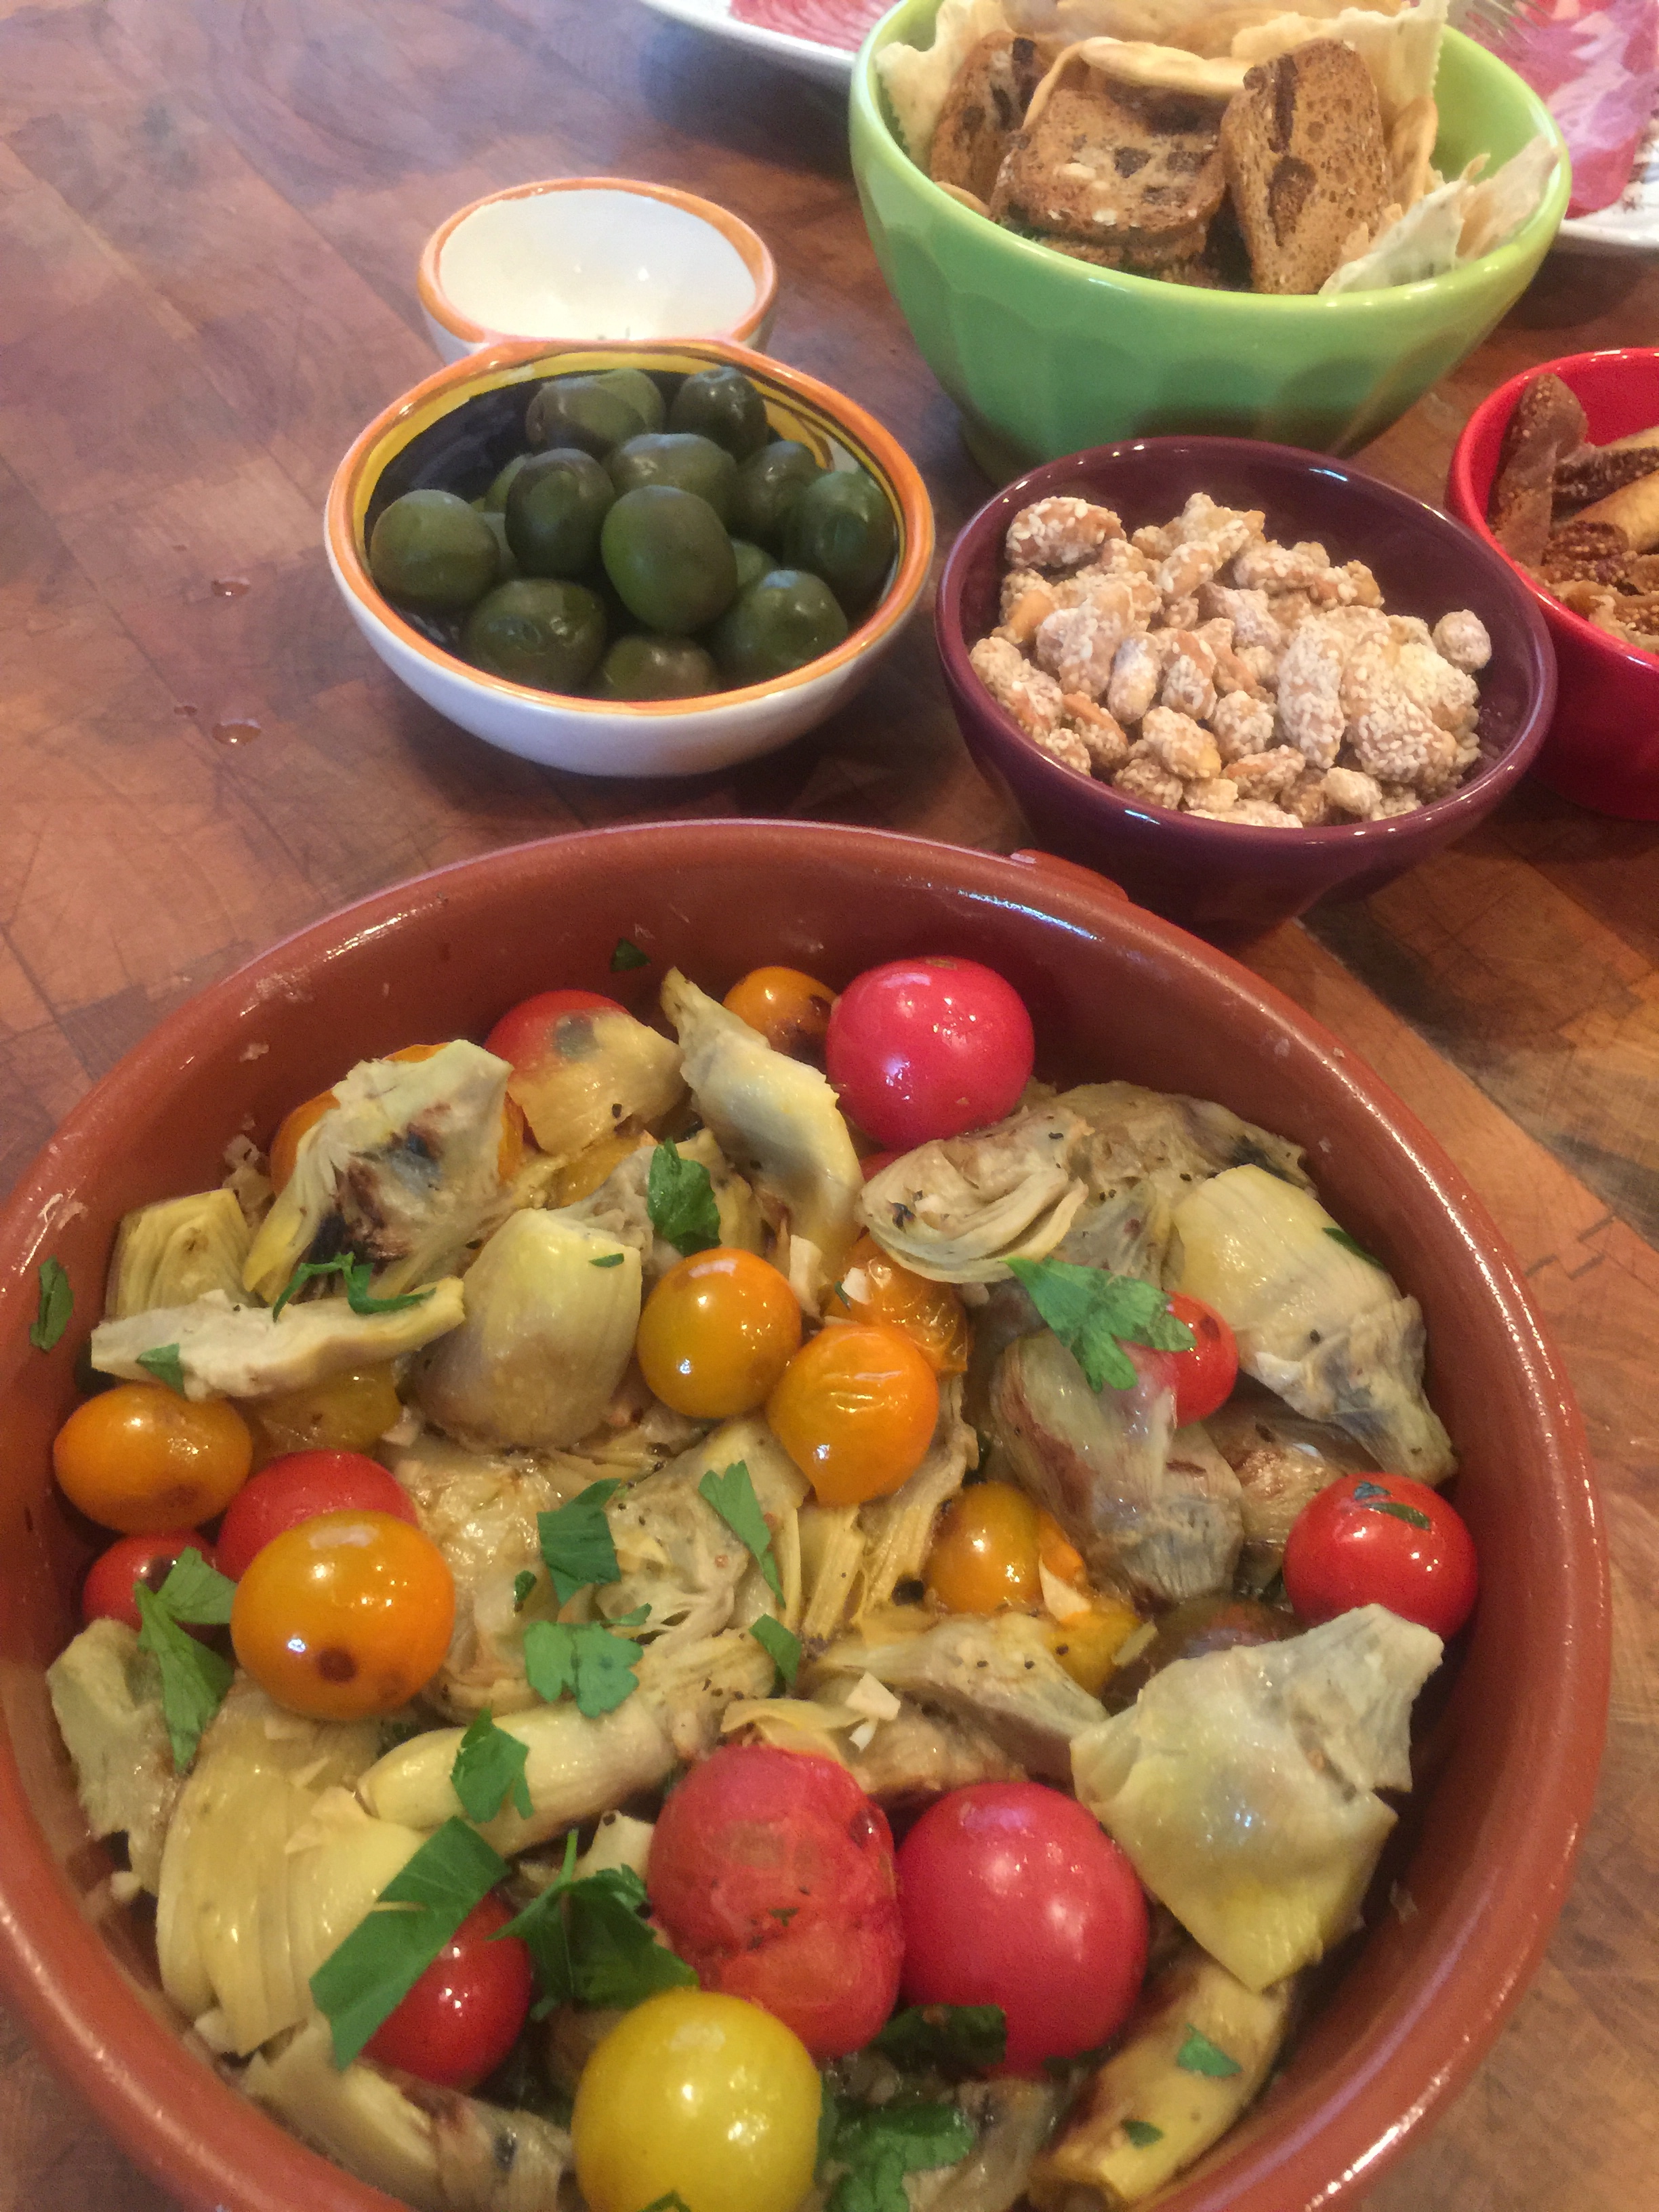
With summer rapidly approaching at warp speed, one of the MOST FUN gatherings you can do is a tapa party…put out about 5-10 different ones (depending on how many people) along with some homemade sangria and Spanish music and WAMMO a night in Spain will surely become memorable!

Artichokes Al Ajillo
 
Print
Prep time
15 mins
Cook time
10 mins
Total time
25 mins
 
Author: Michelle Michelotti-Martinez
Recipe type: Appetizer/Tapa
Cuisine: Spanish
Serves: 4
Ingredients
  • ¼ cup virgin olive oil
  • 2 tablespoons butter
  • 1 bulb garlic, peeled and minced
  • 10 cherry tomatoes cut in half
  • 2 tablespoon dry white wine
  • chicken broth
  • 1 package of artichoke hearts (about 2 cups)
  • Freshly cracked pepper
  • Sea salt
Instructions
  1. In a small bowl put artichokes and toss with olive oil, salt, and pepper. Turn on grill and heat up. In a griddle pan, put artichokes in a single layer and grill until slightly charred. Remove.
  2. In a small sauté pan, add tomatoes on medium and cook until blistered with some black spots. Remove from heat.
  3. In a small sauté pan, heat olive oil and butter and turn heat to medium
  4. Add garlic and cook stirring often for 2 minutes. If garlic is turning brown too quickly turn heat to low
  5. Add tomatoes and cook stirring for 2 minutes
  6. Add wine and cook down for 2 minutes
  7. Add artichoke hearts and cook for 5 minutes.
  8. Add a little chicken broth
  9. Add pepper and salt to taste
  10. Garnish with rosemary sprig (optional)
  11. Serve with rustic bread
3.5.3208

Artichokes Al Ajillo

Artichokes Al Ajillo


Filed Under: Appetizers Tagged With: appetizer, artichoke, Garlic, parsley, tapa, tomato

Grilled Romaine Spears with Corn, Leek, and Anchovy Dressing

July 17, 2015 by Michelle Michelotti-Martinez

Grilled Romaine Spears with Roast Corn and Anchovy Dressing

One of the most forgotten flavors for me is grilled romaine. How could I forget it should remain one of lifes ‘s serious questions because it is SO AWESOME… not to mention super simple to prep for dinner as a yummy side to some grilled meat and veggies. This recipe for grilled romaine with corn, leek, and anchovy dressing inspired from Dash and Bella rocks. I think it is my new fav.

The dressing is super “anchovy” so if you aren’t a fan, I am sure you could go with a simple balsamic with mustard and it would be equally as delish but I happen to dig anchovies like nobody’s business so, I add in a few extra.

The first time I made this recipe of grilled romaine with corn, leek, and anchovy dressing it was for a picnic at the beginning of summer. I served it with a grilled skirt steak and chimichurri sauce and a caprese salad. Now this is the way to kick off summer right….it was so good that every time I entertain, it makes the menu.

With corn at the height of its harvest time, make this…seriously. Tweak it however you want but make it and then make it again. Summer isn’t forever and in my book, sweet corn is one of Earth’s BEST creations.

5.0 from 2 reviews
Grilled Romaine with Corn, Leeks, and Anchovy Vinaigrette
 
Print
Prep time
10 mins
Cook time
5 mins
Total time
15 mins
 
Author: Michelle Michelotti-Martinez Adapted from Dash and Bella
Recipe type: Salad or Side
Serves: 2
Ingredients
  • 2 romaine spears, halved and reddish part of bottom cut off
  • 1 corn on cob, shucked and removed from cob
  • ½ leek, thinly sliced
  • freshly grated parmigiano-reggiano
  • 2 tablespoons butter, divided (half for the romaine and half for the corn)
  • Handful parsley leaves, coarsely chopped, for garnish
  • For Dressing:
  • 2 cloves garlic, peeled and rough chop
  • 4 to 6 anchovy fillets, packed in oil
  • 2 teaspoons lemon juice
  • 1 teaspoon lemon zest
  • 1 tablespoon sherry vinegar
  • 2 teaspoon Dijon mustard (I like Grey Poupon)
  • Splash Worcestershire sauce
  • A little good olive oil
  • ¼ teaspoon plus ⅛ teaspoon kosher salt
  • 2 tablespoon balsamic vinegar
Instructions
  1. To Make Dressing:
  2. In a small food processor, add garlic and anchovies and pulse. Add lemon juice/zest, vinegar, mustard, Worcestershire sauce, and a little olive oil. Taste and add salt and pepper if needed.
  3. Halve the romaines hearts lengthwise.
  4. Evenly sprinkle the cut sides with ¼ teaspoon salt. Set aside.
  5. Put balsamic and 1 tablespoon butter in a large (9-inch or so) pan, preferably cast iron. . Crank the heat to high. Stir until the butter and balsamic melt together and thicken a bit (about a minute).
  6. Press romaine halves cut-side down in the pan. Look after a minute or so. You want a nice dark color but you don't want them to burn.
  7. Flip them over, add some parmigiano, and cook for one more minute. Remove and place on a serving platter.
  8. Turn the heat down to medium. Add the remaining tablespoon of butter. Once it starts to brown, add leek and corn. Add the remaining salt. Turn off the heat. Taste. Adjust the seasoning.
  9. Spoon cooked corn and leek over the grilled romaine.
  10. Garnish with chopped parsley and drizzle with a little dressing
3.3.3077

Grilled Romaine Spears with Roast Corn and Anchovy Dressing 1

Filed Under: Salads Tagged With: anchovy, corn, dressing, grilled, leeks, parsley, romaine, sweet

Baked Crispy Chicken Thighs

February 19, 2015 by Michelle Michelotti-Martinez

Baked Crispy Chicken Thighs 1

You know those weekdays when it just seems daunting to THINK about cooking a meal much less actually doing it? Yep, I thought so…..

We cook a whole chicken almost weekly but it takes a while and some nights we aren’t home until later but I still find myself craving that roasted chicken….it’s such a great comfort food.

My solution on those late weeknights and cravings….baked crispy chicken thighs! They are my favorite part of the chicken because of the flavor and ANY time of year they sound delicious. They cook relatively quickly and if I just have time for a salad to accompany, that works out but if I can, I like to roast some baby potatoes along side……the cool thing about chicken is you can pair almost anything for a side that sounds yummy to you so, go big!

This baked crispy chicken thigh dish is adapted from my whole roasted chicken recipe but you can change up the herbs and use thyme, rosemary, or tarragon, they are ALL good.

I hope this recipe works for you on those weekdays when you feel daunted or even when you don’t, I promise, it’s delish!

Baked Crispy Chicken Thighs 3

Baked Crispy Chicken Thighs
 
Print
Prep time
5 mins
Cook time
40 mins
Total time
45 mins
 
This is a PERFECT quick, easy, and delicious weeknight dinner! Serve with potatoes and a salad!
Author: Michelle Michelotti-Martinez
Recipe type: Entree
Cuisine: American
Serves: 8
Ingredients
  • 8 bone-in, skin-on chicken thighs
  • Kosher salt and freshly ground pepper, to taste
  • Fresh parsley
  • 2 tablespoons butter
  • 1 lemon, cut into 8 rounds
Instructions
  1. Position a rack in the lower third of an oven and preheat to 400°F
  2. Season the chicken thighs on both sides with salt and pepper. Tuck a few leaves of parsley and a sliver of butter under the chicken skin.
  3. Heat the tablespoon of butter in a large ovenproof skillet or fry pan over medium-high heat. Add the chicken, skin side down, and cook until the fat has rendered and the skin is crisp and golden brown, about 10 minutes. Transfer, skin side up, to a plate.
  4. Pour off the excess fat from the pan. Return the chicken, skin side up, to the pan and scatter the lemon slices on top. Transfer to the oven and roast until an instant-read thermometer inserted into the thickest part of a thigh, away from the bone, registers 170°F (77°C), 25-30 minutes.
  5. Scatter an additional 2-3 tablespoons of fresh herbs on top. Let rest for 5 minutes before serving.
3.2.2929

IMG_5749

IMG_5753

Filed Under: Meat and Poultry, Uncategorized Tagged With: baked, Butter, chicken, chicken thighs, crispy, herbs, lemon, parsley, roast, rosemary, tarragon, thyme

Fresh Ricotta and Caramelized Marsala Shallot Angolotti with Shrimp Butter Sauce

January 14, 2015 by Michelle Michelotti-Martinez

Shrimp3

I will always go back to pasta whenever I can….. just simply for my personal comfort food bliss. My fixation with ravioli borders obsessive because of the ENDLESS possibilities for the fillings (well and the dough for that matter). I love to work from the inside out when it comes to creating these little masterpieces, it’s almost like building a little sculpture, or at least in my mind…..

Growing up, my family made traditional ravioli that were filled with ricotta and parmigiano cheese and topped with a beef ragu. We didn’t have much variation to choose from and while I still LOVE these, I really dig the endless creations today.

My infatuation with ravioli really began when I owned my fresh pasta manufacturing company. Customers were requesting fresh ravioli so I actually purchased a ravioli machine. My fears and hesitations toward making them were conquered by the purchase of this machine, no doubt. To say the least, the learning curve itself was frustrating but when I made delicious fillings from what the farmers had for the week, it was ALL worth it. It was here where the creative juices birthed and put me out of the box regarding possibilities, it is where the fun began. Then each week I headed to the market and sold them to our awesome customers who reported amazing dishes they prepared, this was nothing short of addicting.

So when thinking which ravioli to post, I remembered my journey and decided that I would marry my heritage with a twist on innovation for the filling and then top with a decadent shrimp sauce. I also decided to try my hand at angolotti because if you don’t want to invest in a ravioli stamp or cutter to form the pasta, these can be finished with a knife and a fork and have a really pretty half moon shape, plus I really like the name….I have a tendency to pick wine this same way, let me see the label, is it pretty? Perfect, I’ll take it! How many of you can relate?

Anyway, if you haven’t made ravioli before or are a seasoned pro, these are simply delish and while its winter outside and a little more time on our hands, give these a try…….

IMG_6420

IMG_6438

IMG_6426

Shrimp Plate

Fresh Ricotta and Caramelized Marsala Shallot Angolotti with Shrimp Butter Sauce
 
Print
Prep time
1 hour
Cook time
15 mins
Total time
1 hour 15 mins
 
Author: Michelle Michelotti-Martinez adapted from Lucinda Scala
Recipe type: Main
Cuisine: Italian
Serves: 6 servings
Ingredients
  • Filling:
  • 2 T butter
  • 3-4 shallots, thinly sliced
  • ¼ cup ricotta, preferably homemade, recipe below
  • Sauce:
  • 2 sticks of butter
  • 1½ lbs shrimp, shelled and devined
  • Olive oil
  • Salt and pepper
  • 1 recipe basic pasta, rolled to second to the thinnest setting on machine, recipe bellows
  • 1 bunch Italian parsley, finely chopped to yield ¼ cup
  • ¼ cup grated Parmigiano-Reggiano
  • Fresh Ricotta:
  • 6 cups organic whole milk
  • 2 cups organic heavy cream
  • 1 tsp salt
  • 3 T organic white wine vinegar
  • Fresh Egg Pasta:
  • 4 cups all purpose flour or caputo semolina flour (found on amazon)
  • 4 -5 large eggs
  • ½ teaspoon salt
  • water as needed
Instructions
  1. To Make Fresh Pasta:
  2. Make a mound of the flour in the center of a large wooden cutting board or in a bowl, whichever is more comfortable to you. Make a well in the middle of the flour and add the eggs and salt. Using a fork, beat together the eggs and begin to incorporate the flour starting with the inner rim of the well. As you expand the well, keep pushing the flour up to retain the well shape. Do not worry that this initial phase looks messy. The dough will come together when ½ of the flour is incorporated. If using a bowl, turn out onto a wooden cutting board now and start kneading the dough with both hands, using the palms of your hands primarily. Once you have a dough ball, remove its rom the board and scrape up any left over crusty bits. Lightly flour the board and continue kneading for 3 more minutes. If dry, add 1 T of water at a time and incorporate. The dough should be elastic and a little sticky. Continue to knead for another 3 minutes, remembering to dust your board when necessary. Wrap the dough in plastic and allow to rest for 30 minutes at room temperature. Note: do not skip the kneading or resting portion of this recipe, they are essential for a light pasta.
  3. To Make Filling:
  4. In a saucepan on stove over medium heat, put in the milk, cream, salt, and vinegar. Bring to a medium heat and boil where it starts to separate. Put in a mesh colander over a bowl until liquid is drained.
  5. On stove top, heat medium sauté pan and add 2 T butter and melt. Add shallots and cook down. Add ⅛ cup of marsala wine and cook until caramelized.
  6. Take ricotta and put in a bowl and fold in caramelized shallots. Mixture shouldn't need salt and pepper but season to taste. If it is a little "thin" fold in some freshly grated parmigiano cheese as you don't want a "runny filling".
  7. To Make Angolotti:
  8. Cut dough into 8 sections and cover unused portion with damp cloth to avoid drying out. With a hand pasta machine or kitchen aide attachment set at widest setting, take a piece of pasta and press flat and pass through rollers, dust with flour and repeat on same setting, fold in half and repeat again, change setting to next smallest and run pasta through twice. Dust pasta if needed and repeat process on all until pass through second to last setting. Repeat this for all of the pasta and put the strips on a floured work surface.
  9. To form agnolotti, take a strip of pasta and place 1 tablespoon of filling 1 inch from the edge and 2-3 inches apart down the pasta strip. Brush pasta dough edges and in-between filling lightly with water. Take the pasta and fold op of over filling and pinch closed. Press dough flat between lumps of filling. Using a pastry/pasta cutter, preferably fluted, cut half moons using folded part as flat side of moon. If your cutter is smooth or you are using a knife, go back and press lightly with a fork to make indents. Continue until pasta and filling are finished and put on floured trays.
  10. To Make Shrimp Sauce:
  11. Preheat oven to 400. Rinse shrimp and add to bowl. Put in some olive oil and salt and pepper and toss together. About 5 minutes before boiling ravioli, spread shrimp on a cookie sheet and put in oven for 10-11 minutes.
  12. On stove top in a medium sauce pan, add 2 sticks of butter (can add more if needed and depending on serving amount), melt on medium-low until starts to become a brown butter. Don't do this step too soon or the butter will continue to brown and get burnt. If you do ahead, pour into a bowl and then reheat when ready.
  13. When shrimp are done, add to butter and cover to keep warm while angolotti are cooking.
  14. To Cook Angolotti:
  15. In a wide dutch oven pot, fill about ¾ full with water and bring to a boil. Add salt (salty as the sea) and carefully put in angolotti. Becareful NOT to overcrowd so do in batches if necessary. Cook about 5 - 7 minutes or until tender and remove with a slotted spoon onto a tray or into pasta bowls. If using pasta bowls, heat them slightly in microwave so that pasta isn't going into cool bowl. Repeat until done. Spoon over shrimp sauce and top with fresh parmigiano and fresh parsley. Serve immediately.
3.2.2885

Shrimp3 

Filed Under: Fish and Seafood, Pasta, Pizza, and Polenta Tagged With: angolotti, Butter, caramelized, fresh, marsala, Parmigiano, parsley, pasta, ricotta, Shallots, shrimp

  • Page 1
  • Page 2
  • Next Page »

Primary Sidebar

Meet Michelle and Enrique

Eatentions is a way of being with our food experience. It is a thought-filled process starting with connection to source all the way through the finished creation. We like to call it "from root to experience". Its the entire thing, its that conscious. Thank you for popping by and welcome to our life.

Let’s Connect!

Archives

Categories


My Favorites

Arancini|Eatentions

Arancini

Torta Caprese

Torta Caprese

Lemon Pasta with Broiled Salmon and Charred Lemon|eatentions

Lemon Pasta with Broiled Salmon and Charred Lemon

Footer

Instagram

Instagram has returned invalid data.

Follow Me!

Connect With Us

  • Email
  • Facebook
  • Instagram
  • Pinterest
  • RSS
  • Twitter

We believe in celebrating amazing people, delicious food, great conversation, sustainability and experience. For us,our lives have always been about love, family, friends and sharing all things together. Connecting with people through food, sharing stories and supporting one another to live our dreams and our purpose is what inspires us daily.

My Favorites

Arancini|Eatentions
Torta Caprese

Copyright © 2026 · Foodie Pro & The Genesis Framework