• Skip to primary navigation
  • Skip to content
  • Skip to primary sidebar
  • Skip to footer

Eatentions

Organic * Local * Sustainable

  • Home
  • About Us
  • Recipes
  • Culinary Socials
  • CSM – Community Sourced Meals
  • Contact
  • Nav Social Menu

    • Facebook
    • Instagram
    • Pinterest
    • RSS
    • Snapchat
    • Twitter

Recipes

Schiacciata all’uva (Tuscan grape foccacia)

April 9, 2015 by Michelle Michelotti-Martinez

Grape Foccacia Schiacciata

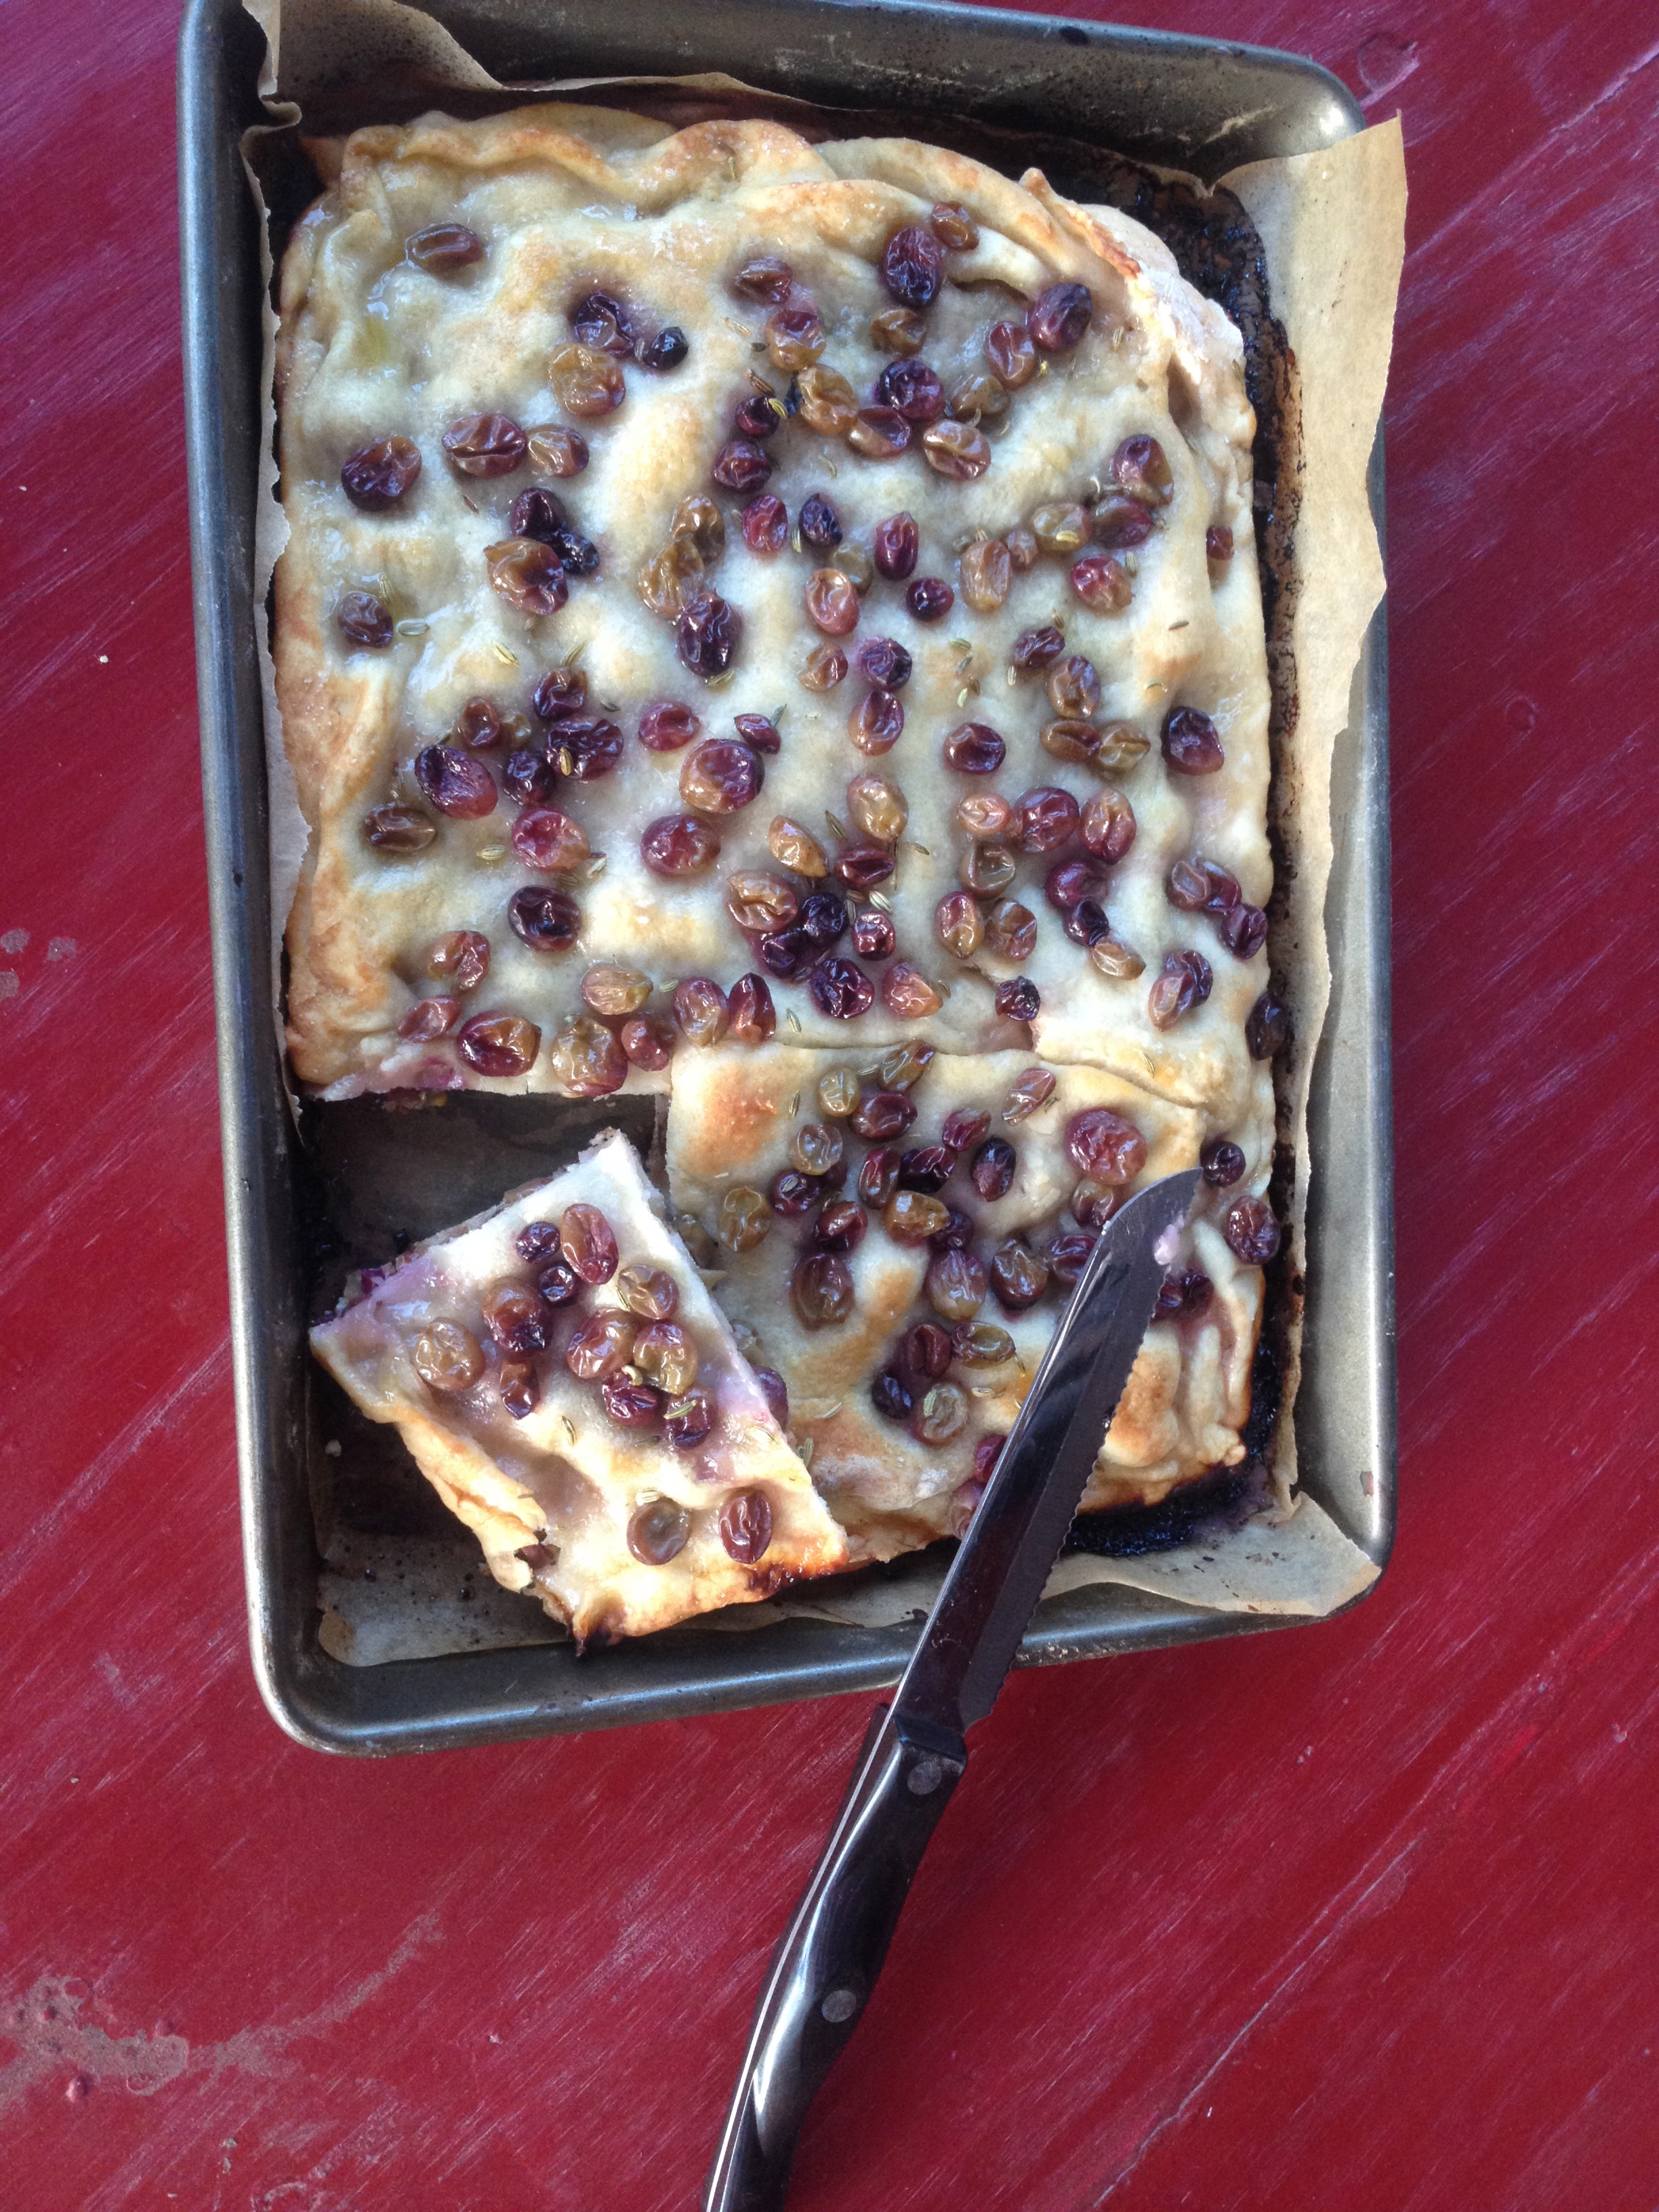
I posted a picture of schiacciata all’ uva on my Facebook page the other day and realized how GORGEOUS this focaccia is so, time to share on my blog and tie it to a great memory of a cooking school in Tuscany.

It was a gift from the hubby on my 40th birthday, a 4-day cooking school in Tuscany. After all I needed something to sustain the blow of going into the 4 decade of life!

We booked the adventure for the fall of the following year, this is my favorite time to travel to Europe or anywhere for that matter, and the class existed of us and my dad. It was PERFECT and Elena was the quintessential master chef!

Each day encompassed the lesson of a 4-course Italian extravaganza, all inclusive of eating our delicious preparations accompanied by the wine made at the farm. Good thing the wine flowed with lunch and not before as I doubt any of us would have made it through the instruction of course 1 much less course 4!

It was simply one of the BEST experiences of my life! Elena would reel off instructions in Italian, forgetting I was the only one who understood her, and when the boys stood with a blank stare her response was “beh….VAI”! She didn’t understand why they weren’t jumping to her command so I would quickly “shoo” them away with the instructions she spoke and a smile would make its way to Elena’s face; I knew it was part of the entire package.

As we learned, prepped, and cooked, Elena would explain all the reasons for the dishes, the history, the ingredients, and occasion. Each one had a special cooking vessel and serving dish/platter, all which were handed down to her from those who passed on the secrets…..it was magnificent.

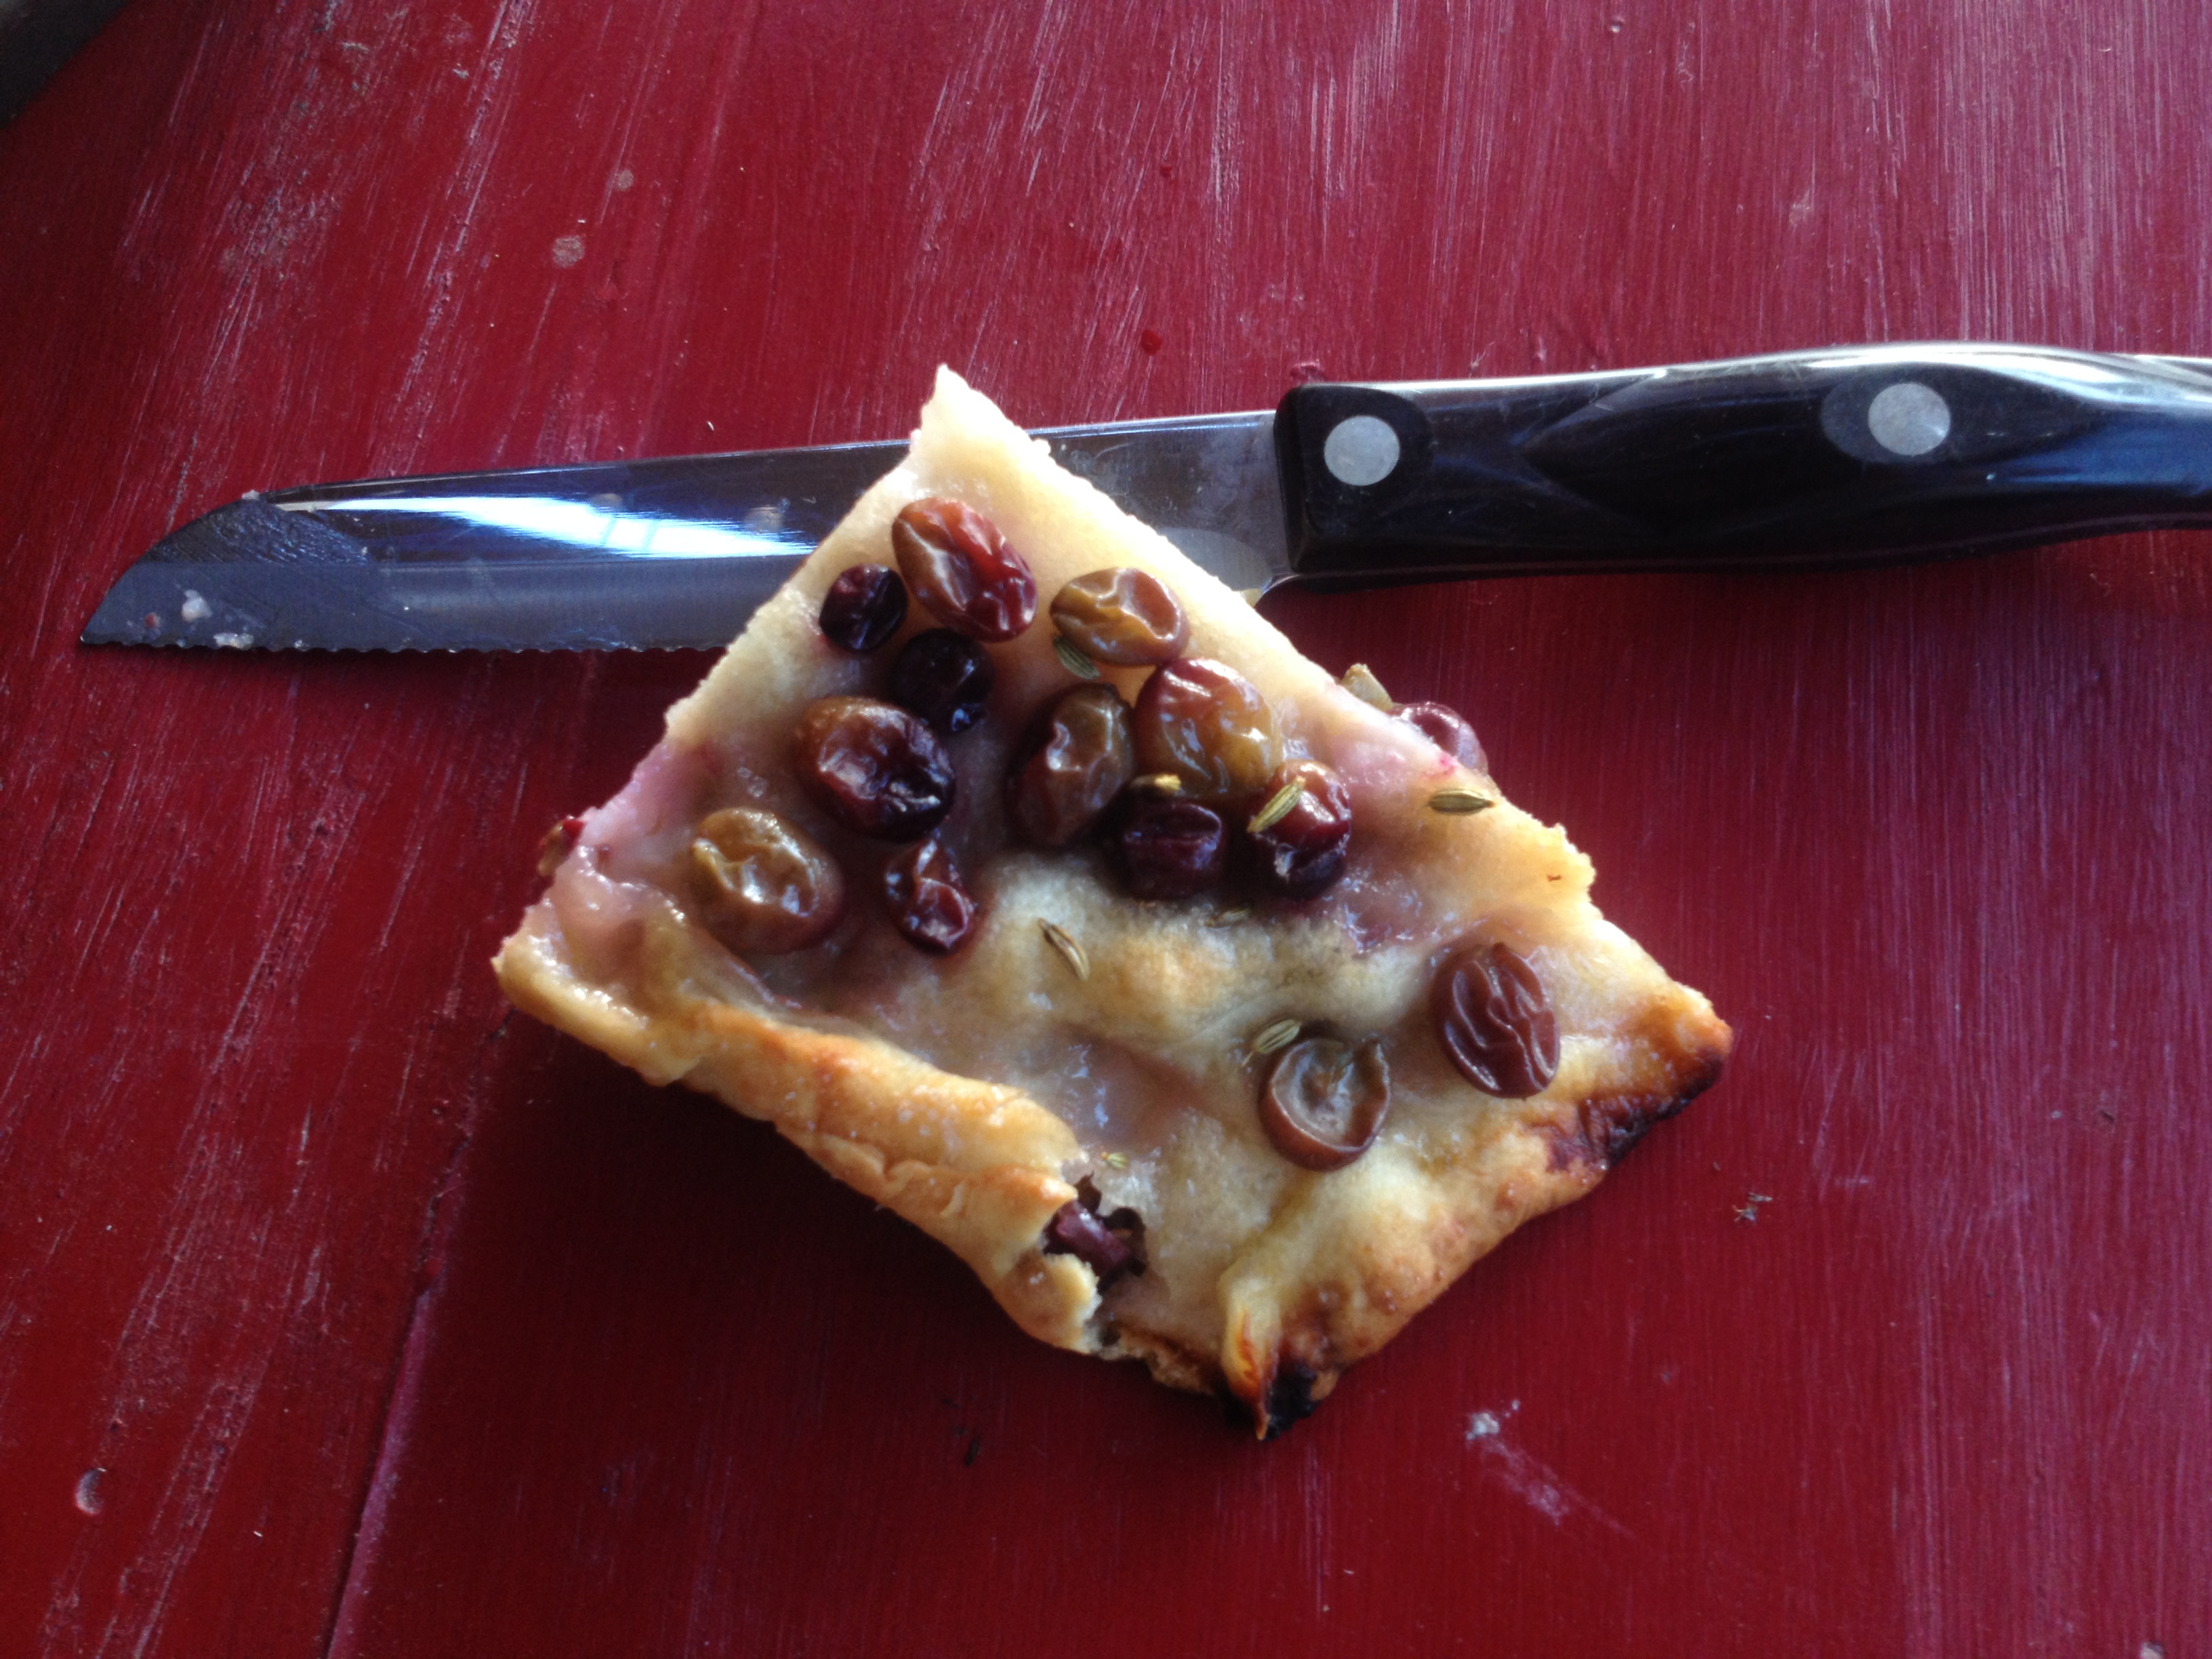
Day 3 of the venture was no different than the first except that the dessert we prepared  became a fast favorite of mine, the schiacciata all’uva. Not only was it delicious but also it was balanced so perfectly between savory with a dash of sweet and served with a beautiful Vin Santo dessert wine. This is one of the many reasons I love Italian food, the desserts are balanced and NOT sweet which leaves me so satisfied.

The schiacciata all’uva was made with grapes from the farm vineyard but throughout the year, could be substituted with blueberries, cranberries, raspberries, whatever you like but since I am in love with the traditional version, I freeze grapes from my sister’s vines and enjoy all year long.

So here’s to the memory of Elena, the 4-day cooking school, and the birthing of the 4th decade of my life….

Grape Foccacia Schiacciata 7

Grape Foccacia Schiacciata 12


Grape Foccacia Schiacciata 11

Grape Foccacia Schiacciata 1

5.0 from 1 reviews
Schiacciata all'uva (Tuscan grape foccacia)
 
Print
Prep time
2 hours
Cook time
40 mins
Total time
2 hours 40 mins
 
The schiacciata alluvia can be made with grapes from the farm vineyard but throughout the year, could be substituted with blueberries, cranberries, raspberries, whatever you like but since I am in love with the traditional version, I freeze grapes from my sister’s vines and enjoy all year long.
Author: Michelle Michelotti-Martinez adapted from Elena
Recipe type: Dessert
Cuisine: Italian
Serves: 8
Ingredients
  • 3 cups unbleached all-purpose flour
  • 1½ cups lukewarm water
  • 1½ tsp dried yeast
  • 1 tsp salt
  • a bunch (about 250 gr) of fresh concord or other sweet red grapes
  • 5-6 tablespoons caster or raw sugar
  • 3-4 tablespoons of extra virgin olive oil
Instructions
  1. For The Dough:
  2. Prepare the dough for the schiacciata, this should be done the night before you need to bake it.
  3. In a stand mixer fitted with dough hook, combine 1½ cup flour, yeast, and 1 cup water and mix on low until combined. This is a called a sponge. Cover the sponge with rest of flour, salt, and 2 T of olive oil, mix well and then slowly add the ½ cup water. You want the dough to be sticky so if you need more water, add bit by bit.
  4. Once dough comes together, turn mixer on high and let it go until it is smooth and elastic, leaving sides clean and hook covered. This will probably take about 5 minutes.
  5. Coat a large bowl with oil and put dough in and rub a bit more oil on top of dough. Cover with plastic wrap and put in a warm place and let rise. I let it go all night and if your more comfortable, put in fridge overnight.
  6. Assembling the Schiacciata:
  7. Turn oven to 350
  8. Wash and pat dry the grapes and separate them from the stem, no need to deseed them, Tuscans eat them with the seeds and all.
  9. When the dough has risen, line a rectangular baking pan with some baking paper
  10. Take the dough out of the bowl with well-floured hands as (if it is successful), it will be very sticky! Divide the dough into two balls, one slightly larger than the other. Roll out the larger ball on a well-floured surface roughly to the size of your pan, no more than 1cm thick. Lay the dough in the pan, pushing the dough to the corners and sides with your fingers if necessary.
  11. Divide about two thirds of the grapes and scatter them on top of the first dough layer and sprinkle half of the sugar over, with a drizzle of olive oil.
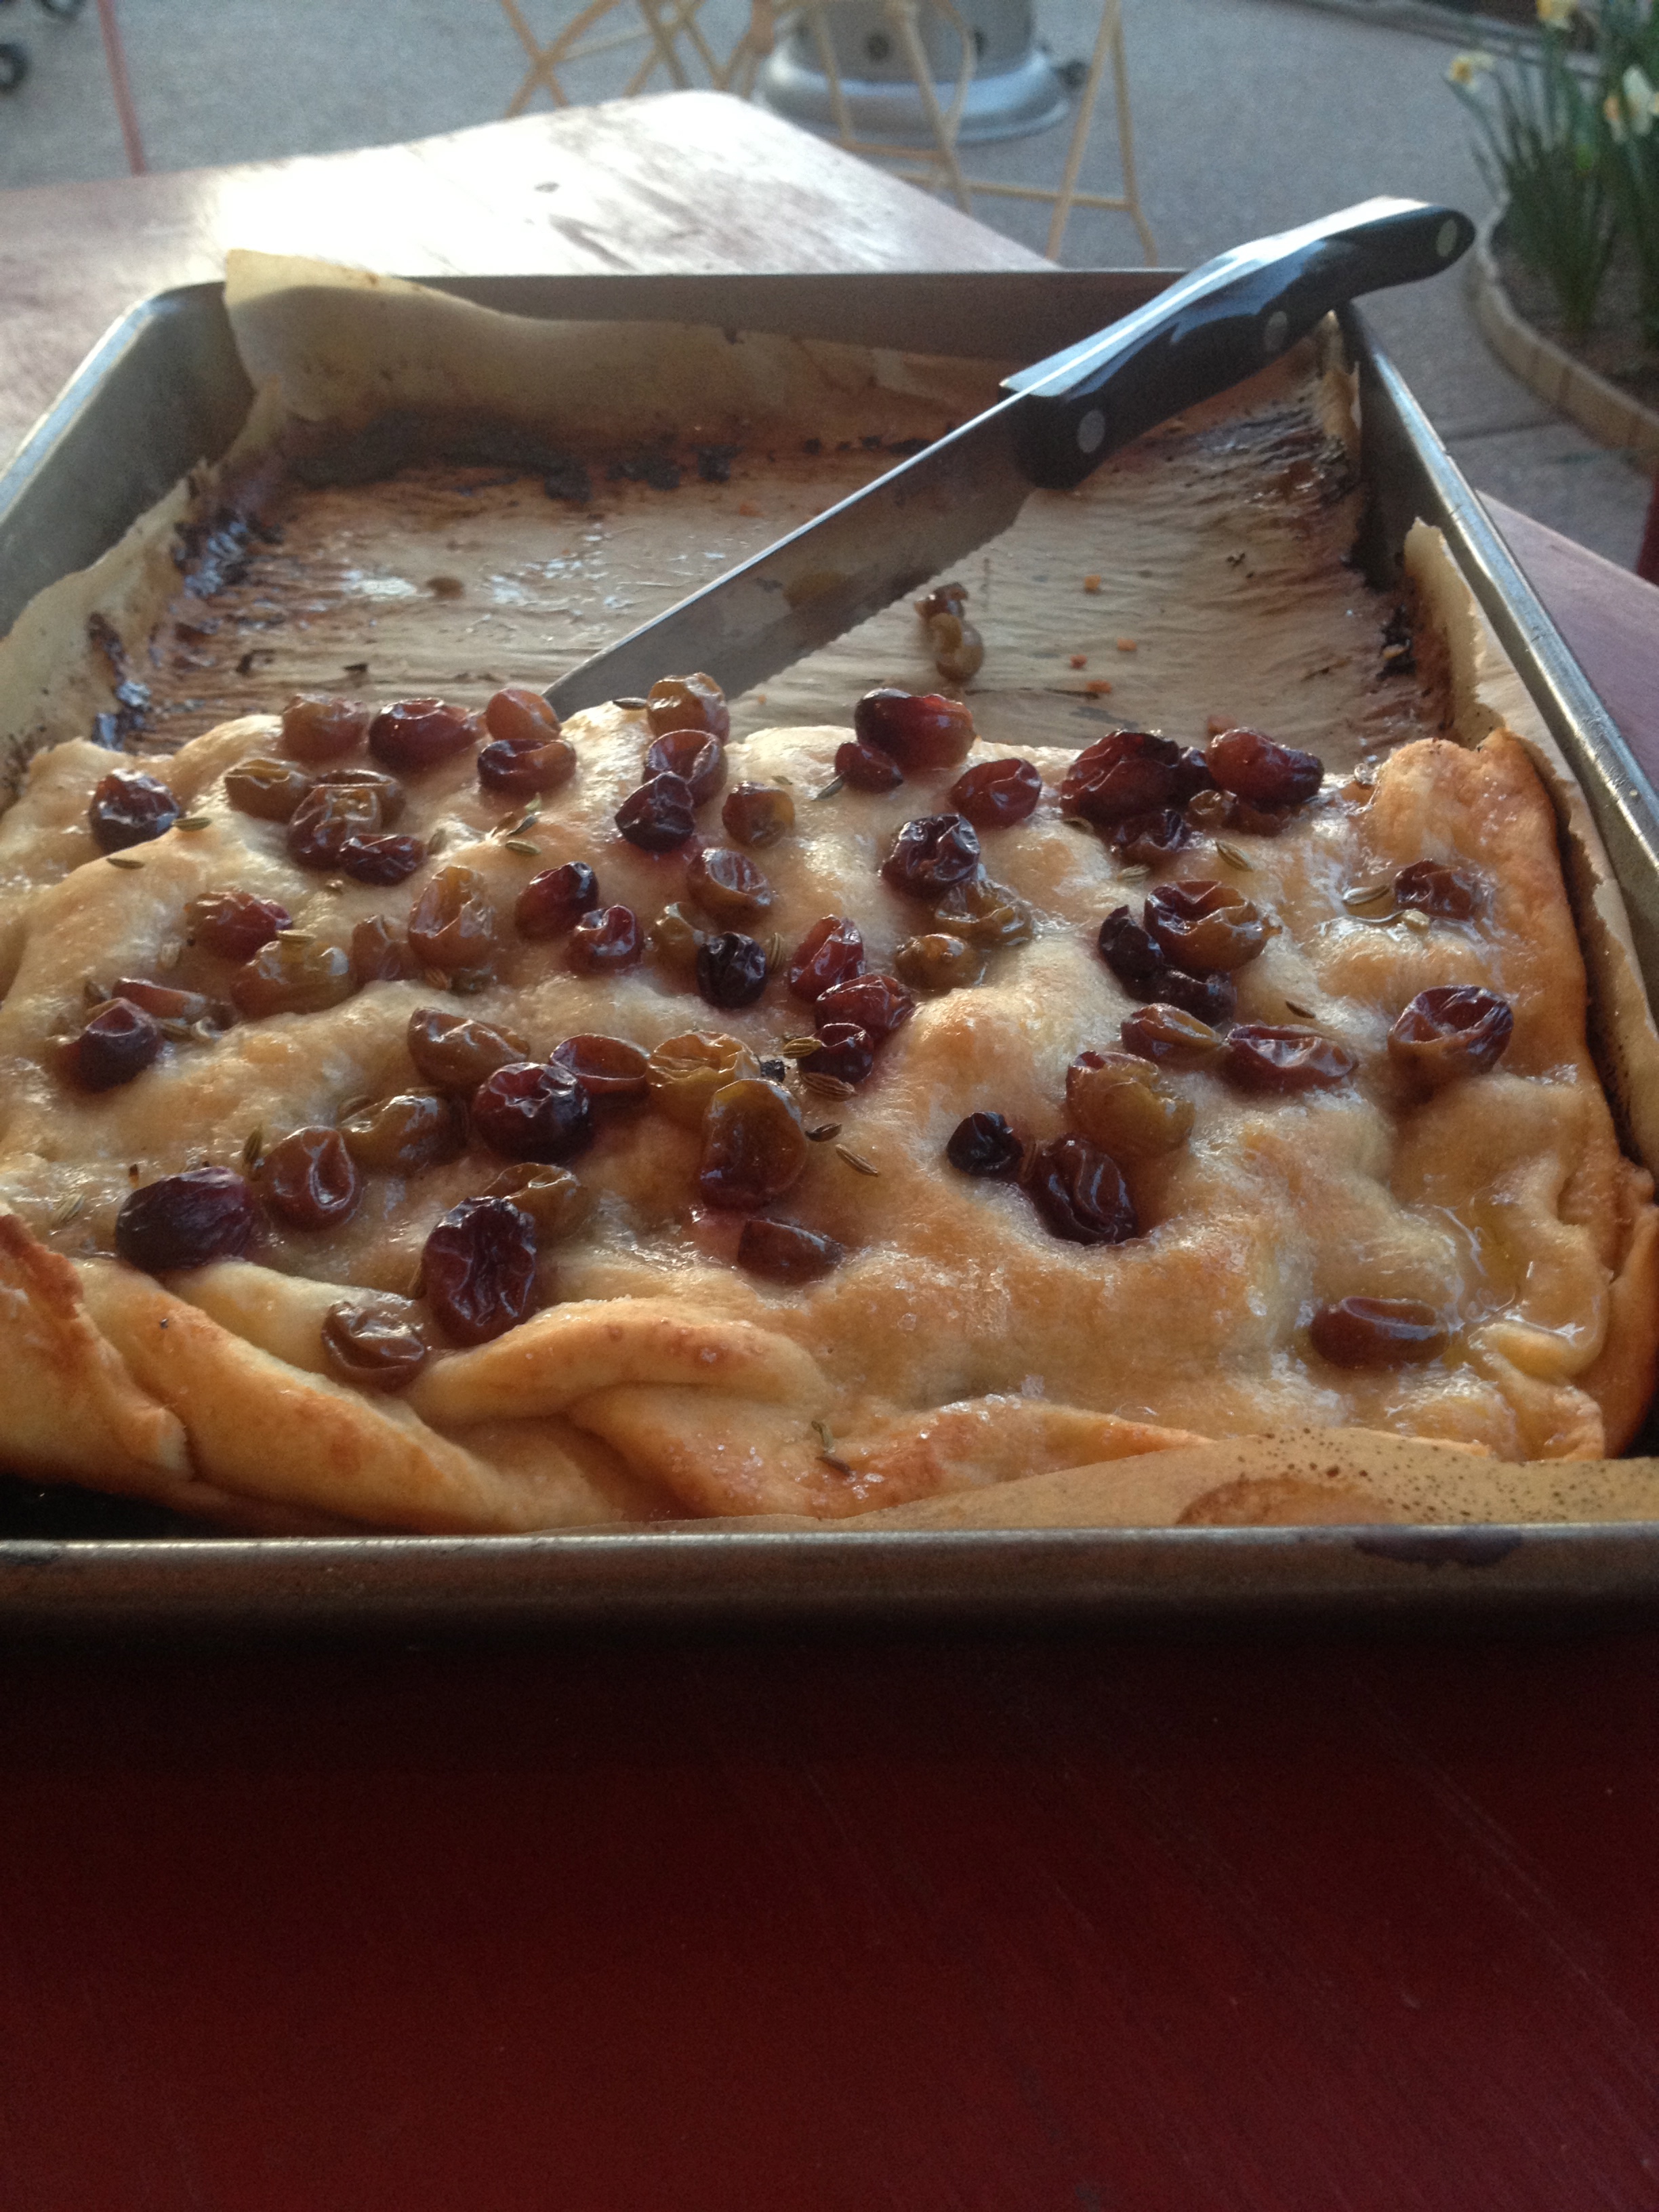
  12. Roll out the second ball of dough to the size of the pan and cover the grapes with this second layer of dough, rolling up the edges of the bottom layer of dough from underneath to the top, to close the schiacciata. Gently, with your fingers, push down on the surface of the dough to create little ‘craters’ all over.
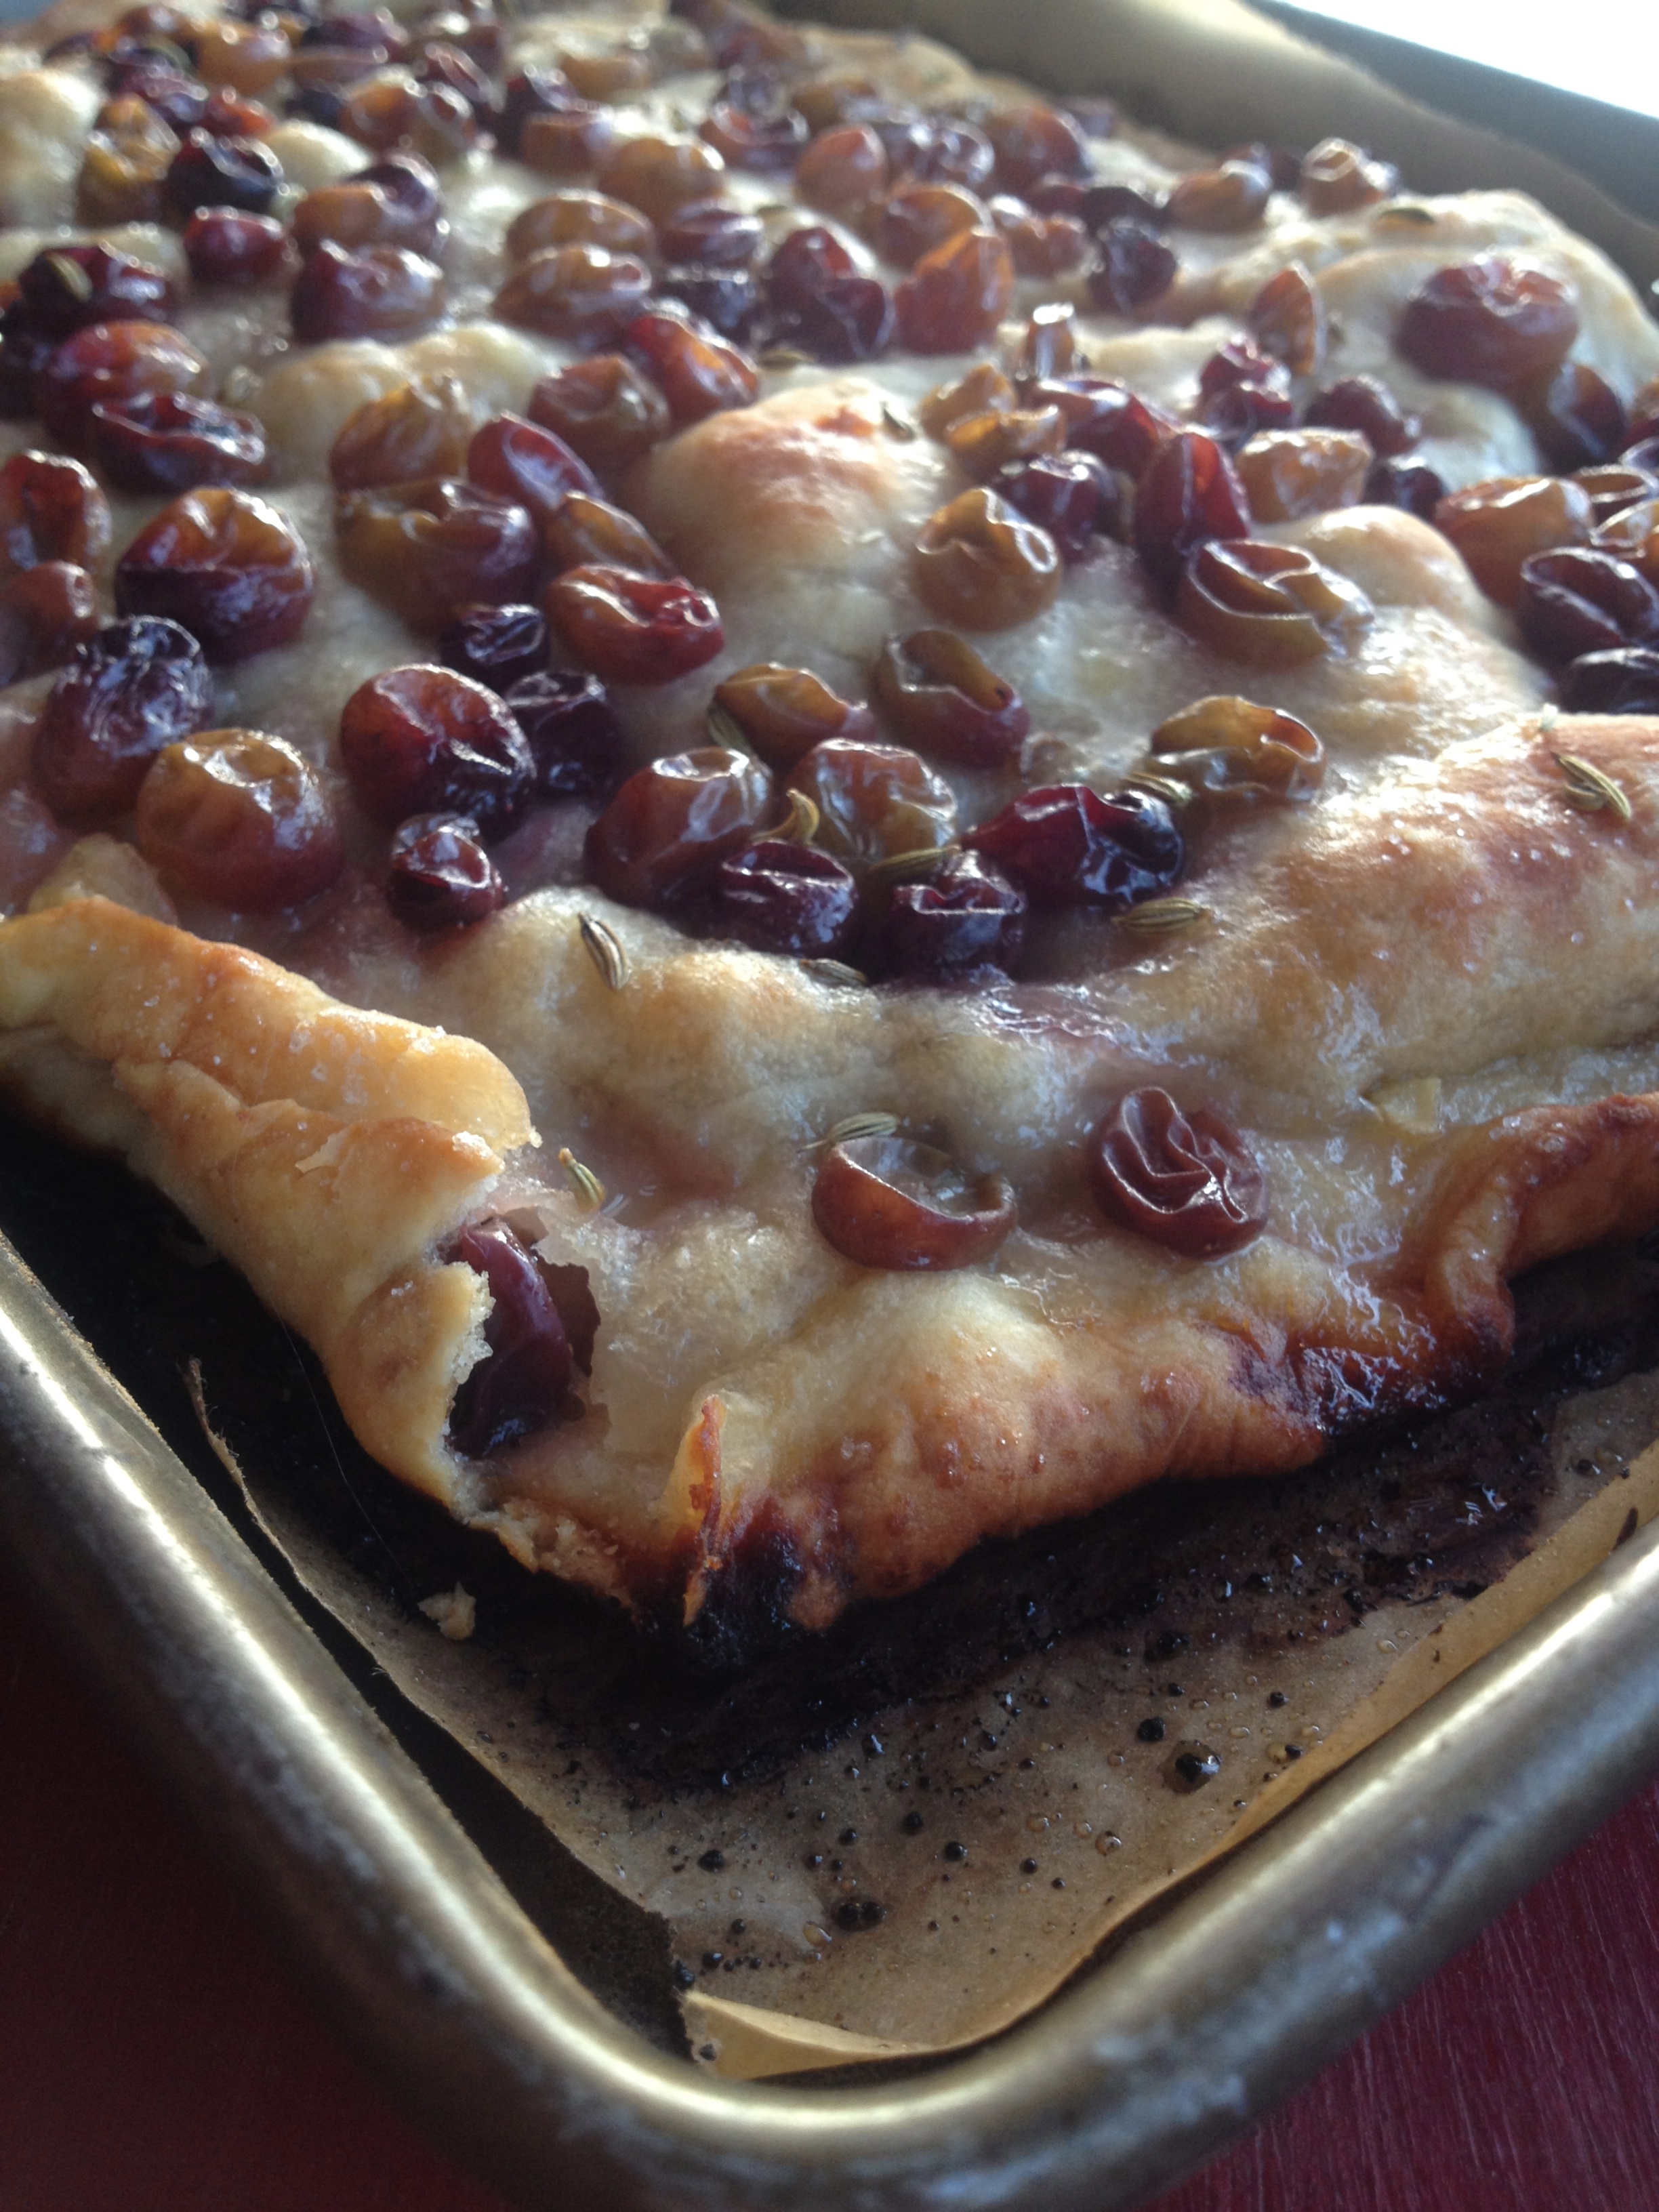
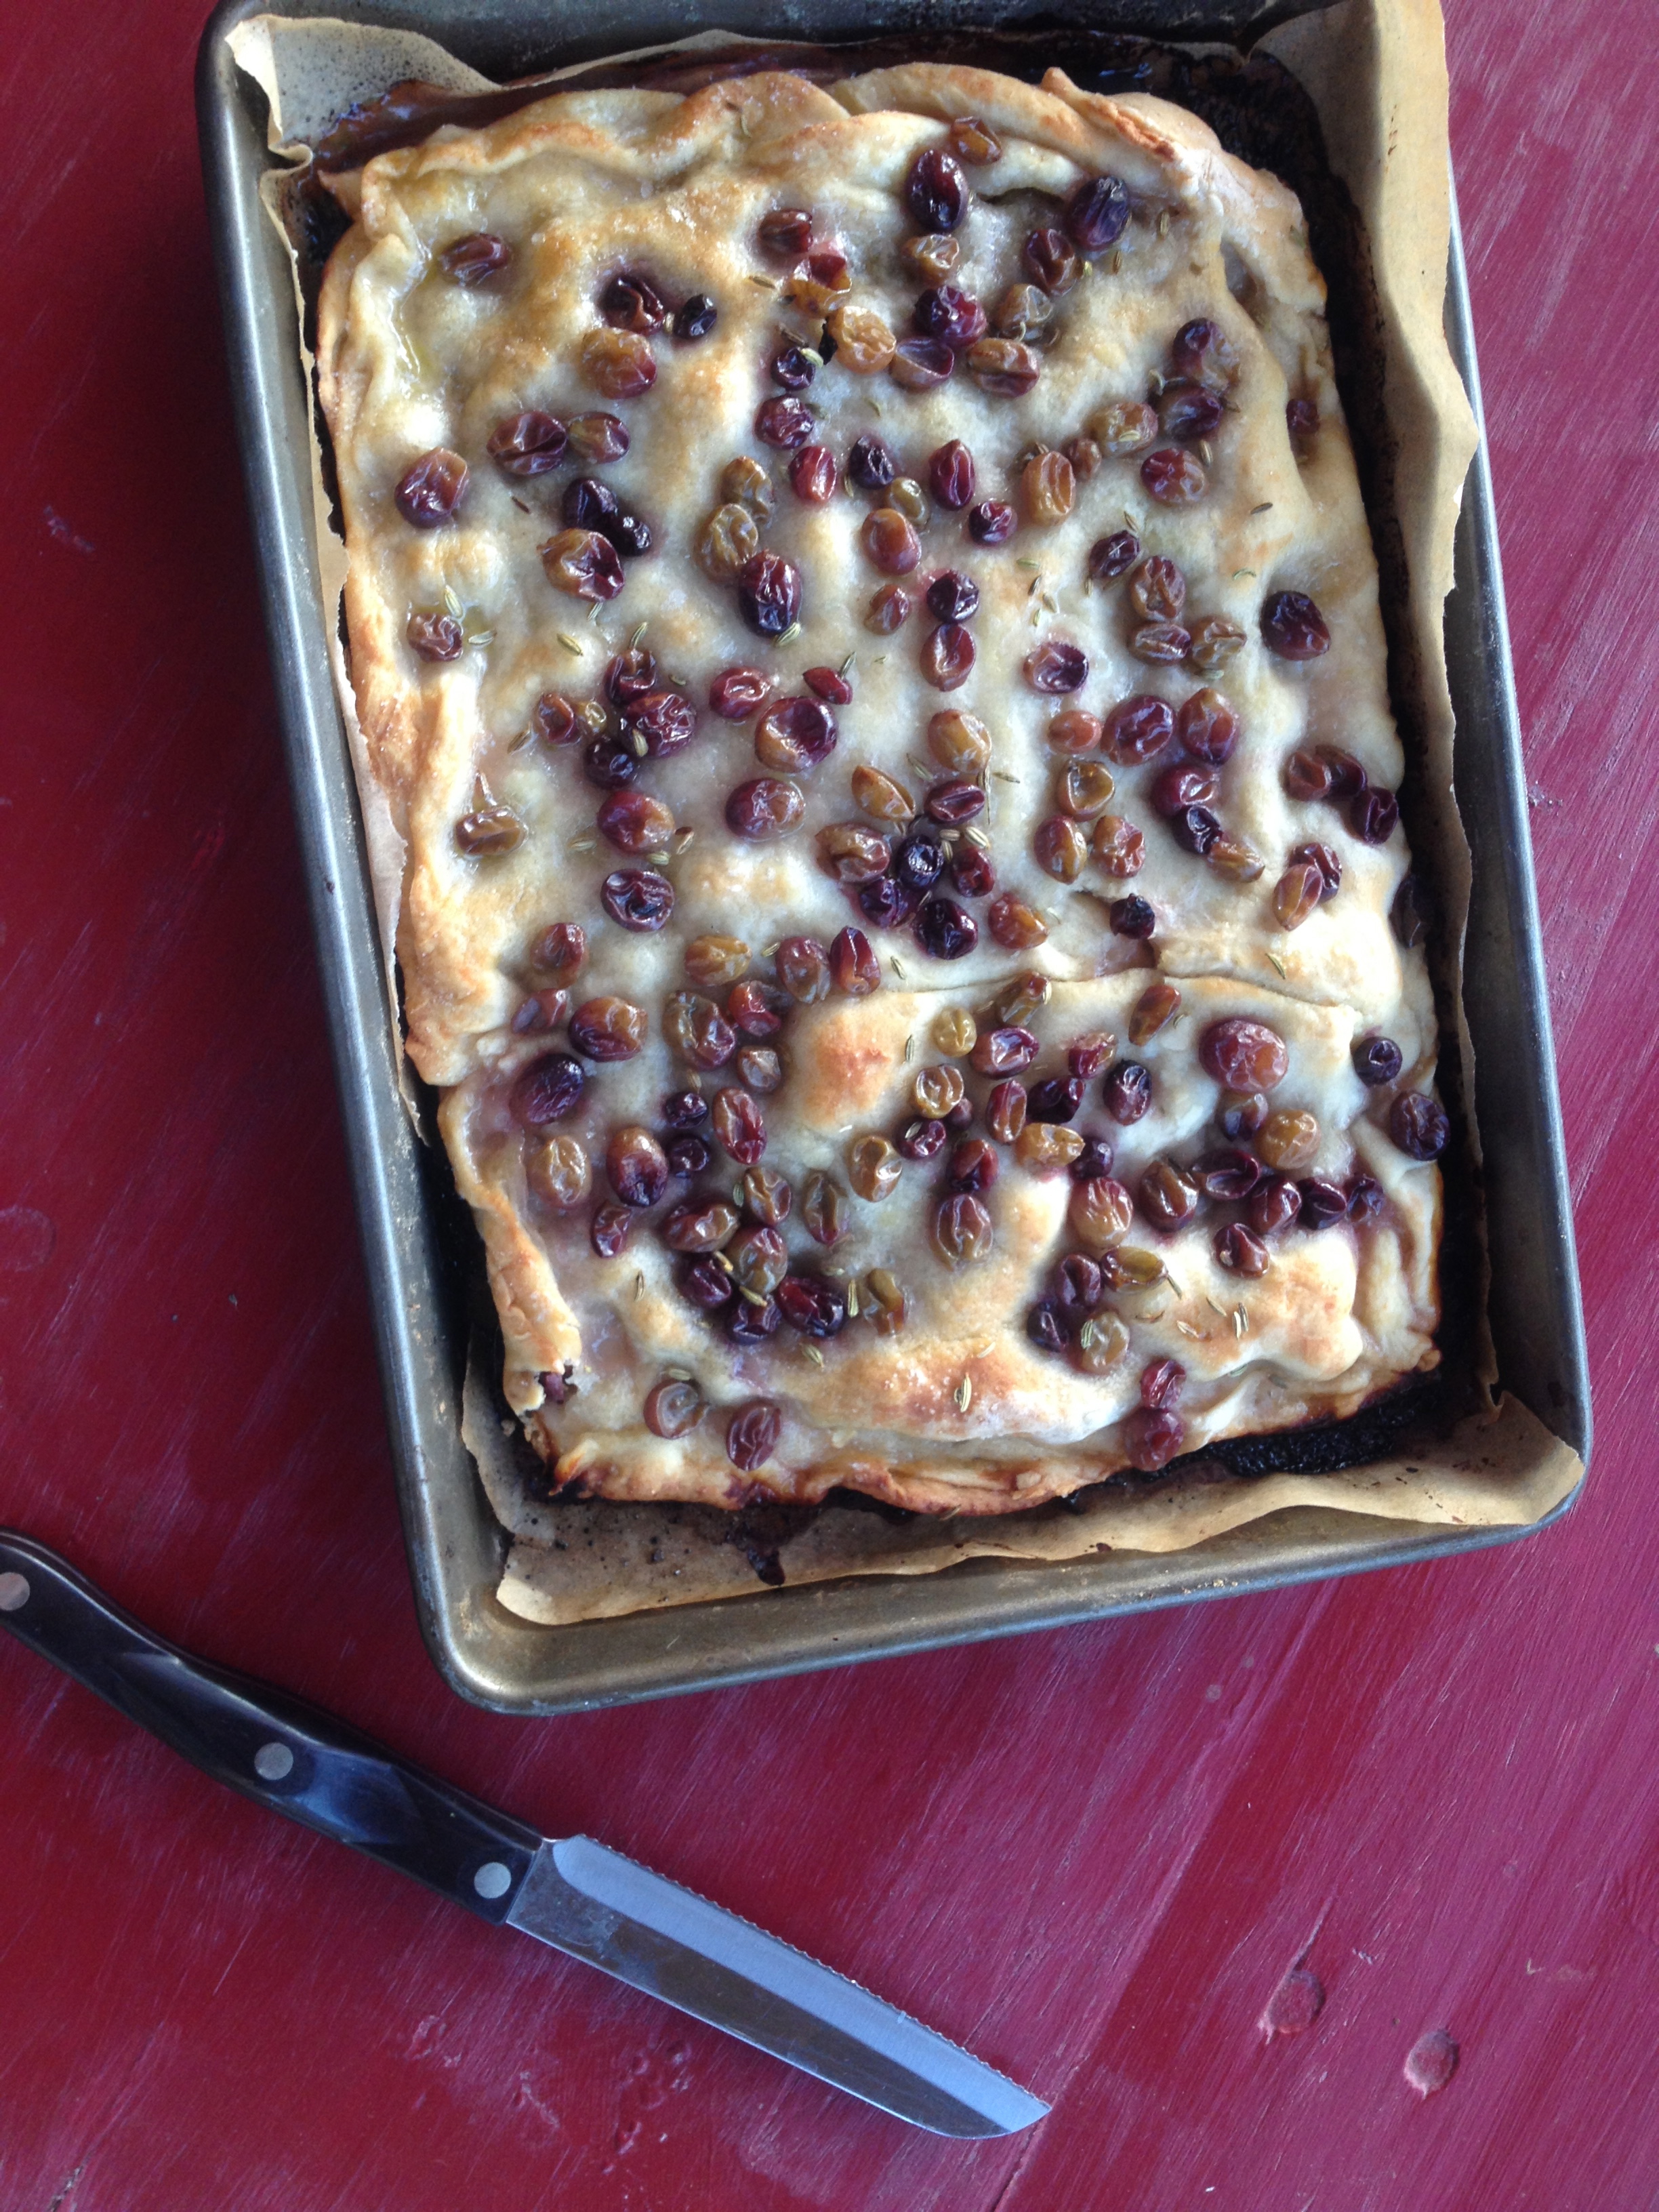
  13. Cover the top with the rest of the grapes and sprinkle the remaining sugar over the top. Drizzle with olive oil and bake for about 35-40 minutes or until the dough becomes golden and crunchy on top and the grapes are oozing and cooked.
  14. Allow to cool completely. When ready to serve, cut into squares and dust generously with icing sugar, if using. This is best served and eaten the day of baking, or at the most the next day.
3.2.2929


Filed Under: Breads, Delectable Desserts Tagged With: bread, Foccacia, grape, schiacciata all'uva, tuscan

Pesto Pizza with Roasted Tomatoes, Homemade Ricotta, and Caramelized Onions

March 13, 2015 by Michelle Michelotti-Martinez

Pesto Pizza with Roasted Tomatoes and Caramelized Onions

Pesto Pizza with Roasted Tomatoes and Caramelized Onions in Pizza Oven

I simply adore Italian food and whether I like pasta or pizza better is so hard to say, in fact, it’s impossible. I love them both for many of the same reasons and for many different ones.

Both fill my comfort food addictions and needs! Both are creative, fun to make, and involve CARBS which I ADORE! Both seem simple but to perfect from scratch is not easy; it takes time, patience, knowledge, and a good “nonna” for a teacher.

As for the differences, I could make pasta everyday, period. I fantasize about the various recipes, shapes, sauces, and pairings. I ADORE making pasta. Pizza, I love to make just not everyday BUT when I want something and think about the two, chances are I will eat pizza more often than pasta. So, try to figure this one out……okay never mind, don’t…..

Honestly, at the end of the day, it’s not as complicated as I am making it sound. If you love Italian food, I really don’t know anyone who doesn’t and if I did, I probably wouldn’t associate with them, it’s a difference I couldn’t comprehend, but if you do love it as much as I then pizza or pasta, who cares, just MANGA!

On that note, everyone has a recipe for a margarita pizza so I wanted to post a recipe that is a little more unusual but incorporates ingredients that most everyone loves and this pesto pizza with roasted tomatoes, homemade ricotta, and caramelized onions just rocks! If you have a pizza oven or know someone who does (I happen to know someone, mille graze a caterina e giovanni:), use it….but if all you have access to is an oven, it does the trick. I would suggest investing in a pizza stone if you don’t have one, it’s the closest thing you can get to mimicking cooking in a pizza oven!

Now go and figure out your favorite…..pizza, pasta, or BOTH….. before you contemplate, pour a glass of vino!

5.0 from 1 reviews
Pesto Pizza with Roasted Tomatoes, Homemade Ricotta, and Caramelized Onions
 
Print
Prep time
25 hours
Cook time
30 mins
Total time
25 hours 30 mins
 
If you are a pizza addict like me, this version is scrumptious!
Author: Michelle Michelotti-Martinez
Recipe type: Main
Cuisine: Italian
Serves: 8
Ingredients
  • Pizza Dough:
  • 4 cups flour
  • 1½ cups warm water
  • 2¼ tsp fresh yeast
  • 2 T + 2 tsp olive oil
  • 1 tsp salt
  • 1 tsp sugar
  • Caramelized Onions:
  • 2 sweet onions, halved and thinly sliced
  • olive oil
  • marsala wine
  • salt
  • Pesto:
  • 2 cups fresh basil
  • 2 cloves of garlic
  • ¼ - ½ cup olive oil
  • ¼ c toasted pine nuts
  • parmigiano-reggiano cheese
  • salt and pepper
  • Roasted Tomatoes:
  • 1-2 lbs cherry tomatoes
  • olive oil
  • salt and pepper
  • sugar
  • Homemade Ricotta:
  • 6 cups organic whole milk
  • 2 cups organic heavy whip cream
  • 1 tsp salt
  • 3 T organic white wine vinegar
  • Toppings:
  • asiago cheese
  • fresh mozzarella cheese
  • basil
Instructions
  1. Pizza Dough:
  2. Day before making pizza:
  3. Combine the bread flour, sugar, yeast and kosher salt in the bowl of a stand mixer and combine. While the mixer is running, add the water and 2 tablespoons of the oil and beat until the dough forms into a ball. If the dough is sticky, add additional flour, 1 tablespoon at a time, until the dough comes together in a solid ball. If the dough is too dry, add additional water, 1 tablespoon at a time. Scrape the dough onto a lightly floured surface and gently knead into a smooth, firm ball.
  4. Grease a large bowl with the remaining 2 teaspoons olive oil, add the dough, cover the bowl with plastic wrap and put it in a warm area to let it double in size, about 1 hour. Turn the dough out onto a lightly floured surface and divide it into 2 equal pieces. Cover each with a clean kitchen towel or plastic wrap and let them rest for 24 hours. This allows the yeast to rise fully.
  5. Caramelized Onions
  6. On stove top in medium sized pan over medium heat, add a little olive oil and warm. Add onions and sauté. Add a little more olive oil as they cook and turn heat down a little bit to slow cooking. When starting to brown, add about ¼ cup marsala wine and a little salt. Let onion cook way down til golden brown.
  7. Roasted Tomatoes:
  8. Preheat oven to 350. Line a baking sheet with parchment paper and spread out tomatoes. Drizzle with olive oil, season with salt and pepper and a little sugar. Place in oven and cook until roasted, about 20-25 minutes.
  9. Homemade Ricotta:
  10. In a saucepan on stove over medium heat, put in the milk, cream, salt, and vinegar. Bring to a medium heat and boil where it starts to separate. Put in a mesh colander over a bowl until liquid is drained.
  11. To Make Pesto:
  12. In a food processor, add basil and garlic. Pulse until well blended and finally chopped. Add ½ pine nuts and ¼ cup olive oil and run until well blended. Add a little salt and pepper and pulse. Check consistency and flavor. Add oil and seasoning if necessary. Don't want pesto "runny" but spreadable.
  13. To assemble pizza:
  14. Preheat oven to 500. If you have a pizza stone, preheat in oven for 15-20 minutes but if using a baking sheet then don't preheat. Roll out 1 of the pizza balls in desired shape, rectangle or round, to desired thickness, I like really thin crust. Prick dough with fork as to not form bubbles.
  15. Spread basil on bottom to of dough. Add ricotta in small amount around pizza and same with mozzarella. Add ½ caramelized onion and ½ tomatoes and top with a little asiago and parmigiano-reggiano cheese. Remember, pizza is a balance of crust and toppings, don't "load up" with too much cheese. Repeat with other pizza ball.
  16. Bake for 10-15 minutes, until crust is browned well and toppings are melted. Pull out of oven and dot with fresh basil and drizzle with olive oil. Cut and serve immediately with roasted red pepper flakes and fresh grated parmigiano-reggiano cheese.
3.2.2929

Pizza Oven with Four Cheese Pizza and Pesto Pizza with Roasted Tomatoes and Caramelized Onions 2

Filed Under: Pasta, Pizza, and Polenta Tagged With: asiago, basil, basil pesto, caramelized onions, dough, homemade ricotta, Parmigiano-Reggiano, pizza, roasted tomatoes

Molka Cake with Penuche Frosting

February 27, 2015 by Michelle Michelotti-Martinez

Molka Cake with Penuche Frosting 3

Molka Cake with Penuche Frosting 9

Do you have that favorite childhood birthday cake recipe? Maybe it’s nothing more than a box cake with frosting out of a can but it brings back the BEST memories of days gone by? That time each year where for one day you feel special to the world…..and the birthday cake was the secret.

For me, I was blessed to get a homemade molka cake with penuche frosting. It came from my Dad’s side of the family, passed down several generations and still going. This is my ultimate cake fantasy ABOVE and BEYOND ANY other cake in the world. Not only is it dense, rich, moist, and delicious, it is jammed packed with memories of anticipation for each one of our birthdays as it was the ULTIMATE treat. I still have photos from all our birthdays with that molka cake as the centerpiece of the table. I don’t remember ONE gift I received but I remember that cake, perhaps that was my gift.

I have such fond memories of watching my mother, grandmother or great grandmother make this for each one of us children. We weren’t able to request it except on our birthdays so the anticipation almost exceeded everything. When I grew up and still got this as my cake of choice, it always met the expectation, always. Now, I make it for my nieces and nephews and it has become their favorite too.

As you read the ingredients, some of them might look peculiar….potato? Seriously? In a cake??? But because of this one ingredient, you will never worry about a dried out or overbaked cake, it keeps it moist and dense.

So, if you have someone special to bake a cake for whose recipe goes back over 100 years, this is a gem. Hopefully the memories you create will be as fond as the ones I remember…..

Molka Cake with Penuche Frosting 1

Molka Cake with Penuche Frosting 5


Molka Cake with Penuche Frosting 12

Molka Cake with Penuche Frosting 6

Molka Cake with Penuche Frosting
 
Print
Prep time
40 mins
Cook time
30 mins
Total time
1 hour 10 mins
 
Author: Michelle Michelotti-Martinez
Recipe type: Dessert
Serves: 8-10
Ingredients
  • Molka Cake:
  • 1½ cup sugar
  • 1 c butter or crisco (I prefer butter)
  • 4 T cocoa
  • 1½ cup mashed potato (russet) - boiled and pushed through a mesh strainer
  • 1 c buttermilk
  • 1 tsp. baking soda (in buttermilk)
  • 4 eggs, separated
  • 2 cups flour
  • 1 tsp. salt
  • 1 tsp. vanilla
  • ½ cup golden raisins
  • ½ cup chopped walnuts
  • Penuche Frosting: (recipe adapted to make 1½ quantity)
  • ¾ cup butter
  • 1½ cup brown sugar
  • ¼ cup + ⅛ cup whole milk
  • 2¾ - 3 cups powdered sugar
Instructions
  1. Molka Cake:
  2. In a sauce pan over medium heat, bring 2 russet potatoes to a boil and cook until very tender ( I cut in half and this will be a little more than you need for cake). Drain, cool, then put through mesh strainer and measure out 1½ cups.
  3. Turn oven onto 350 and grease and flour 2 cake pans.
  4. In a mixer, combine sugar and butter (or crisco) until light and fluffy, about 10 min.
  5. Add in the cocoa and potato and mix well.
  6. Add egg yolks and mix well.
  7. Pour milk into glass measuring cup and add soda and mix.
  8. Combine all dry ingredients in a bowl.
  9. Add the dry and wet ingredients, alternating between flour mixture and buttermilk mixture (start and finish with flour). Mix for 15 minutes or so.
  10. In a separate bowl, whip egg whites until stiff. Fold into batter.
  11. Add nuts and raisins and fold in.
  12. Pour mixture evenly between both cake pans.
  13. Cook for 30 minutes or until toothpick comes out clean.
  14. Penuche Frosting:
  15. Over medium heat on stove in a saucepan, melt butter.
  16. Stir in brown sugar and bring to boil and stir over heat for 2 minutes.
  17. Add milk and bring to boil stirring constantly.
  18. Cool to lukewarm and gradually mix in powdered sugar until spreadable frosting.
  19. *Note - Cake is easier to frost if it has been frozen and frosted frozen. Put in fridge til ready to serve.
3.2.2929


Filed Under: Delectable Desserts Tagged With: cake, chocolate, frosting, molka, penuche

Posole Verde with Roasted Chicken

February 5, 2015 by Michelle Michelotti-Martinez

Posole Verde Full View

Posole Verde with Avocado Close Up

How is it when harvesting during the fall there is a “sure” feeling that come winter all this deliciousness will run out? Yet after the holiday indulgence there seems to be PLENTLY left to fold out into winter recipes and carry us into the beginnings of growing season again. Life is so good.

A favorite New Year’s resolution for me is to make a conscious effort to cook most of our meals with ALL the yummy goodies we spent hours putting up, either by freezing or by canning. Funny, when we are going through the harvesting process we are absolutely SURE we will never forget the labor of love put in but as the months pass, somehow the time spent fades in our memory….

It was a Sunday afternoon and I went out to refresh my memory on what treasures were hidden away. As I hung over the side of my deep freezer digging away, I saw an entire box of frozen roasted tomatillo sauce I had completely forgotten about! For us, this is one of the easiest things to grow and if I didn’t figure a use, I could easily see filling another 20 jars next year….

Since we are a soup lovin family, I decided I wanted to make posole. I LOVE traditional posole but this time I wanted a bit of a change and these frozen tomatillos would be perfect! I would make posole verde and add some shredded roasted chicken and then pile on a bunch of fresh crunchies such as radish, cabbage, tomato, and avocado! I was starting to drool….it sounded so fresh and delish!

In I went and prepped the chicken to roast. While it was roasting, I pulled out some poblano chiles, jalapenos, onion, and garlic; these were the perfect sofrito for the posole. I love to get that “char” on the skins of the chile and infiltrate the broth with that flavor…ooohhhhh I was getting jazzed!

Once those flavors melded, I added the oregano and cilantro and seasoned with salt and pepper. Then came the chicken stock and hominy. It was looking awesome! Now for the star of the show, straight from our garden, the roasted tomatillo sauce, the smell brought me right back to harvest, right back to the memories of those long days preserving our garden treasures…

Lastly I put in the shredded chicken, you could leave this out and add it along with the garnishing’s on top, but I decided to marry all the flavors and fold it in. I seasoned a bit more and heated it through.

I hadn’t told Enrique what I had made so when dinnertime came, I served it up in big bowls and topped it with the fresh goodies and toasted up some fresh corn tortillas. I brought it to him and his eyes got as big as saucers, this is his soul food and when I shared that the base was all of our tomatillos, he grinned from ear to ear…….

It’s nights like this, many months later that I easily see the circle of life……

Posole Verde Close Up

Posole Verde Frontal View

Posole Verde with Roasted Chicken
 
Print
Prep time
30 mins
Cook time
4 hours
Total time
4 hours 30 mins
 
Author: Michelle Michelotti-Martinez
Recipe type: Soup
Cuisine: Mexican
Serves: 10
Ingredients
  • 1 whole chicken, roasted
  • 1 T butter
  • 8 cups chicken stock or low-sodium broth
  • 2 pounds tomatillos, husked and halved
  • 1 small onion, quartered
  • 2 poblano chiles—cored, seeded and diced
  • 2 jalapeños, seeded and diced
  • 4 large garlic cloves, smashed
  • ½ cup chopped cilantro
  • 1 tablespoon oregano leaves
  • Salt and freshly ground black pepper
  • 1 tablespoon vegetable oil
  • Three 15-ounce cans of white hominy, drained
  • Finely shredded cabbage, sliced radishes, chopped onion, diced avocado, queso fresco, corn tortillas, and lime wedges, for serving
Instructions
  1. Preheat oven to 350 degrees. Rinse chicken and throughly dry. Melt 1 T of butter and coat chicken and brush all over and cover with salt and pepper. Roast for 1 hour and 30 min. Remove and allow to cool and shred meat into separate bowl, discard bones and skin.
  2. Put husked tomatillos on a parchment-lined baking sheet and roast in oven for 30 minutes or until soft. Put into a blender or food processor and puree until smooth. Set aside.
  3. In a large, dutch oven, heat 1 T of vegetable oil until hot. Add onion, poblanos, and jalapeños. Add oregano, cilantro, salt, and pepper. Cook until soft and chiles have a little "char" on skin.
  4. Add the tomatillo puree and cook over moderate heat, stirring occasionally, until the sauce turns a deep green, about 12 minutes, Add chicken broth and hominy. Season with salt and pepper.
  5. Add the shredded chicken to the stew and cook just until heated through.
  6. Serve the posole in deep bowls, passing the cabbage, radishes, onion, avocado, queso fresco, corn tortillas and lime wedges at the table.
3.2.2885


Filed Under: Soups and Stews Tagged With: chicken, corn, Garlic, hominy, jalapeño, onion, poblano, posole, radishes, tomatillo, verde

  • « Previous Page
  • Page 1
  • Page 2
  • Page 3
  • Page 4
  • Page 5
  • Page 6
  • Page 7
  • Next Page »

Primary Sidebar

Meet Michelle and Enrique

Eatentions is a way of being with our food experience. It is a thought-filled process starting with connection to source all the way through the finished creation. We like to call it "from root to experience". Its the entire thing, its that conscious. Thank you for popping by and welcome to our life.

Let’s Connect!

Archives

Categories


My Favorites

Arancini|Eatentions

Arancini

Torta Caprese

Torta Caprese

Lemon Pasta with Broiled Salmon and Charred Lemon|eatentions

Lemon Pasta with Broiled Salmon and Charred Lemon

Footer

Instagram

Instagram has returned invalid data.

Follow Me!

Connect With Us

  • Email
  • Facebook
  • Instagram
  • Pinterest
  • RSS
  • Twitter

We believe in celebrating amazing people, delicious food, great conversation, sustainability and experience. For us,our lives have always been about love, family, friends and sharing all things together. Connecting with people through food, sharing stories and supporting one another to live our dreams and our purpose is what inspires us daily.

My Favorites

Arancini|Eatentions
Torta Caprese

Copyright © 2026 · Foodie Pro & The Genesis Framework