• Skip to primary navigation
  • Skip to content
  • Skip to primary sidebar
  • Skip to footer

Eatentions

Organic * Local * Sustainable

  • Home
  • About Us
  • Recipes
  • Culinary Socials
  • CSM – Community Sourced Meals
  • Contact
  • Nav Social Menu

    • Facebook
    • Instagram
    • Pinterest
    • RSS
    • Snapchat
    • Twitter

Fish and Seafood

Seared Scallops with Basil Pistou

March 15, 2017 by Michelle Michelotti-Martinez

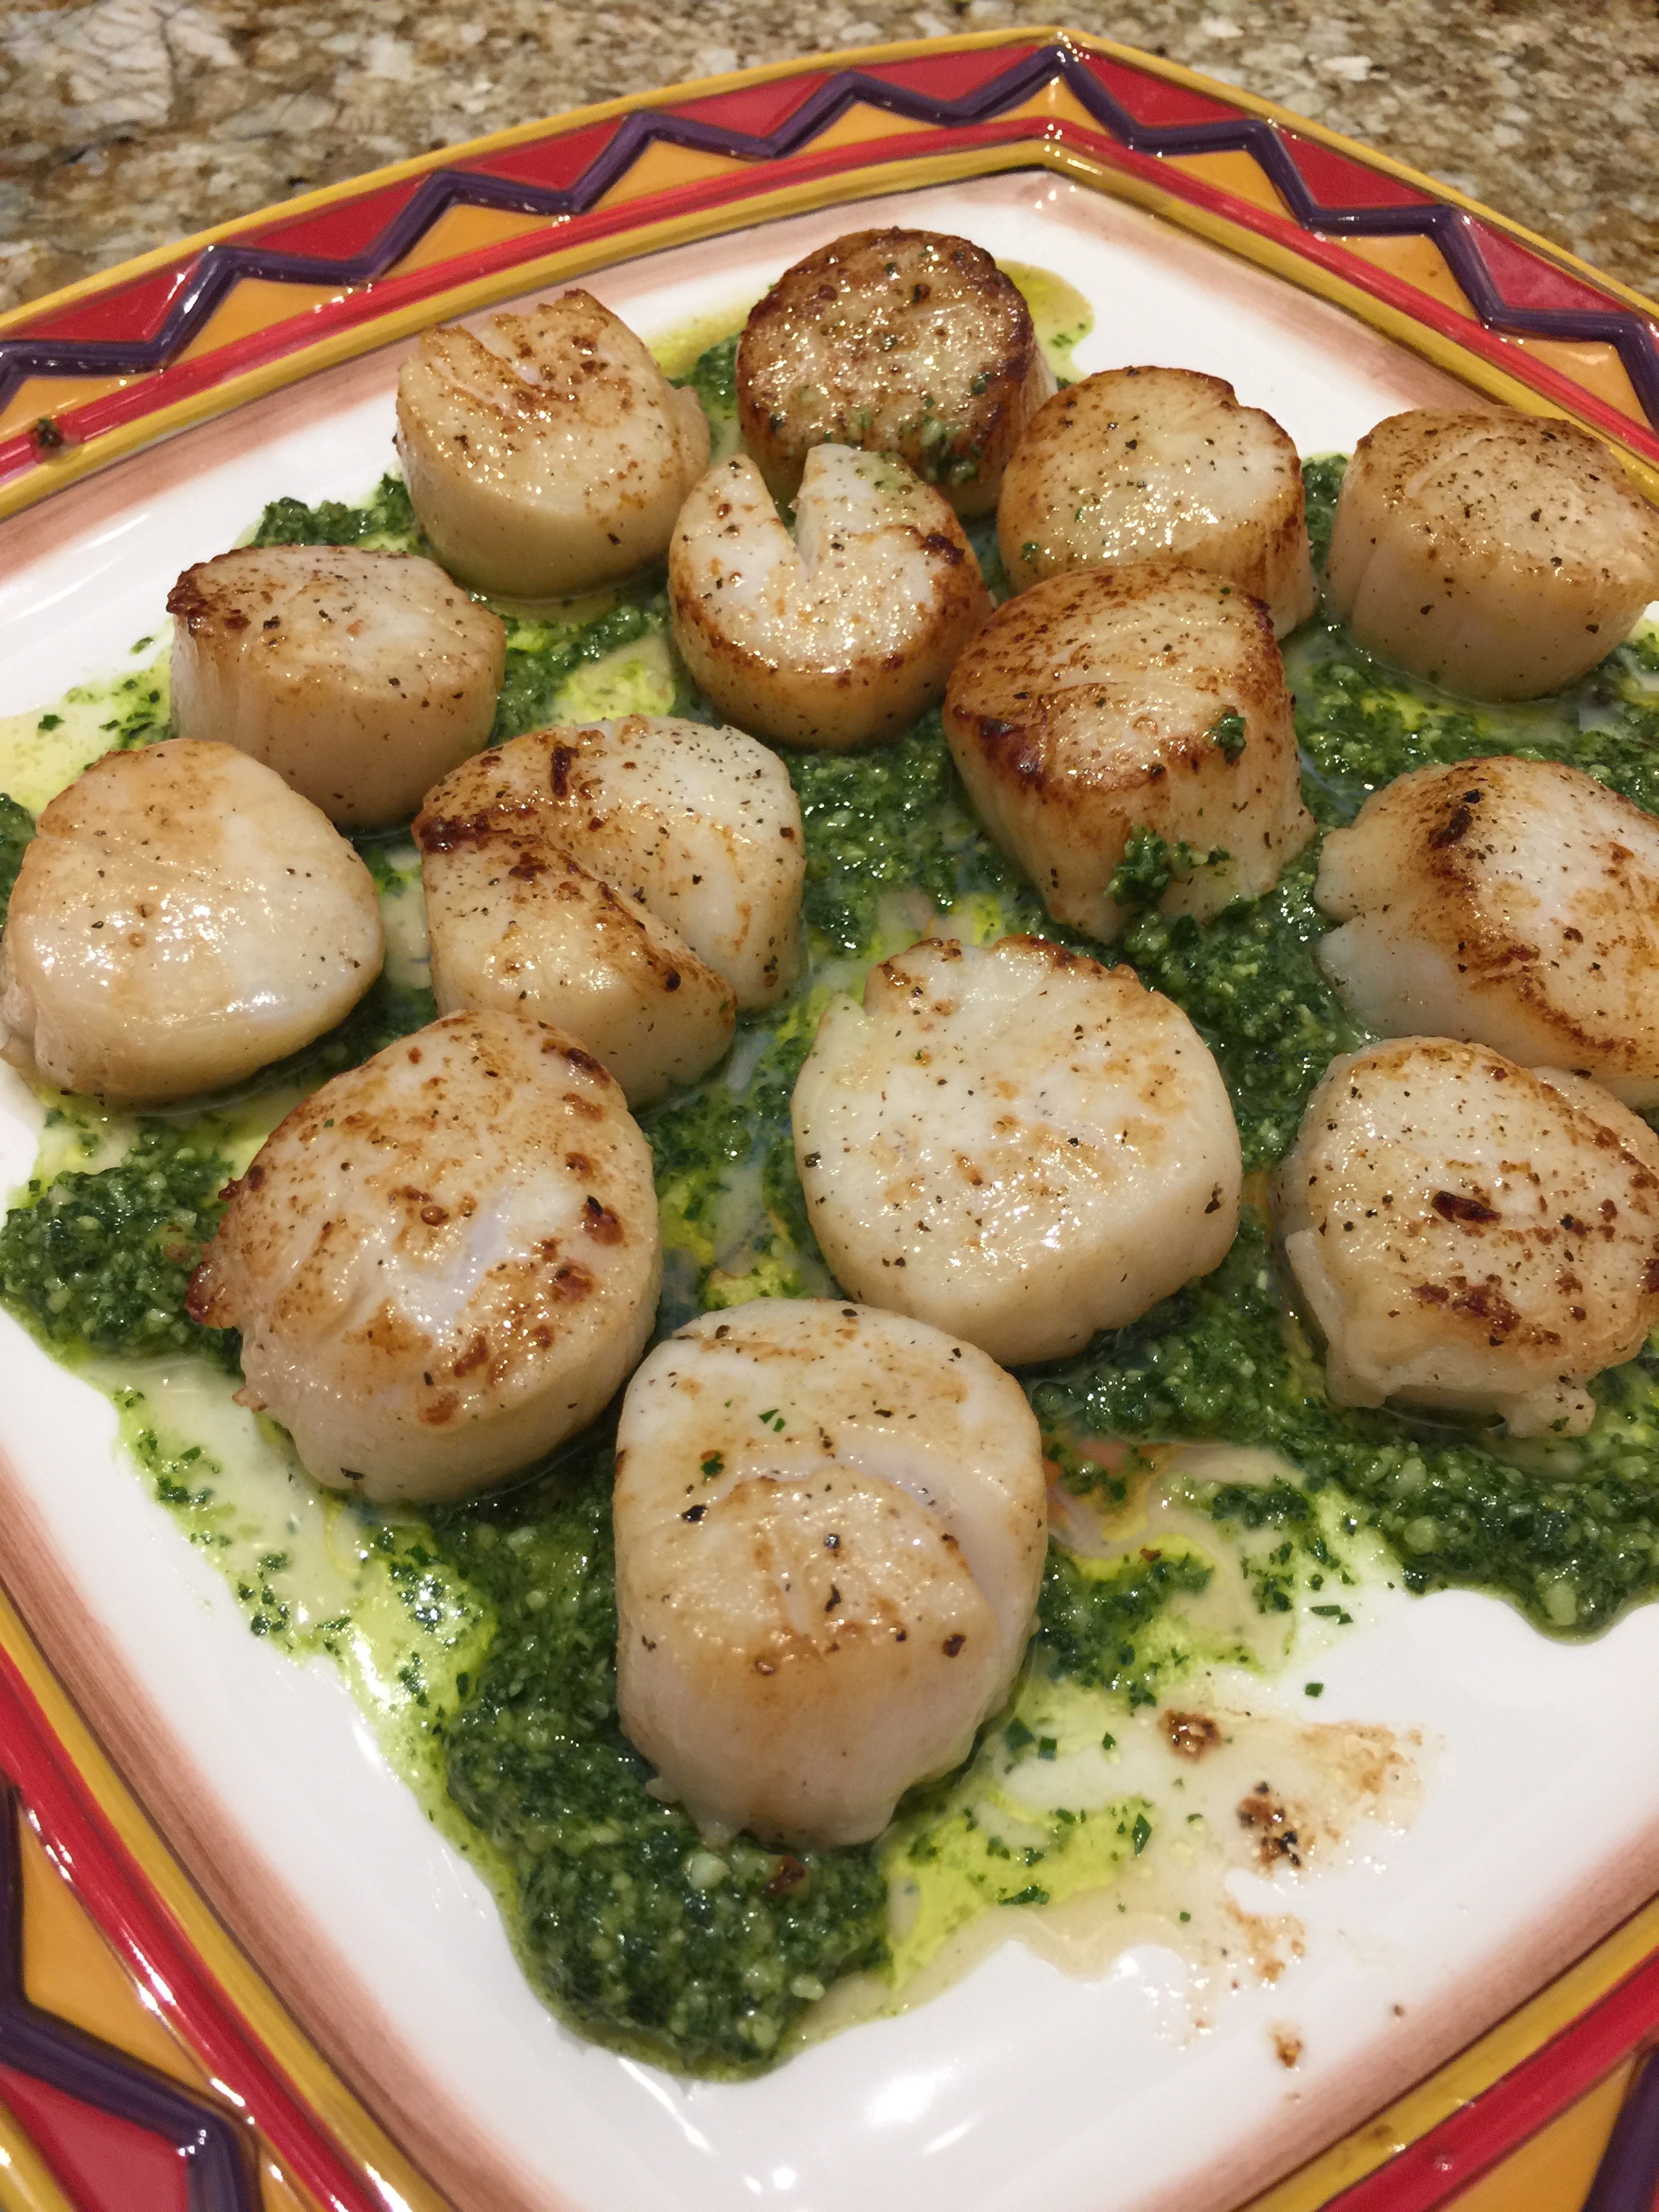
Scallops + Basil Pistou = Simple + Divine

Seared Scallops with Basil Pistou

It really is as easy as that, really. Scallops are one of those decadent wonders that when paired with a simple accompaniment, makes anyone look like a 5 star chef……after all, who wouldn’t want THAT?

I have two members of my family who are scallops freaks, seriously, head over heels about these little meaty, sweet wonders from the sea. They LOVE them and each could devour 15-20 on a daily basis, honestly 15-20.  I often think to myself, why couldn’t they have chosen something a LITTLE less costly, I mean really???

Recently on a trip up north I KNEW I had better create some dish that had scallops or I might not be welcomed back. Anyone who has been north (meaning Montana) in the DEAD of winter KNOWS that fresh scallops are a bit difficult to come by……just a little….okay friggin IMPOSSIBLE! Sure enough as luck would have it, guess when I was going to be there… WINTER!!!

I can’t begin to express my gratitude for my buddy, the fishmonger who I sought out about 7 years ago. He bails me out all the time by keeping some of these little “gems” frozen in his stash for desperate cooks on a mission of pleasure. 🙂

So when I was up north a couple of weeks ago, I  meandered into his little shop for my usual request and asked (with desperation in my voice) if he had his “stash” for me to raid? He went a bit pale as he was sure he had sold the last of the lot to a chef in town. I could feel my heart stop and my eyes fill with tears (a bit dramatic, I know) but he panicked enough to make a trip to the back of the shop and  now it was my turn to hope for a miracle.  Sure enough, after about 15 minutes, he found me the last of the scallop “stash”, hidden beneath a newly frozen salmon.

I jumped up, kissed him, and bid him farewell as I made my way off to create my scallop wonder and to become the favorite of the family……once again.
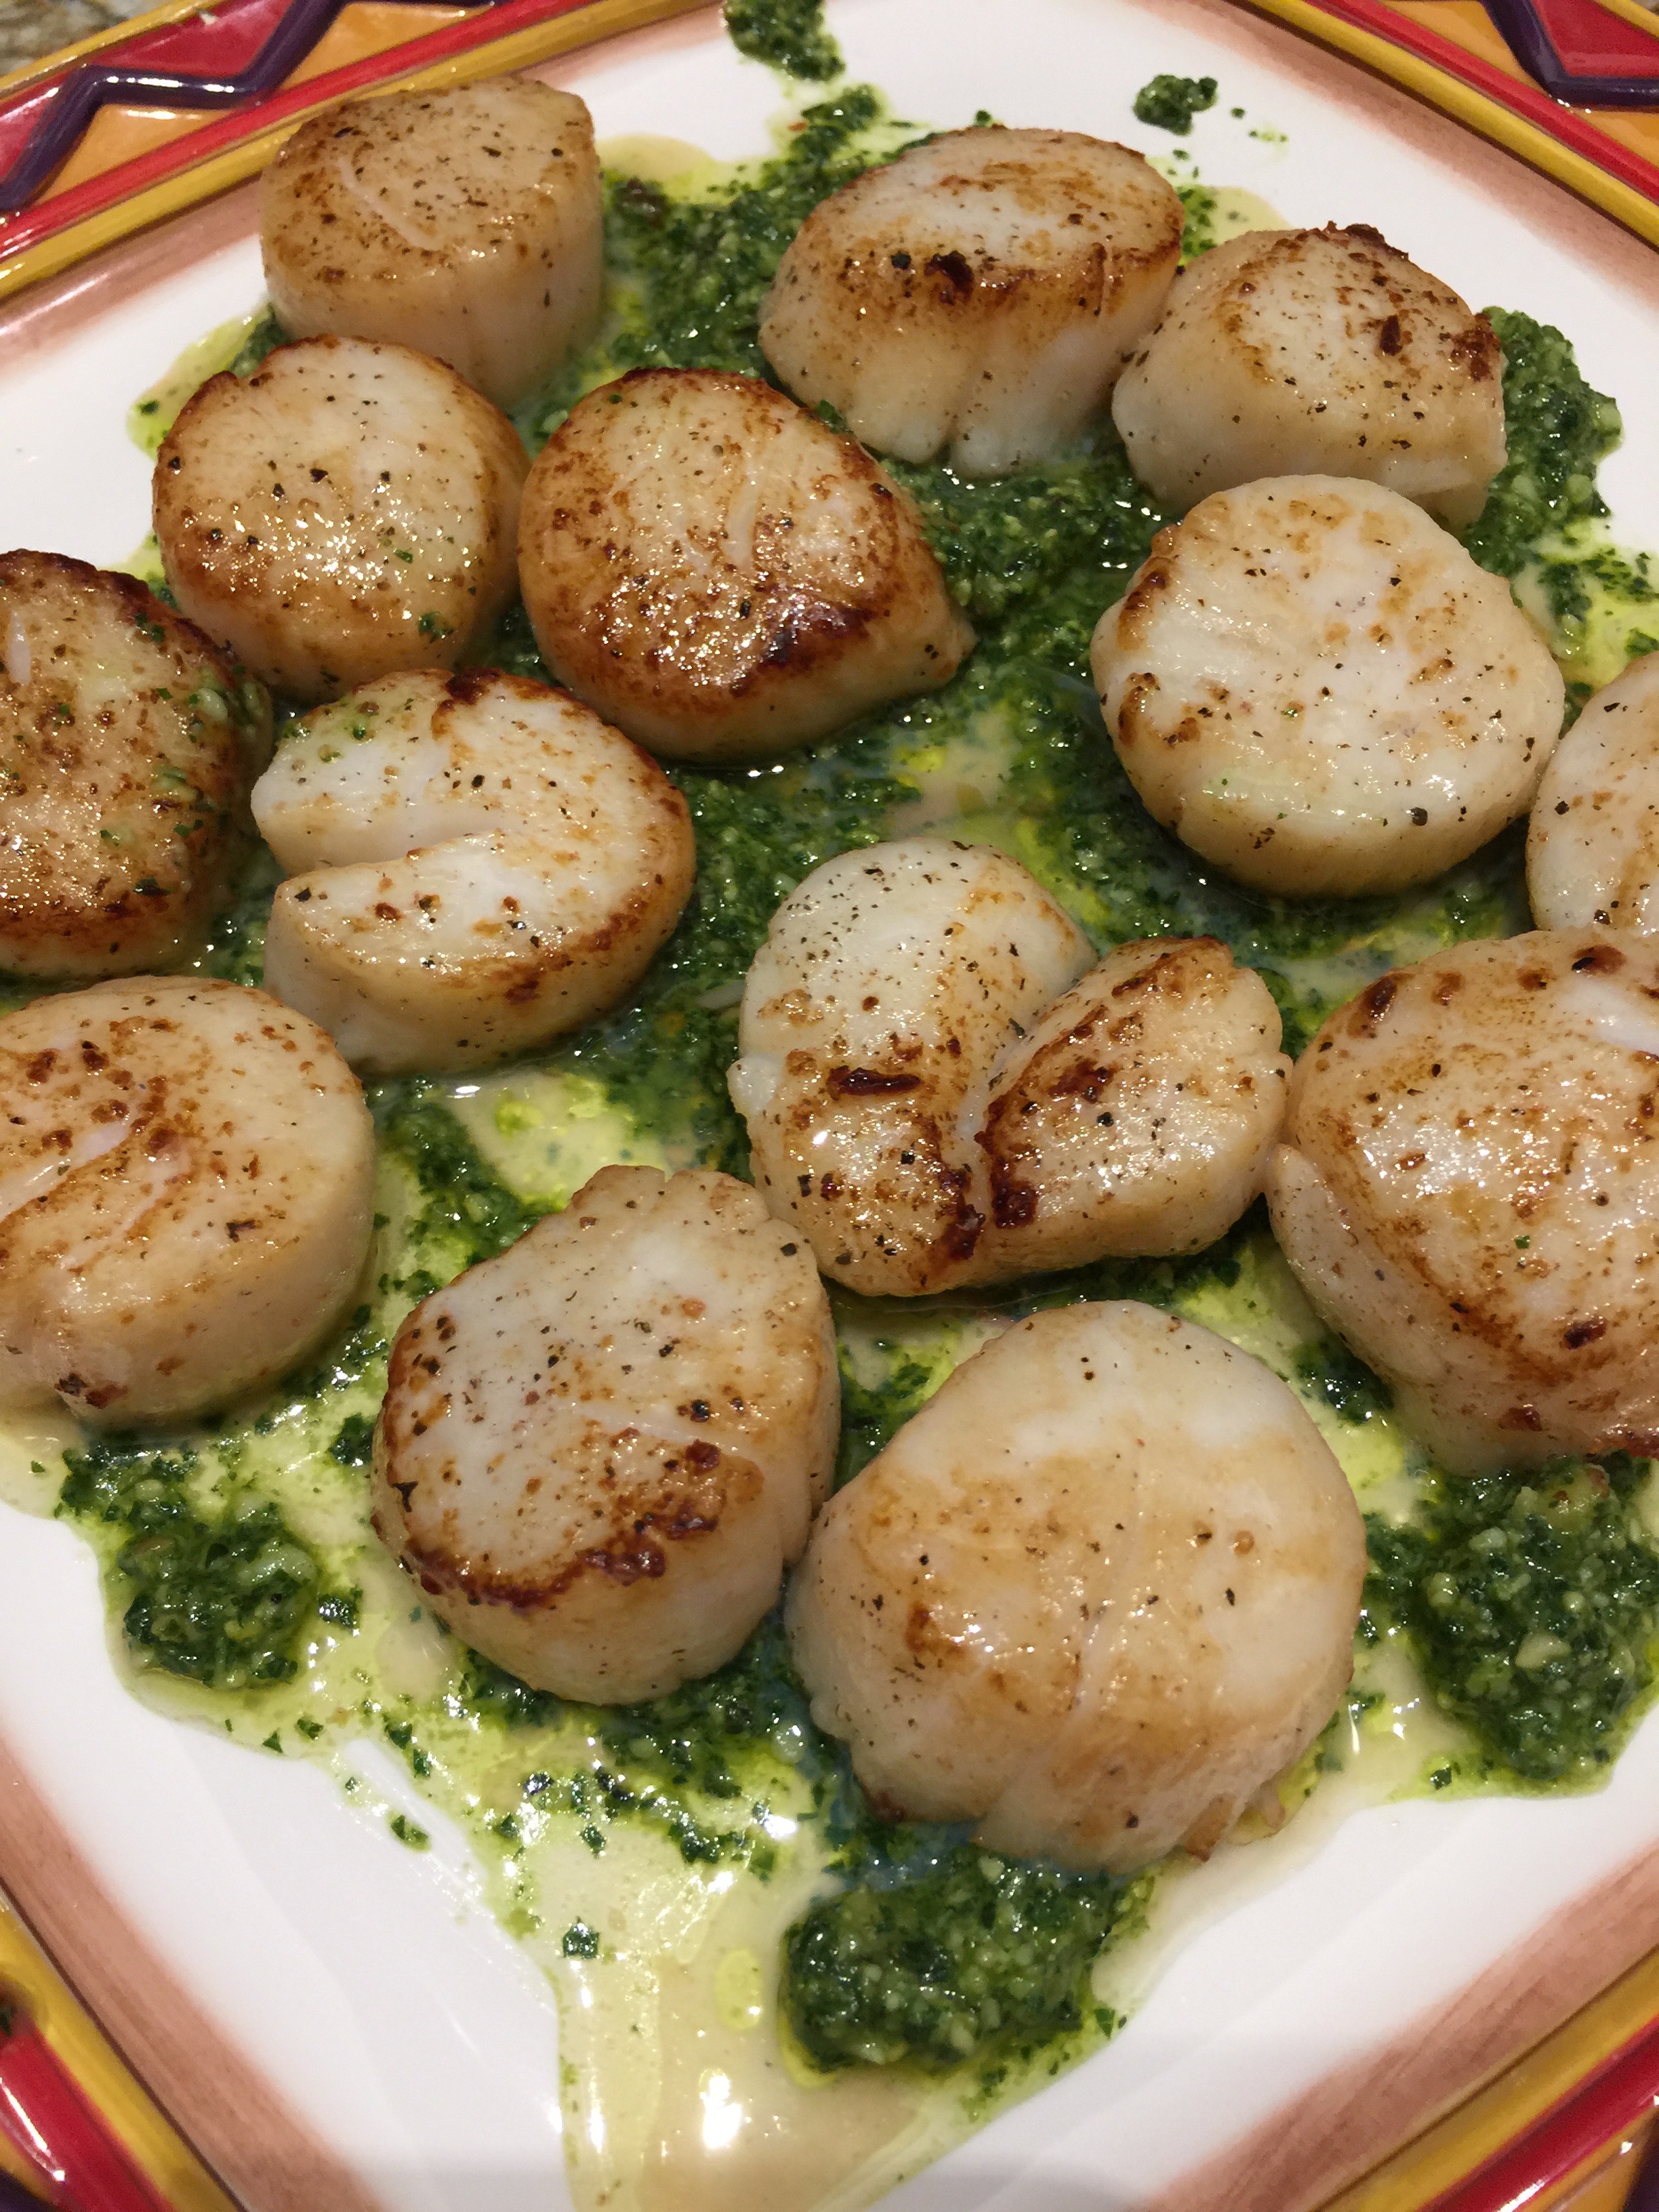
Seared Scallops with Basil Pistou
 
Print
Prep time
10 mins
Cook time
15 mins
Total time
25 mins
 
Author: Michelle Michelotti-Martinez
Serves: 4
Ingredients
  • For the Scallops:
  • 1 to 1¼ pounds dry sea scallops, approximately 16
  • 2 teaspoons unsalted butter
  • 2 teaspoons olive oil
  • Kosher salt
  • Freshly ground black pepper
  • For the Pistou:
  • 1 tablespoon crushed garlic
  • 1 teaspoon kosher salt
  • 4½ cups basil leaves, torn into pieces (2 ounces)
  • ¼ cup coarsely grated plum tomatoes
  • ¼ cup extra-virgin olive oil
  • 1 cup finely grated Mimolette or Parmigiano
Instructions
  1. For the Scallops:
  2. Remove the small side muscle from the scallops, rinse with cold water and thoroughly pat dry.
  3. Add the butter and oil to a 12 to 14-inch saute pan on high heat. Salt and pepper the scallops. Once the fat begins to smoke, gently add the scallops, making sure they are not touching each other. Sear the scallops for 1½ minutes on each side. The scallops should have a ¼-inch golden crust on each side while still being translucent in the center. Serve immediately with pistol.
  4. For the Pistou:
  5. In a large mortar, pound the garlic with the salt to a paste. Add the basil by the handful and grind the leaves against the side of the mortar until almost smooth. Stir in the tomatoes, then gradually stir in the olive oil until it's incorporated. Stir in the cheese and refrigerate until ready to serve.
3.5.3226

Seared Scallops with Basil Pistou

Seared Scallops with Basil Pistou

Filed Under: Fish and Seafood Tagged With: basil, fresh, pistou, scallops, seared

Honey Chipotle Shrimp Skewers

September 24, 2015 by Michelle Michelotti-Martinez

Grilled Sweet and Spicy Shrimp 2

I don’t know if there is an easier or more delicious seafood than shrimp, seriously. In less than 30 minutes you can grill, bake, sauté, or boil and add to a sauce (or not) of your choice and whoala, insta din din….I am certain you can easily claim chef-hood after any preparation of shrimp….that is, if it matters to you.

In our casa, we have it once a week (at least) and this simple preparation of honey chipotle grilled shrimp ROCKS, especially in the summer served with a guacamole greek yogurt dip as a side (or pop them into your mouth right off the grill like we do!) This way, who needs to even bother with the dipping sauce, just replace it with a crisp white or rose wine and you won’t notice.

Whatever you do, don’t let the soaking of the skewers deter you and if it does, just don’t use them…. instead grill in a metal pan with holes or use metal skewers. I promise these little gems taste the same whether on a skewer or on a grill pan, they are the simply the star of the show.

If you don’t like spice you will love these, the balance of chipotle and honey is perfection. You wouldn’t think a dish with 5 simple ingredients could be so decadent but it is and if you need a quick app, this is a sure winner. I don’t know anyone who doesn’t adore shrimp and if they don’t, maybe you need to question your friends…

So this weekend while the weather is warm and fall is just beginning, break out your favorite wine, fire up the grill, and enjoy these as a starter or a main…you’ll thank me later.

Honey Chipotle Grilled Shrimp Skewers
 
Print
Prep time
35 mins
Cook time
5 mins
Total time
40 mins
 
Author: Michelle Michelotti-Martinez Adapted from Eat and Relish
Recipe type: Appetizer or Main
Serves: 4
Ingredients
  • Shrimp Skewers
  • 1 lb peeled and deveined shrimp
  • 2 chipotles in adobo sauce, minced
  • 2 generous spoonfuls of the adobo sauce
  • 1 Tbsp olive oil
  • 1 Tbsp honey
  • bunch of cilantro, chopped
  • wooden skewers
Instructions
  1. First, marinate the shrimp and soak the skewers in water. Combine the minced chilis, the adobo sauce, olive oil, and honey in a large bowl, and whisk to combine. Add the peeled and deveined shrimp, and marinate in the refrigerator for 30 minutes, tossing occasionally.
  2. After the shrimp has marinated 30 minutes, thread the shrimp on the skewers, about 4 per skewer, making sure that the skewer pierces through the tail and head portions – this will help ensure that they do not swivel around when grilling. Heat your grill (or grill pan) to high heat, and grill the skewers, flipping halfway through cooking time, until the shrimp are slightly charred on the outside and are just barely opaque on the inside, about 2 minutes per side. Be careful not to overcook the shrimp, and remember they will continue to cook for a minute or so after you pull them off the grill.
  3. Top with cilantro and serve right away!
3.4.3177

Grilled Sweet and Spicy Shrimp 1

Filed Under: Appetizers, Fish and Seafood Tagged With: chile, chipotle, grilled, honey, marinated, shrimp

Fresh Ricotta and Caramelized Marsala Shallot Angolotti with Shrimp Butter Sauce

January 14, 2015 by Michelle Michelotti-Martinez

Shrimp3

I will always go back to pasta whenever I can….. just simply for my personal comfort food bliss. My fixation with ravioli borders obsessive because of the ENDLESS possibilities for the fillings (well and the dough for that matter). I love to work from the inside out when it comes to creating these little masterpieces, it’s almost like building a little sculpture, or at least in my mind…..

Growing up, my family made traditional ravioli that were filled with ricotta and parmigiano cheese and topped with a beef ragu. We didn’t have much variation to choose from and while I still LOVE these, I really dig the endless creations today.

My infatuation with ravioli really began when I owned my fresh pasta manufacturing company. Customers were requesting fresh ravioli so I actually purchased a ravioli machine. My fears and hesitations toward making them were conquered by the purchase of this machine, no doubt. To say the least, the learning curve itself was frustrating but when I made delicious fillings from what the farmers had for the week, it was ALL worth it. It was here where the creative juices birthed and put me out of the box regarding possibilities, it is where the fun began. Then each week I headed to the market and sold them to our awesome customers who reported amazing dishes they prepared, this was nothing short of addicting.

So when thinking which ravioli to post, I remembered my journey and decided that I would marry my heritage with a twist on innovation for the filling and then top with a decadent shrimp sauce. I also decided to try my hand at angolotti because if you don’t want to invest in a ravioli stamp or cutter to form the pasta, these can be finished with a knife and a fork and have a really pretty half moon shape, plus I really like the name….I have a tendency to pick wine this same way, let me see the label, is it pretty? Perfect, I’ll take it! How many of you can relate?

Anyway, if you haven’t made ravioli before or are a seasoned pro, these are simply delish and while its winter outside and a little more time on our hands, give these a try…….

IMG_6420

IMG_6438

IMG_6426

Shrimp Plate

Fresh Ricotta and Caramelized Marsala Shallot Angolotti with Shrimp Butter Sauce
 
Print
Prep time
1 hour
Cook time
15 mins
Total time
1 hour 15 mins
 
Author: Michelle Michelotti-Martinez adapted from Lucinda Scala
Recipe type: Main
Cuisine: Italian
Serves: 6 servings
Ingredients
  • Filling:
  • 2 T butter
  • 3-4 shallots, thinly sliced
  • ¼ cup ricotta, preferably homemade, recipe below
  • Sauce:
  • 2 sticks of butter
  • 1½ lbs shrimp, shelled and devined
  • Olive oil
  • Salt and pepper
  • 1 recipe basic pasta, rolled to second to the thinnest setting on machine, recipe bellows
  • 1 bunch Italian parsley, finely chopped to yield ¼ cup
  • ¼ cup grated Parmigiano-Reggiano
  • Fresh Ricotta:
  • 6 cups organic whole milk
  • 2 cups organic heavy cream
  • 1 tsp salt
  • 3 T organic white wine vinegar
  • Fresh Egg Pasta:
  • 4 cups all purpose flour or caputo semolina flour (found on amazon)
  • 4 -5 large eggs
  • ½ teaspoon salt
  • water as needed
Instructions
  1. To Make Fresh Pasta:
  2. Make a mound of the flour in the center of a large wooden cutting board or in a bowl, whichever is more comfortable to you. Make a well in the middle of the flour and add the eggs and salt. Using a fork, beat together the eggs and begin to incorporate the flour starting with the inner rim of the well. As you expand the well, keep pushing the flour up to retain the well shape. Do not worry that this initial phase looks messy. The dough will come together when ½ of the flour is incorporated. If using a bowl, turn out onto a wooden cutting board now and start kneading the dough with both hands, using the palms of your hands primarily. Once you have a dough ball, remove its rom the board and scrape up any left over crusty bits. Lightly flour the board and continue kneading for 3 more minutes. If dry, add 1 T of water at a time and incorporate. The dough should be elastic and a little sticky. Continue to knead for another 3 minutes, remembering to dust your board when necessary. Wrap the dough in plastic and allow to rest for 30 minutes at room temperature. Note: do not skip the kneading or resting portion of this recipe, they are essential for a light pasta.
  3. To Make Filling:
  4. In a saucepan on stove over medium heat, put in the milk, cream, salt, and vinegar. Bring to a medium heat and boil where it starts to separate. Put in a mesh colander over a bowl until liquid is drained.
  5. On stove top, heat medium sauté pan and add 2 T butter and melt. Add shallots and cook down. Add ⅛ cup of marsala wine and cook until caramelized.
  6. Take ricotta and put in a bowl and fold in caramelized shallots. Mixture shouldn't need salt and pepper but season to taste. If it is a little "thin" fold in some freshly grated parmigiano cheese as you don't want a "runny filling".
  7. To Make Angolotti:
  8. Cut dough into 8 sections and cover unused portion with damp cloth to avoid drying out. With a hand pasta machine or kitchen aide attachment set at widest setting, take a piece of pasta and press flat and pass through rollers, dust with flour and repeat on same setting, fold in half and repeat again, change setting to next smallest and run pasta through twice. Dust pasta if needed and repeat process on all until pass through second to last setting. Repeat this for all of the pasta and put the strips on a floured work surface.
  9. To form agnolotti, take a strip of pasta and place 1 tablespoon of filling 1 inch from the edge and 2-3 inches apart down the pasta strip. Brush pasta dough edges and in-between filling lightly with water. Take the pasta and fold op of over filling and pinch closed. Press dough flat between lumps of filling. Using a pastry/pasta cutter, preferably fluted, cut half moons using folded part as flat side of moon. If your cutter is smooth or you are using a knife, go back and press lightly with a fork to make indents. Continue until pasta and filling are finished and put on floured trays.
  10. To Make Shrimp Sauce:
  11. Preheat oven to 400. Rinse shrimp and add to bowl. Put in some olive oil and salt and pepper and toss together. About 5 minutes before boiling ravioli, spread shrimp on a cookie sheet and put in oven for 10-11 minutes.
  12. On stove top in a medium sauce pan, add 2 sticks of butter (can add more if needed and depending on serving amount), melt on medium-low until starts to become a brown butter. Don't do this step too soon or the butter will continue to brown and get burnt. If you do ahead, pour into a bowl and then reheat when ready.
  13. When shrimp are done, add to butter and cover to keep warm while angolotti are cooking.
  14. To Cook Angolotti:
  15. In a wide dutch oven pot, fill about ¾ full with water and bring to a boil. Add salt (salty as the sea) and carefully put in angolotti. Becareful NOT to overcrowd so do in batches if necessary. Cook about 5 - 7 minutes or until tender and remove with a slotted spoon onto a tray or into pasta bowls. If using pasta bowls, heat them slightly in microwave so that pasta isn't going into cool bowl. Repeat until done. Spoon over shrimp sauce and top with fresh parmigiano and fresh parsley. Serve immediately.
3.2.2885

Shrimp3 

Filed Under: Fish and Seafood, Pasta, Pizza, and Polenta Tagged With: angolotti, Butter, caramelized, fresh, marsala, Parmigiano, parsley, pasta, ricotta, Shallots, shrimp

Classic Valencia Paella

November 7, 2014 by Michelle Michelotti-Martinez

IMG_4493

Madrid Spain is one of my favorite cities in the world. Cosmopolitan and full of history, outstanding museums and sites, and INCREDIBLE FOOD (the male flamenco dancers are pretty amazing too but we will leave that for another post :)!!!

The coolest thing about the Spanish is that they start their day at about 10, stop for lunch around 1, siesta from 2-4, work from 4-8, and then their evening begins. They adore being out and about, young and old, it doesn’t matter. It is SO refreshing to see kids playing in the streets while the parents visit and take in a meal or a stroll. I totally dig it.

Typically, they don’t just hit a restaurant for dinner although, that may be slowly changing with the influx of tourism but instead, start out by “tapa-hopping”. This is so awesome….they go to a local tapa bar, order a sangria or drink of choice, pick a tapa or two (small appetizers), share with friends and then off to the next spot. This goes on till about 10 or 11 when it comes time to gather at a restaurant for the main course. After this, dancing till 2 or 3……gotta love it!

On my first night in Madrid, we decided to try this ritual; I mean, “When in Rome, do as the Romans do, right?” Plus we are suckers for trying whatever is new and part of the culture. Anyway, we made it through with flying colors for the first 4-tapa stops and I am thinking “seriously, this rocks, I must have been a Spaniard in my last life!” Partying for 6 hours every night? What????

Time came for the main course and our hotel concierge led us to the direction of paella, the infamous rice dish of Spain. We pranced off to the hot spot only to be stopped about a block away with a line of giddy and hungry patrons. We asked the group in front of us if this was “normal” or should we try another place less busy? They looked at one another and giggled, I am sure thinking….AMERICANS, and answered back that all of Madrid comes out at night so hunker down and grab another sangria! NICE!! I can follow directions…

Another 2 sangrias and we finally made it into the restaurant to be seated at a cozy table bustling with laughter and pan after pan of mouth-watering paella. We were salivating!

We perused the menu consisting of 50+ varieties of paella, each one made to order, and realized we probably still were at least an hour away from chow time and it was nearing midnight. It wasn’t helping that the flowing glasses of sangria throughout the tapa bars and in line were finally catching up to me and my eyes were getting so heavy that it felt like someone was standing on the lids. Great, I see it now, the paella comes and I fall face first into it, what a rock star partier. Pathetic.

I managed to somehow stay awake and sober up and when the paella was presented to us, we were ready to devour! We stayed classic and ordered the Valencia paella, laced with chorizo, chicken, seafood, veggies, and topped with huge mussels and clams. Not only did it look delicious it was a culinary art piece. It was colorful and carefully crafted and each piece of food was meticulously placed in a methodical order, it was amazing…no wonder it took an hour, it was worth it and we hadn’t even taken a bite. We look at each other and decided if it tastes as good as it looks, we are moving in.

It did and more. We finished it all, it was 2am and dancing would have to wait.

IMG_4496

Classic Valencia Paella
 
Print
Prep time
1 hour 30 mins
Cook time
1 hour
Total time
2 hours 30 mins
 
This is one of my all time favorite dishes to cook for a party along with a bunch of tapas and the evening can carry on as though we are on the streets of Spain. Cava On!
Author: Michelle Michelotti-Martinez
Recipe type: Entree
Cuisine: Spanish
Serves: 10
Ingredients
  • 10 cup Paella Pan
  • 6 cups chicken broth
  • ½ ounce saffron (about 8 threads)
  • ½ tsp sea salt
  • ⅛ tsp black pepper
  • 2 red bell peppers
  • ¼ cup olive oil
  • 10 skinless chicken thighs cut in thirds
  • ¾ lb pound Spanish chorizo sausage
  • 1½ pounds med-sized shrimp (raw)
  • 1 pound sea scallops cut in thirds
  • 3 cloves garlic chopped
  • 1 med sweet onion chopped
  • ½ tsp turmeric
  • 2 cups arborio or bomba rice
  • ½ cup white wine (Sauvignon blanc preferred)
  • 4 med ripe tomatoes (cut in half, grate, and discard the skin)
  • 2 tsp sweet paprika
  • 25 mussels or clams
  • ½ cup peas, fresh or frozen
  • Lemon wedges for garnish
Instructions
  1. Heat chicken stock on stove in large pot with saffron, salt and pepper. Steep on low heat until adding it to paella.
  2. Roast peppers under broiler until charred on all sides, remove and put in plastic bag to steam, about 5 to 10 minutes. Remove and gently peel, remove seeds and veins. Slice in strips and set aside.
  3. In paella pan, either on stove, barbecue, or paella burner, add olive oil until somewhat hot. Add chicken and cook until 80 percent done. Add a little salt and pepper to start building flavor. Remove and cover. Add sausage in same oil until flavor is distiller into oil. Remove and save. Add shrimp and cook until there is color. Remove and cover. Add scallops and cook till translucent. Add a little oil if needed.
  4. In same oil add garlic for about 20 seconds and then onion. Add a little salt and pepper. Stir until translucent.
  5. Take measured rice and create well, add turmeric and spread over onion and garlic. Add grated tomato and paprika and stir. Now this is all being flavored with ingredients that went into oil, flavor will flow into rice as paella cooks. Cook this for 3 minutes. Add wine and stir. Raise temp underneath pan for a couple of minutes and then add stock, stir. Turn heat down until liquid has mixed well with other ingredients.
  6. Start putting in chicken and mussels or clams, spread evenly. Add sausage, shrimp, and scallops the same way.
  7. Observe at rate liquid is absorbing the rice, if too watery at beginning, fine. You want low simmer so paella cooks evenly.
  8. Cover with foil and simmer for about 45 minutes. DON'T STIR!
Notes
ADDITIONAL TIPS:
DRY VS MOIST
The paella can stay moist for about 20 minutes, if left too long on fire, it will dry. A lot of Spaniards like it crusty on bottom and some soupy, you choose.
FINISHING TOUCHES
Just 5 minutes before done, put on bell peppers and peas. Place decoratively for color. Place on table and eat out of pan or buffet style and serve with lemon wedges
PREPARATION
The French have a wonderful saying, mise en place, meaning to have everything in place and chopped, cleaned, and ready.
SEAFOOD
Keep clams or mussels closed and cold before using them by immediately running them under cold water and washing them when you return from store. Use a wire mesh colander. Place a large plate underneath and put in fridge with a wet cloth over them, this keeps them moist and breathing. You want the shells closed, they will open during cooking. If they don't, throw them away.
SUBSTITUTIONS
You may substitute other shellfish and various vegetables to match to your liking be creative!!!
SHOPPING TIPS:
Shopping can be done 2 days ahead for all ingredients except for chicken and seafood, purchase these the same day you cook paella. It is essential to use arborio or bomba rice, other types don't hold up to cooking.
3.2.2802

Filed Under: Entrees, Fish and Seafood Tagged With: bell peppers, chicken, clams, mussels, paella, peas, rice, saffron, seafood, spanish, valencia

  • Page 1
  • Page 2
  • Next Page »

Primary Sidebar

Meet Michelle and Enrique

Eatentions is a way of being with our food experience. It is a thought-filled process starting with connection to source all the way through the finished creation. We like to call it "from root to experience". Its the entire thing, its that conscious. Thank you for popping by and welcome to our life.

Let’s Connect!

Archives

Categories


My Favorites

Arancini|Eatentions

Arancini

Torta Caprese

Torta Caprese

Lemon Pasta with Broiled Salmon and Charred Lemon|eatentions

Lemon Pasta with Broiled Salmon and Charred Lemon

Footer

Instagram

Instagram has returned invalid data.

Follow Me!

Connect With Us

  • Email
  • Facebook
  • Instagram
  • Pinterest
  • RSS
  • Twitter

We believe in celebrating amazing people, delicious food, great conversation, sustainability and experience. For us,our lives have always been about love, family, friends and sharing all things together. Connecting with people through food, sharing stories and supporting one another to live our dreams and our purpose is what inspires us daily.

My Favorites

Arancini|Eatentions
Torta Caprese

Copyright © 2026 · Foodie Pro & The Genesis Framework