• Skip to primary navigation
  • Skip to content
  • Skip to primary sidebar
  • Skip to footer

Eatentions

Organic * Local * Sustainable

  • Home
  • About Us
  • Recipes
  • Culinary Socials
  • CSM – Community Sourced Meals
  • Contact
  • Nav Social Menu

    • Facebook
    • Instagram
    • Pinterest
    • RSS
    • Snapchat
    • Twitter

Entrees

Grilled Iron Steak with Balsamic Soaked Raisin and Green Olive Salsa

August 28, 2015 by Michelle Michelotti-Martinez

Grilled Iron Steak with Balsamic Soaked Raisin and Green Olive Salsa

Grilled Iron Steak with Balsamic Soaked Raisin and Green Olive Salsa 1

Grilled Iron Steak with Balsamic Soaked Raisin and Green Olive Salsa 4

Who doesn’t LOVE the grilling season? I know for us, we do it 5 of the 7 nights of the week and make it a long evening of ritual and enjoyment.

While the grill heats, we usually check out the garden, talk about what is working and growing…..then we ewww and awww over the new flowers, herbs, and sprouts. I usually fill the bird feeder so we can hear the songs of chatter amongst them as they “frenzy” around the feeding tube while we peruse the backyard. We have such a lush oasis in the high desert of New Mexico and it just rocks.

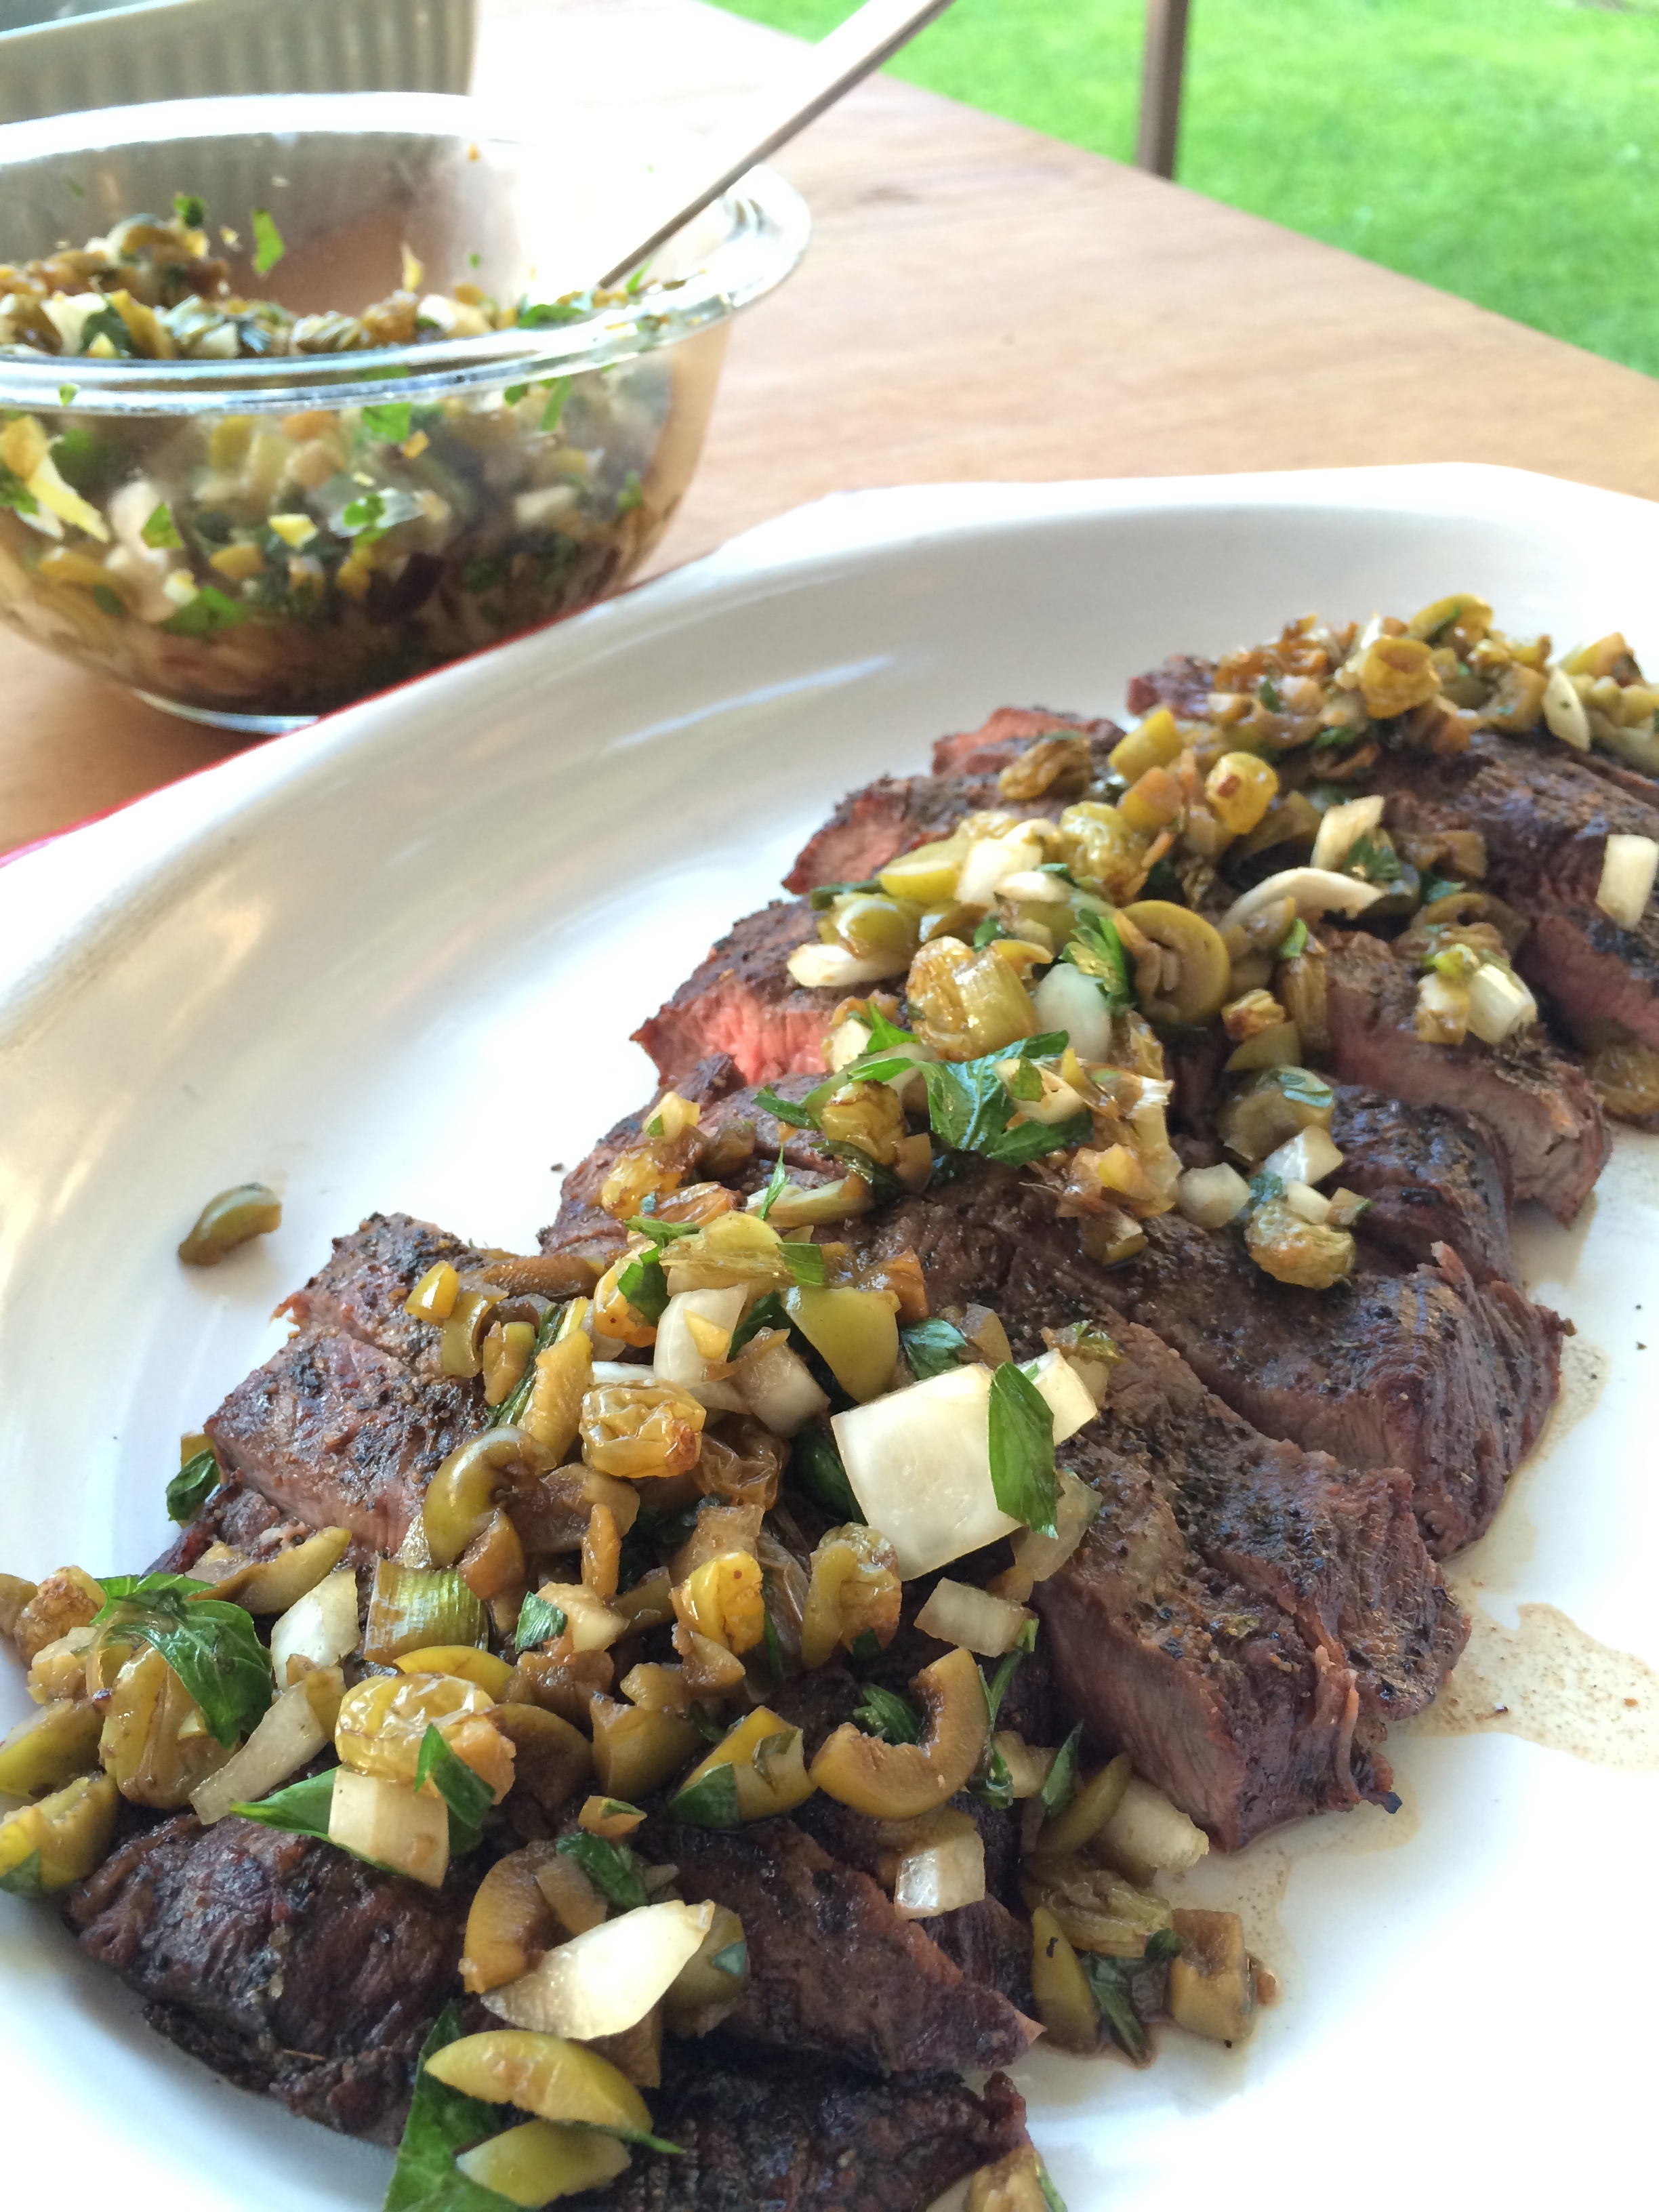
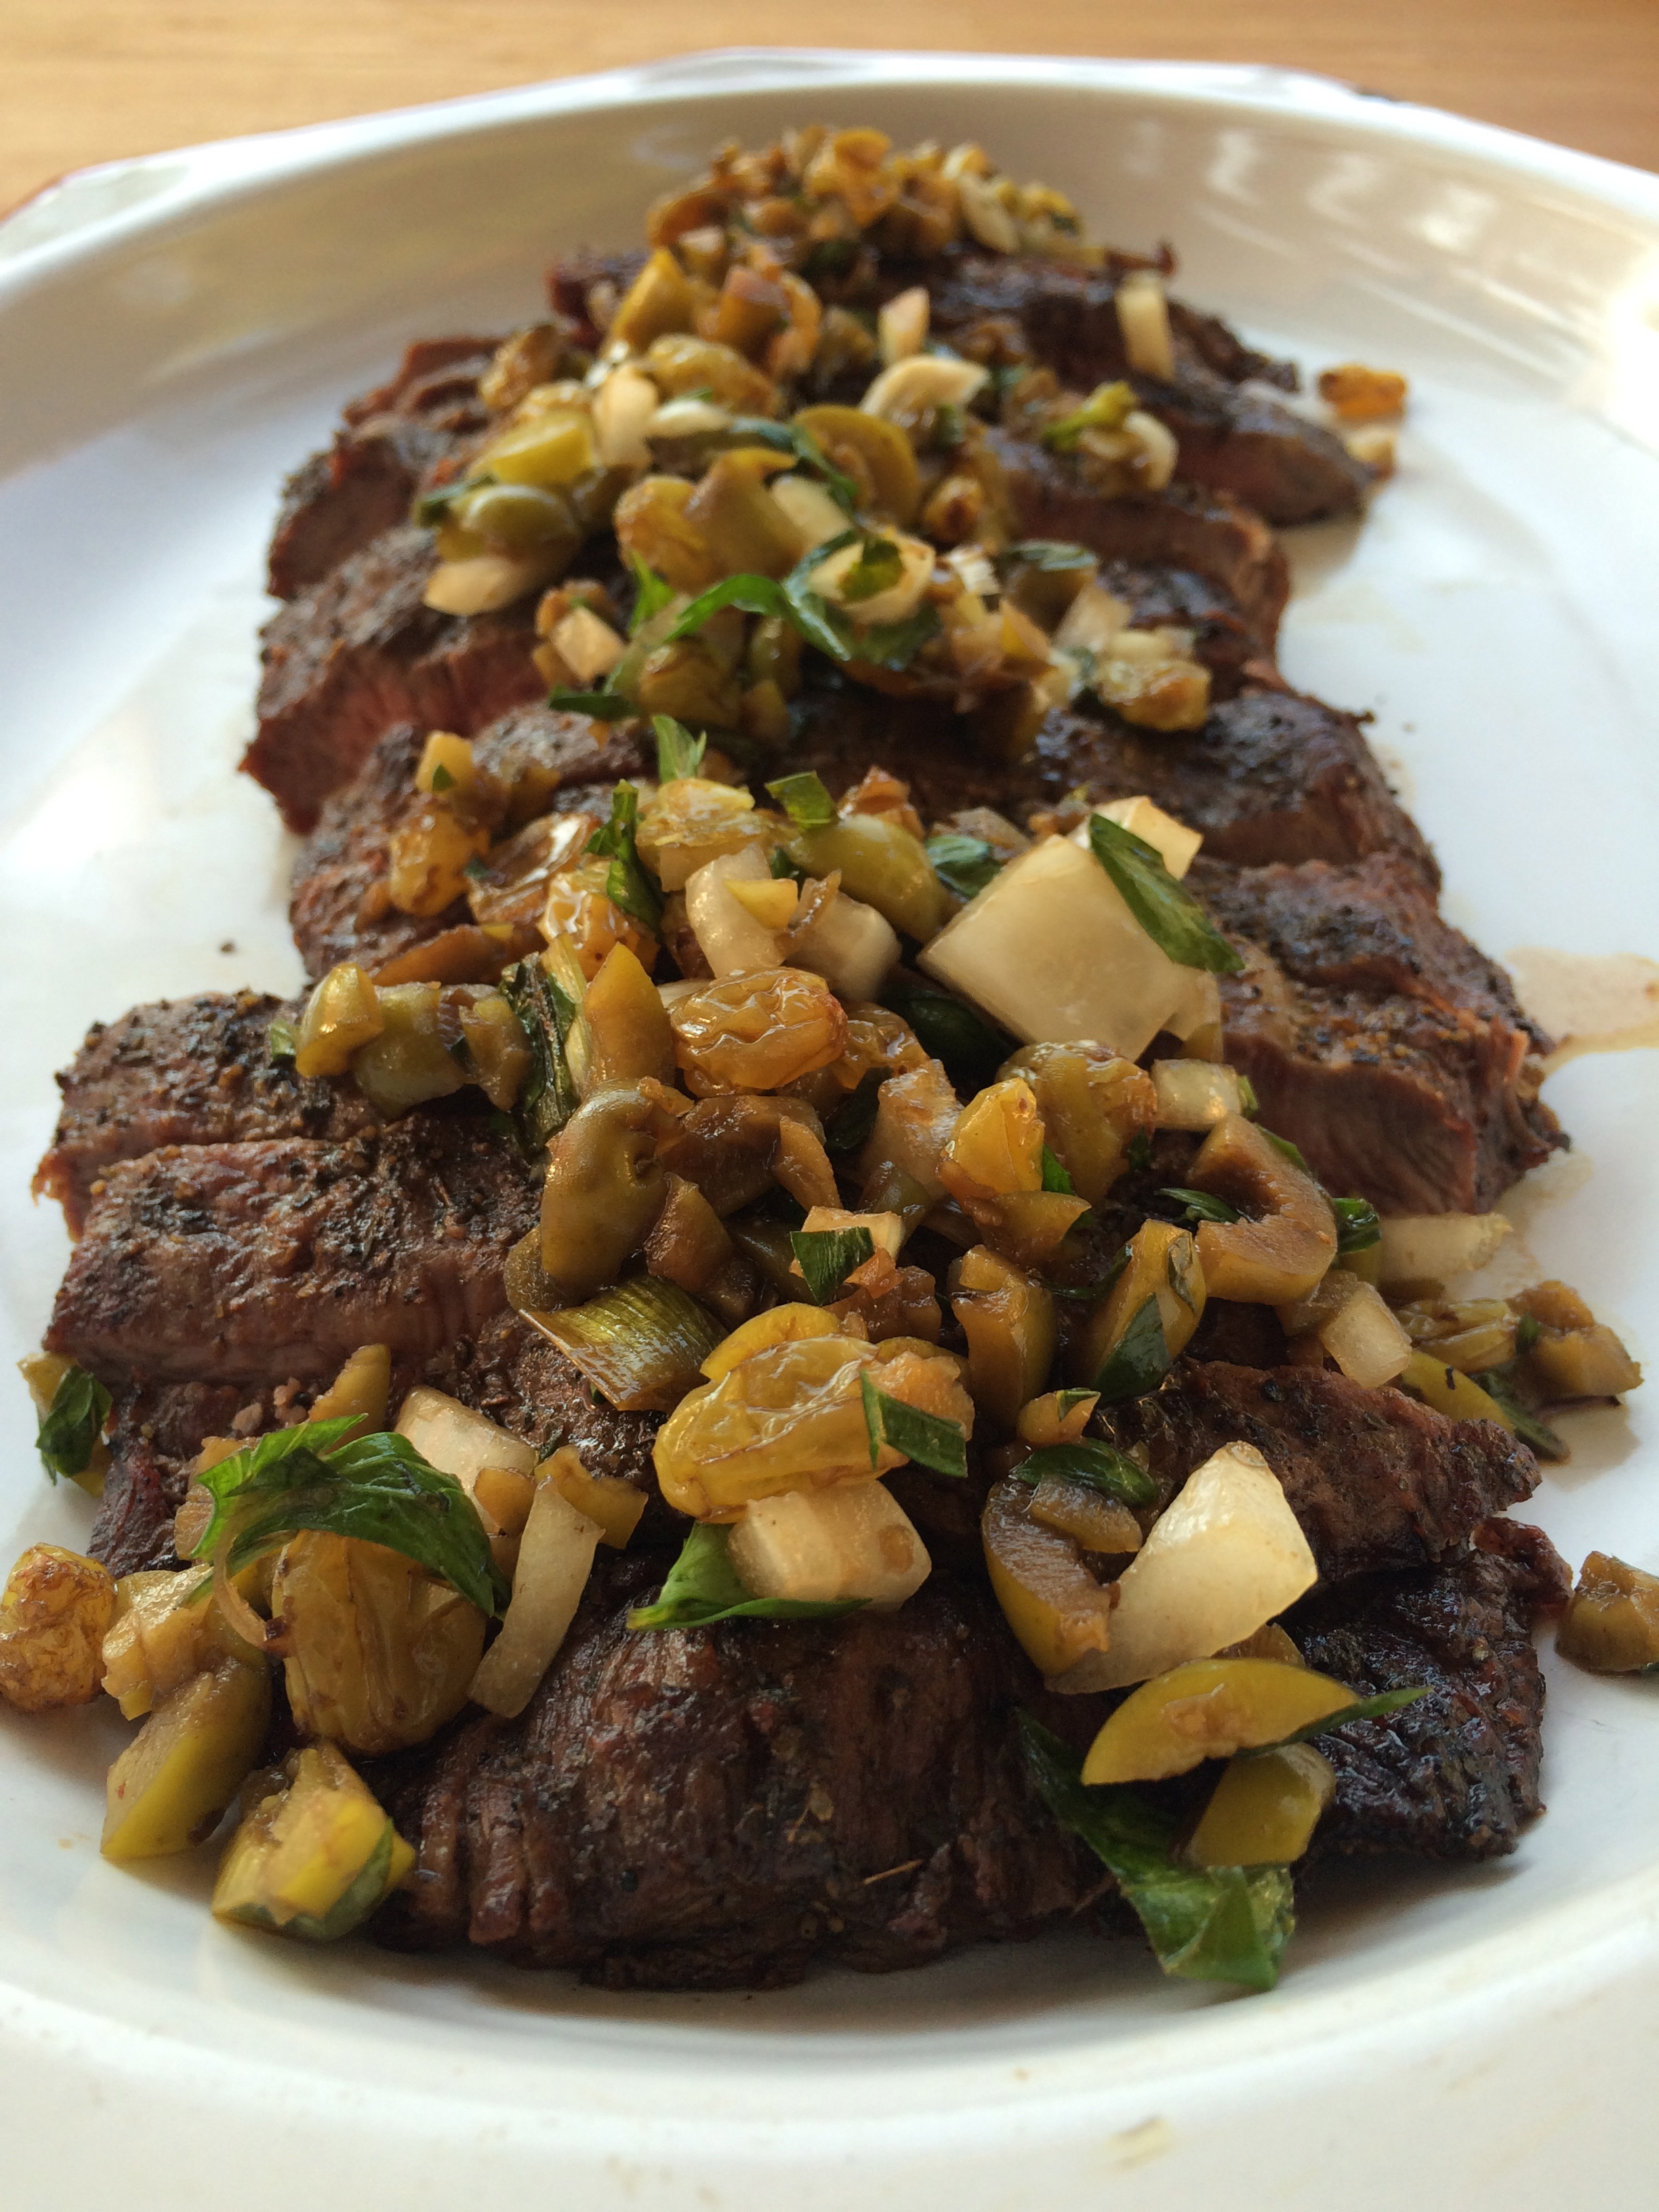
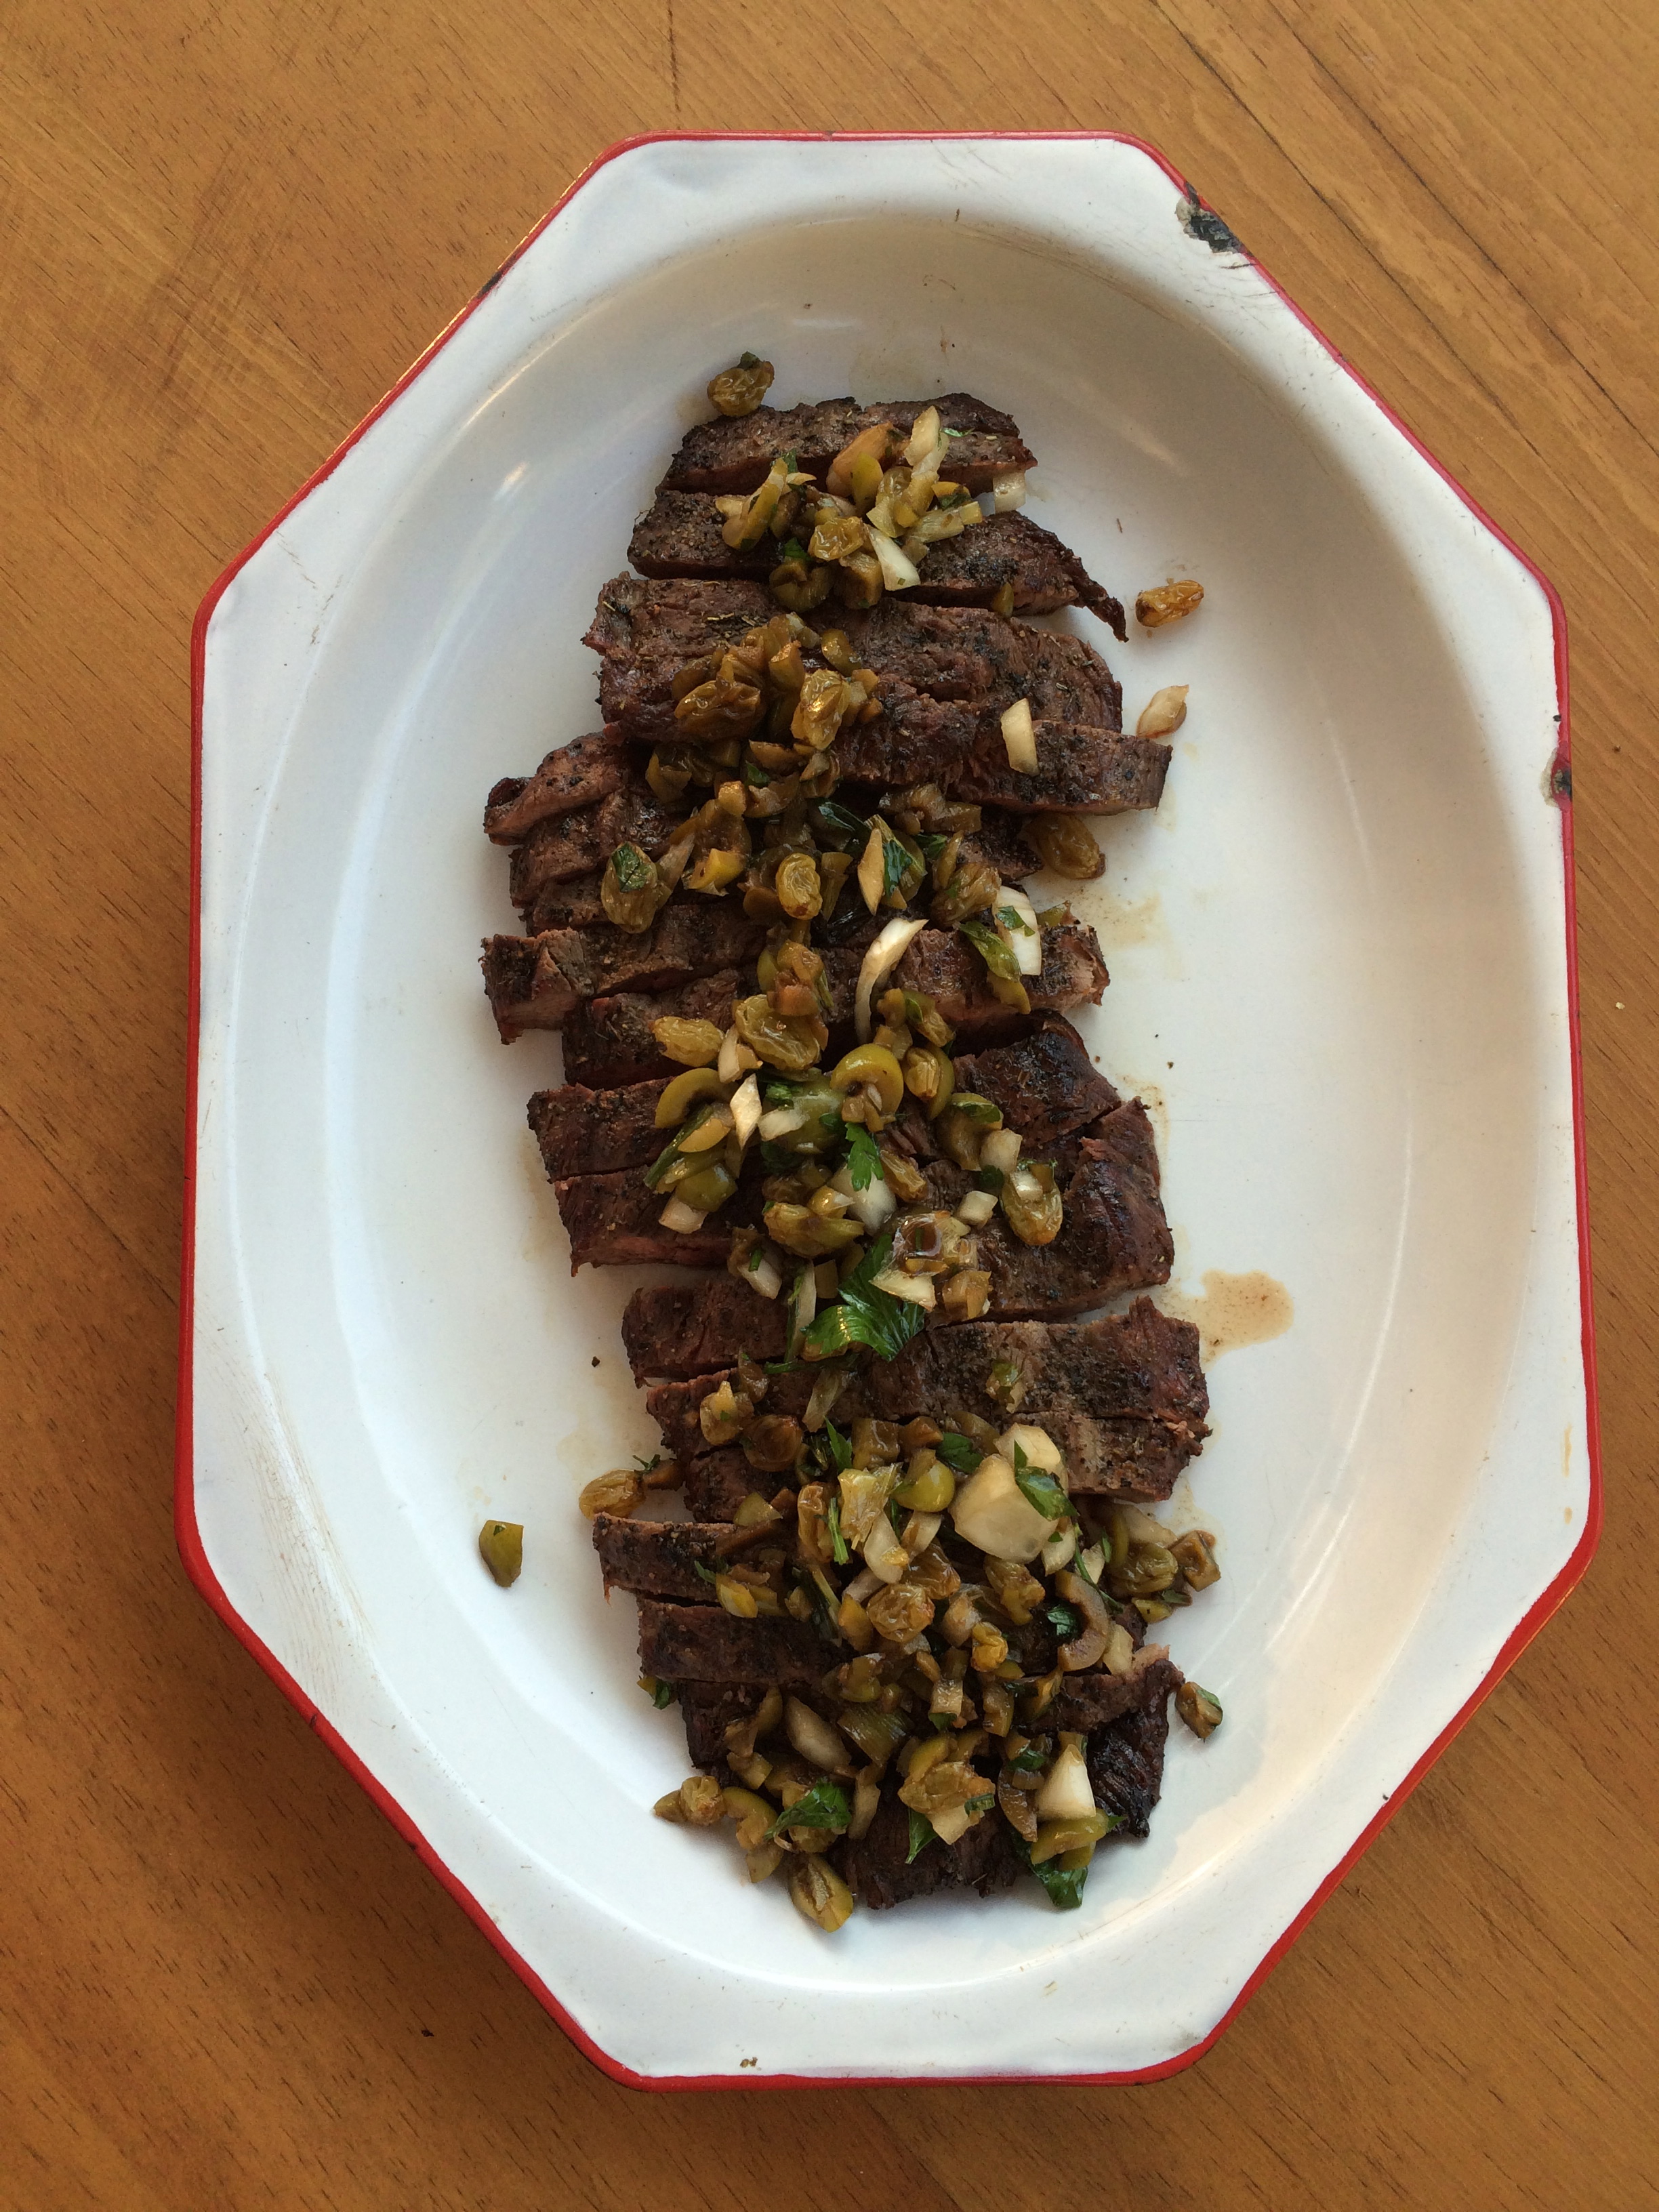
Okay, now back to the food which is our evening highlight and one of our favorites is to grill iron steak marinated in a dry rub and serve it with a balsamic soaked raisin and green olive salsa, the perfect marriage of sweet, acid, and salt.

Years ago, cuts like flank, iron, or skirt were considered the cheaper cuts and not really prized for any type of gourmet experience but now in the world of culinary diversion and experimentation, chefs and home cooks from around the globe have reignited these cuts with dry or wet rubs accompanied with salsas, sauces, pesto’s, and the like….they are still fairly inexpensive and totally fill our “grill cravings”!

So if you are looking for something really easy and delish, this dish is divine! We always double the salsa recipe and put out some fresh grilled corn tortillas to munch on while we wonder the oasis…….

Grilled Iron Steak with Balsamic Soaked Raisin and Green Olive Salsa
 
Print
Prep time
15 mins
Cook time
20 mins
Total time
35 mins
 
Author: Michelle Michelotti-Martinez
Recipe type: Main
Serves: 4-6
Ingredients
  • Iron Steak Rub:
  • 1-2 tablespoons chili powder
  • 1 tablespoon dark brown sugar or coconut palm sugar
  • 1½ teaspoons ground cumin
  • 1½ teaspoon dried oregano
  • 1 teaspoon ground coriander
  • 1 teaspoon garlic powder
  • 1 teaspoon sea salt
  • 1 teaspoon fresh cracked pepper
  • 2 lbs iron steak brought to room temperature
  • 1 tablespoon olive oil
  • Balsamic Soaked Raisins and Green Olive Salsa:
  • 3 tablespoons cilantro, chopped
  • 3 tablespoons chopped white onion
  • ⅓ cup green olives, chopped
  • 2 tablespoons raisins
  • ½ cup balsamic vinegar
Instructions
  1. Iron Steak Rub:
  2. Mix all ingredients in a bowl.
  3. About 2-3 hours before grilling, sprinkle steak with spice rub on both sides, cover and put in fridge. Remove from fridge 30 minutes before grilling.
  4. Turn grill onto medium high heat. Cook steaks for about 15-20 or until medium rare. Remove from grill and let rest 10 minutes and then slice.
  5. How to Make Balsamic Soaked Raisins and Green Olive Salsa:
  6. Put raisins and balsamic vinegar in a small saucepan. Heat, then reduce to low and simmer until balsamic is reduced by at least half and raisin are plumped. Remove raisins with a slotted spoon, letting the reduced balsamic drip out, and put them in a bowl with the olives, cilantro, and chopped onion.
3.3.3077


Filed Under: Entrees, Meat and Poultry Tagged With: balsamic vinegar, green olive, iron steak, onion, raisins

Classic Valencia Paella

November 7, 2014 by Michelle Michelotti-Martinez

IMG_4493

Madrid Spain is one of my favorite cities in the world. Cosmopolitan and full of history, outstanding museums and sites, and INCREDIBLE FOOD (the male flamenco dancers are pretty amazing too but we will leave that for another post :)!!!

The coolest thing about the Spanish is that they start their day at about 10, stop for lunch around 1, siesta from 2-4, work from 4-8, and then their evening begins. They adore being out and about, young and old, it doesn’t matter. It is SO refreshing to see kids playing in the streets while the parents visit and take in a meal or a stroll. I totally dig it.

Typically, they don’t just hit a restaurant for dinner although, that may be slowly changing with the influx of tourism but instead, start out by “tapa-hopping”. This is so awesome….they go to a local tapa bar, order a sangria or drink of choice, pick a tapa or two (small appetizers), share with friends and then off to the next spot. This goes on till about 10 or 11 when it comes time to gather at a restaurant for the main course. After this, dancing till 2 or 3……gotta love it!

On my first night in Madrid, we decided to try this ritual; I mean, “When in Rome, do as the Romans do, right?” Plus we are suckers for trying whatever is new and part of the culture. Anyway, we made it through with flying colors for the first 4-tapa stops and I am thinking “seriously, this rocks, I must have been a Spaniard in my last life!” Partying for 6 hours every night? What????

Time came for the main course and our hotel concierge led us to the direction of paella, the infamous rice dish of Spain. We pranced off to the hot spot only to be stopped about a block away with a line of giddy and hungry patrons. We asked the group in front of us if this was “normal” or should we try another place less busy? They looked at one another and giggled, I am sure thinking….AMERICANS, and answered back that all of Madrid comes out at night so hunker down and grab another sangria! NICE!! I can follow directions…

Another 2 sangrias and we finally made it into the restaurant to be seated at a cozy table bustling with laughter and pan after pan of mouth-watering paella. We were salivating!

We perused the menu consisting of 50+ varieties of paella, each one made to order, and realized we probably still were at least an hour away from chow time and it was nearing midnight. It wasn’t helping that the flowing glasses of sangria throughout the tapa bars and in line were finally catching up to me and my eyes were getting so heavy that it felt like someone was standing on the lids. Great, I see it now, the paella comes and I fall face first into it, what a rock star partier. Pathetic.

I managed to somehow stay awake and sober up and when the paella was presented to us, we were ready to devour! We stayed classic and ordered the Valencia paella, laced with chorizo, chicken, seafood, veggies, and topped with huge mussels and clams. Not only did it look delicious it was a culinary art piece. It was colorful and carefully crafted and each piece of food was meticulously placed in a methodical order, it was amazing…no wonder it took an hour, it was worth it and we hadn’t even taken a bite. We look at each other and decided if it tastes as good as it looks, we are moving in.

It did and more. We finished it all, it was 2am and dancing would have to wait.

IMG_4496

Classic Valencia Paella
 
Print
Prep time
1 hour 30 mins
Cook time
1 hour
Total time
2 hours 30 mins
 
This is one of my all time favorite dishes to cook for a party along with a bunch of tapas and the evening can carry on as though we are on the streets of Spain. Cava On!
Author: Michelle Michelotti-Martinez
Recipe type: Entree
Cuisine: Spanish
Serves: 10
Ingredients
  • 10 cup Paella Pan
  • 6 cups chicken broth
  • ½ ounce saffron (about 8 threads)
  • ½ tsp sea salt
  • ⅛ tsp black pepper
  • 2 red bell peppers
  • ¼ cup olive oil
  • 10 skinless chicken thighs cut in thirds
  • ¾ lb pound Spanish chorizo sausage
  • 1½ pounds med-sized shrimp (raw)
  • 1 pound sea scallops cut in thirds
  • 3 cloves garlic chopped
  • 1 med sweet onion chopped
  • ½ tsp turmeric
  • 2 cups arborio or bomba rice
  • ½ cup white wine (Sauvignon blanc preferred)
  • 4 med ripe tomatoes (cut in half, grate, and discard the skin)
  • 2 tsp sweet paprika
  • 25 mussels or clams
  • ½ cup peas, fresh or frozen
  • Lemon wedges for garnish
Instructions
  1. Heat chicken stock on stove in large pot with saffron, salt and pepper. Steep on low heat until adding it to paella.
  2. Roast peppers under broiler until charred on all sides, remove and put in plastic bag to steam, about 5 to 10 minutes. Remove and gently peel, remove seeds and veins. Slice in strips and set aside.
  3. In paella pan, either on stove, barbecue, or paella burner, add olive oil until somewhat hot. Add chicken and cook until 80 percent done. Add a little salt and pepper to start building flavor. Remove and cover. Add sausage in same oil until flavor is distiller into oil. Remove and save. Add shrimp and cook until there is color. Remove and cover. Add scallops and cook till translucent. Add a little oil if needed.
  4. In same oil add garlic for about 20 seconds and then onion. Add a little salt and pepper. Stir until translucent.
  5. Take measured rice and create well, add turmeric and spread over onion and garlic. Add grated tomato and paprika and stir. Now this is all being flavored with ingredients that went into oil, flavor will flow into rice as paella cooks. Cook this for 3 minutes. Add wine and stir. Raise temp underneath pan for a couple of minutes and then add stock, stir. Turn heat down until liquid has mixed well with other ingredients.
  6. Start putting in chicken and mussels or clams, spread evenly. Add sausage, shrimp, and scallops the same way.
  7. Observe at rate liquid is absorbing the rice, if too watery at beginning, fine. You want low simmer so paella cooks evenly.
  8. Cover with foil and simmer for about 45 minutes. DON'T STIR!
Notes
ADDITIONAL TIPS:
DRY VS MOIST
The paella can stay moist for about 20 minutes, if left too long on fire, it will dry. A lot of Spaniards like it crusty on bottom and some soupy, you choose.
FINISHING TOUCHES
Just 5 minutes before done, put on bell peppers and peas. Place decoratively for color. Place on table and eat out of pan or buffet style and serve with lemon wedges
PREPARATION
The French have a wonderful saying, mise en place, meaning to have everything in place and chopped, cleaned, and ready.
SEAFOOD
Keep clams or mussels closed and cold before using them by immediately running them under cold water and washing them when you return from store. Use a wire mesh colander. Place a large plate underneath and put in fridge with a wet cloth over them, this keeps them moist and breathing. You want the shells closed, they will open during cooking. If they don't, throw them away.
SUBSTITUTIONS
You may substitute other shellfish and various vegetables to match to your liking be creative!!!
SHOPPING TIPS:
Shopping can be done 2 days ahead for all ingredients except for chicken and seafood, purchase these the same day you cook paella. It is essential to use arborio or bomba rice, other types don't hold up to cooking.
3.2.2802

Filed Under: Entrees, Fish and Seafood Tagged With: bell peppers, chicken, clams, mussels, paella, peas, rice, saffron, seafood, spanish, valencia

Spaghetti Squash Boat with Roasted Tomato Sauce

October 28, 2014 by Michelle Michelotti-Martinez

IMG_5199

I do have to confess that the idea of eating spaghetti squash vs real pasta didn’t excite my universe too much. My mom tried to pass it off as the same but when you are a kid, pasta is pasta, right? You know, gooey goodness of mac and cheese or lasagna, it’s the best taste in the world, ever. How I am supposed to pretend that a stringy squash is gonna give me similar excitement and pleasure…NOT.

It didn’t stop her tenacity and she was Italian so I pretty much had to hush up and eat it and like it. There wasn’t a separate menu for those of us on the picket line, just a pass to our room on an empty stomach. She didn’t worry too much if our tummy’s growled or we dramatically entered out of our room before bed crying with hunger pains. Back then we either ate what was at dinner or waited until breakfast to see if we still were picketing or back into the land of the living. Anyone relate?

I do have to thank her diligence, no doubt because now I completely adore spaghetti squash. It’s a weekly staple at our house for dinner and my favorite prep is a simple roasted tomato sauce with onions, garlic, and basil. All sourced out of our garden and canned…..savoring goodness all year long.

Thanks mom, tenacity pays…..

Spaghetti Squash Boat with Roasted Tomato Sauce
 
Print
Prep time
15 mins
Cook time
45 mins
Total time
1 hour
 
This is a simple weeknight delight that is both delicious and healthy. If you don't have fresh tomatoes, canned will work
Author: Michelle Michelotti-Martinez
Recipe type: Entree
Cuisine: Farm to Table
Serves: 2
Ingredients
  • 1 spaghetti squash, cut in half and placed face down on a cookie sheet
  • 6 large tomatoes, placed on a cookie sheet lined with parchment to roast (can substitute 28 ounce can of diced tomatoes, preferably San Marzano or Pomi)
  • 1 medium sweet onion, diced
  • 4 garlic cloves, minced
  • 3 T olive oil
  • Bunch of basil
  • Sea salt and fresh ground pepper to taste
  • Grated pecorino cheese for serving
Instructions
  1. Heat oven to 350 and put in spaghetti squash and tomatoes, roast until done, about 30 min for tomatoes and 45 min for squash
  2. When tomatoes are finished, place in blender or food processor and pulse until smooth
  3. In a medium saucepan, put in 3 T olive oil and heat. Add onion and sauté until translucent and add garlic, cook for 1 minute.
  4. Add tomatoes and cook for 15 minutes. Season with salt and pepper to taste.
  5. Add basil and cook for another 5-10 minutes
  6. When squash is done, turn over and scoop out seeds. Add marinara sauce and top with pecorino.
  7. Serve immediately
3.2.2802


Filed Under: Entrees, Vegetables Tagged With: basil, fall, Garlic, harvest, healthy, pecorino, sauce, Spaghetti squash, squash, tomatoes

Beef and Lamb Meatballs with Fava Beans and Lemon!

May 6, 2014 by Michelle Michelotti-Martinez

BEEF AND LAMB MEATBALLS WITH FAVA BEANS AND LEMON

This dish just makes me happy. I’m going to start this post with that statement because I can. It is just the BEST of all worlds when you bring in every element.

I found this brilliant gem in Yotam Ottolenghi’s book Jerusalem. This book is stacked full of simply delicious recipes and I find myself pouring through its contents on a regular basis.

What makes it fun is to read his memories of the dishes and go then back to the archives of my travel ventures and compare notes. While I haven’t been to Jerusalem, I have had the pleasure of eating many a delish meal heavily influenced by the Jewish traditions and ingredients.

So this trip down memory lane brings me to Spain, if you can believe that. Yeah, I know, it’s a bit FAR and I’m not even in the same arena but hang with me, there’s a story.

If you have ever had the chance to go to the Andalucía area of Spain, the food simply rocks, really. We ate our way through the cities, villages, train stations, wherever. Nowhere was disappointing.

On one of our gluttonous jaunts, we stumbled across a Moroccan restaurant in Rhonda, Spain. We found it off the beaten path from the old town center. The outside tables were across a small street in a park so of course we chose to sit there. Plus it was fun to watch the waiters carry food and drink out while dogging the cars zipping through the square. It was impressive and I wondered how they interviewed for their staff? “Looking for waiters who are talented in stunt work”.

The menu itself was an inch thick and I immediately thought, HOW can they be this good at ALL of this? Well, we were here and if nothing else, the entertainment was worth it and I can always drink wine.

I decided we would need 3 days to study the menu so we asked the stunt man, I mean waiter for his recommendations. As he started page by page, we quickly realized we just needed to entrust this multi-talented man with the task of satisfying our pallets.

He was very calculated as he chose the dishes he felt would please our curiosity and us; he didn’t disappoint. Three hours later, we were filled with the most exquisite combinations of spices, herbs, nuts, and fruits emulsified into sauces and dressed over appetizers, salads, and then fish and lamb. The flavors were so complex and their layers lingered through the entire experience of the dishes.

One of the highlight dishes we had were lamb meatballs laced with almonds, herbs, and various spices and then placed in a delicate sauce of lamb stock, beans, and onion. I dreamt of the restaurant and this dish for days and returned twice in hopes of conquering the menu but always ended up with this favorite.

This recipe takes me back to the park across the street from the little restaurant.

Beef and Lamb Meatballs with Fava Beans and Lemon!
 
Print
Prep time
30 mins
Cook time
50 mins
Total time
1 hour 20 mins
 
Pair up the fava bean with another springtime delicacy, lamb and finish it all with the brightness of lemon and you have the PERFECT dish! Mop this up with fresh pita bread OR serve it over basmati/orzo rice…perhaps do BOTH, which is my favorite! I also add a yogurt-tahini sauce to the top which mixes in a creaminess to the complex flavors.
Author: Adapted from Yotam Ottolenghi's book Jerusalem)
Recipe type: Entree
Cuisine: Middle Eastern
Serves: 6
Ingredients
  • For the meatballs
  • ½ lb minced beef
  • ½ lb minced lamb
  • 1 medium onion, finely chopped
  • 1 cup breadcrumbs
  • 2 tbsp each chopped flat-leaf parsley, mint, dill and coriander, plus ½ tbsp extra of each to finish
  • 2 large garlic cloves, crushed
  • 1 tbsp baharat spice mix, recipe below
  • 1 tbsp ground cumin
  • 2 tsp capers, chopped
  • 1 egg, beaten
  • 4½ tbsp olive oil
  • 1½ cups fava beans, fresh or frozen
  • 
4 whole thyme sprigs
  • 6 garlic cloves, sliced
  • 8 spring onions, cut at an angle into 2cm segments
  • 2½ tbsp lemon juice
  • 
2½ cups chicken stock
  • salt and black pepper
  • Baharat spice mix:
  • 4 tablespoons ground black pepper
  • 2 tablespoons ground coriander
  • Fresh cinnamon stick
  • 2 tablespoons ground cloves
  • 3 tablespoons ground cumin
  • 1 teaspoon ground cardamom
  • 4 teaspoons fresh nutmeg, grated
  • 4 tablespoons paprika
Instructions
  1. Put all the ingredients for the meatballs in a large bowl. Add three-quarters of a teaspoon of salt and plenty of black pepper, mix with your hands and form into balls about the size of ping-pong balls. Heat a tablespoon of olive oil in an extra-large frying pan for which you have a lid. Sear half the meatballs over a medium heat, turning them until they are brown all over – this will take about five minutes. Remove from the pan, add another half-tablespoon of oil to the pan and cook the other batch of meatballs. Once browned all over, remove these from the pan, too, then wipe it clean with paper towel.
  2. While the meatballs are cooking, throw the fava beans into a pot with plenty of salted boiling water and blanch for two minutes. Drain, refresh under cold water, then remove and discard the skins from half the fava beans.
  3. Heat the remaining oil in the meatball pan, add the thyme, garlic and spring onion, and sauté over a medium heat for three minutes. Add the unshelled fava beans, 1/1/2 tablespoons of the lemon juice, ⅓ cup of the stock, a ¼ teaspoon of salt and plenty of black pepper. The beans should be almost covered by liquid. Pop on the lid and cook over a low heat for 10 minutes.
  4. Return the meatballs to the pan, add the remaining stock, cover again and simmer gently for 25 minutes. Taste the sauce and adjust the seasoning. If it is still very runny, remove the lid and reduce a little. Once the meatballs stop cooking, they will soak up a lot of the juices, so make sure there is still plenty of sauce at this point. You can leave the meatballs now, off the heat, until you're ready to serve.
  5. Just before serving, reheat the meatballs and add a more broth, if needed, to get enough sauce. Gently stir in the remaining herbs, lemon juice and the shelled fava beans and serve immediately.
3.2.2802

Filed Under: Entrees, Meat and Poultry Tagged With: beef, broad beans, fava beans, fresh, lamb, lemon, meatballs, organic, spring

Primary Sidebar

Meet Michelle and Enrique

Eatentions is a way of being with our food experience. It is a thought-filled process starting with connection to source all the way through the finished creation. We like to call it "from root to experience". Its the entire thing, its that conscious. Thank you for popping by and welcome to our life.

Let’s Connect!

Archives

Categories


My Favorites

Arancini|Eatentions

Arancini

Torta Caprese

Torta Caprese

Lemon Pasta with Broiled Salmon and Charred Lemon|eatentions

Lemon Pasta with Broiled Salmon and Charred Lemon

Footer

Instagram

Instagram has returned invalid data.

Follow Me!

Connect With Us

  • Email
  • Facebook
  • Instagram
  • Pinterest
  • RSS
  • Twitter

We believe in celebrating amazing people, delicious food, great conversation, sustainability and experience. For us,our lives have always been about love, family, friends and sharing all things together. Connecting with people through food, sharing stories and supporting one another to live our dreams and our purpose is what inspires us daily.

My Favorites

Arancini|Eatentions
Torta Caprese

Copyright © 2026 · Foodie Pro & The Genesis Framework