• Skip to primary navigation
  • Skip to content
  • Skip to primary sidebar
  • Skip to footer

Eatentions

Organic * Local * Sustainable

  • Home
  • About Us
  • Recipes
  • Culinary Socials
  • CSM – Community Sourced Meals
  • Contact
  • Nav Social Menu

    • Facebook
    • Instagram
    • Pinterest
    • RSS
    • Snapchat
    • Twitter

Michelle Michelotti-Martinez

Easy Homemade Ciabatta Bread

November 24, 2014 by Michelle Michelotti-Martinez

IMG_5450

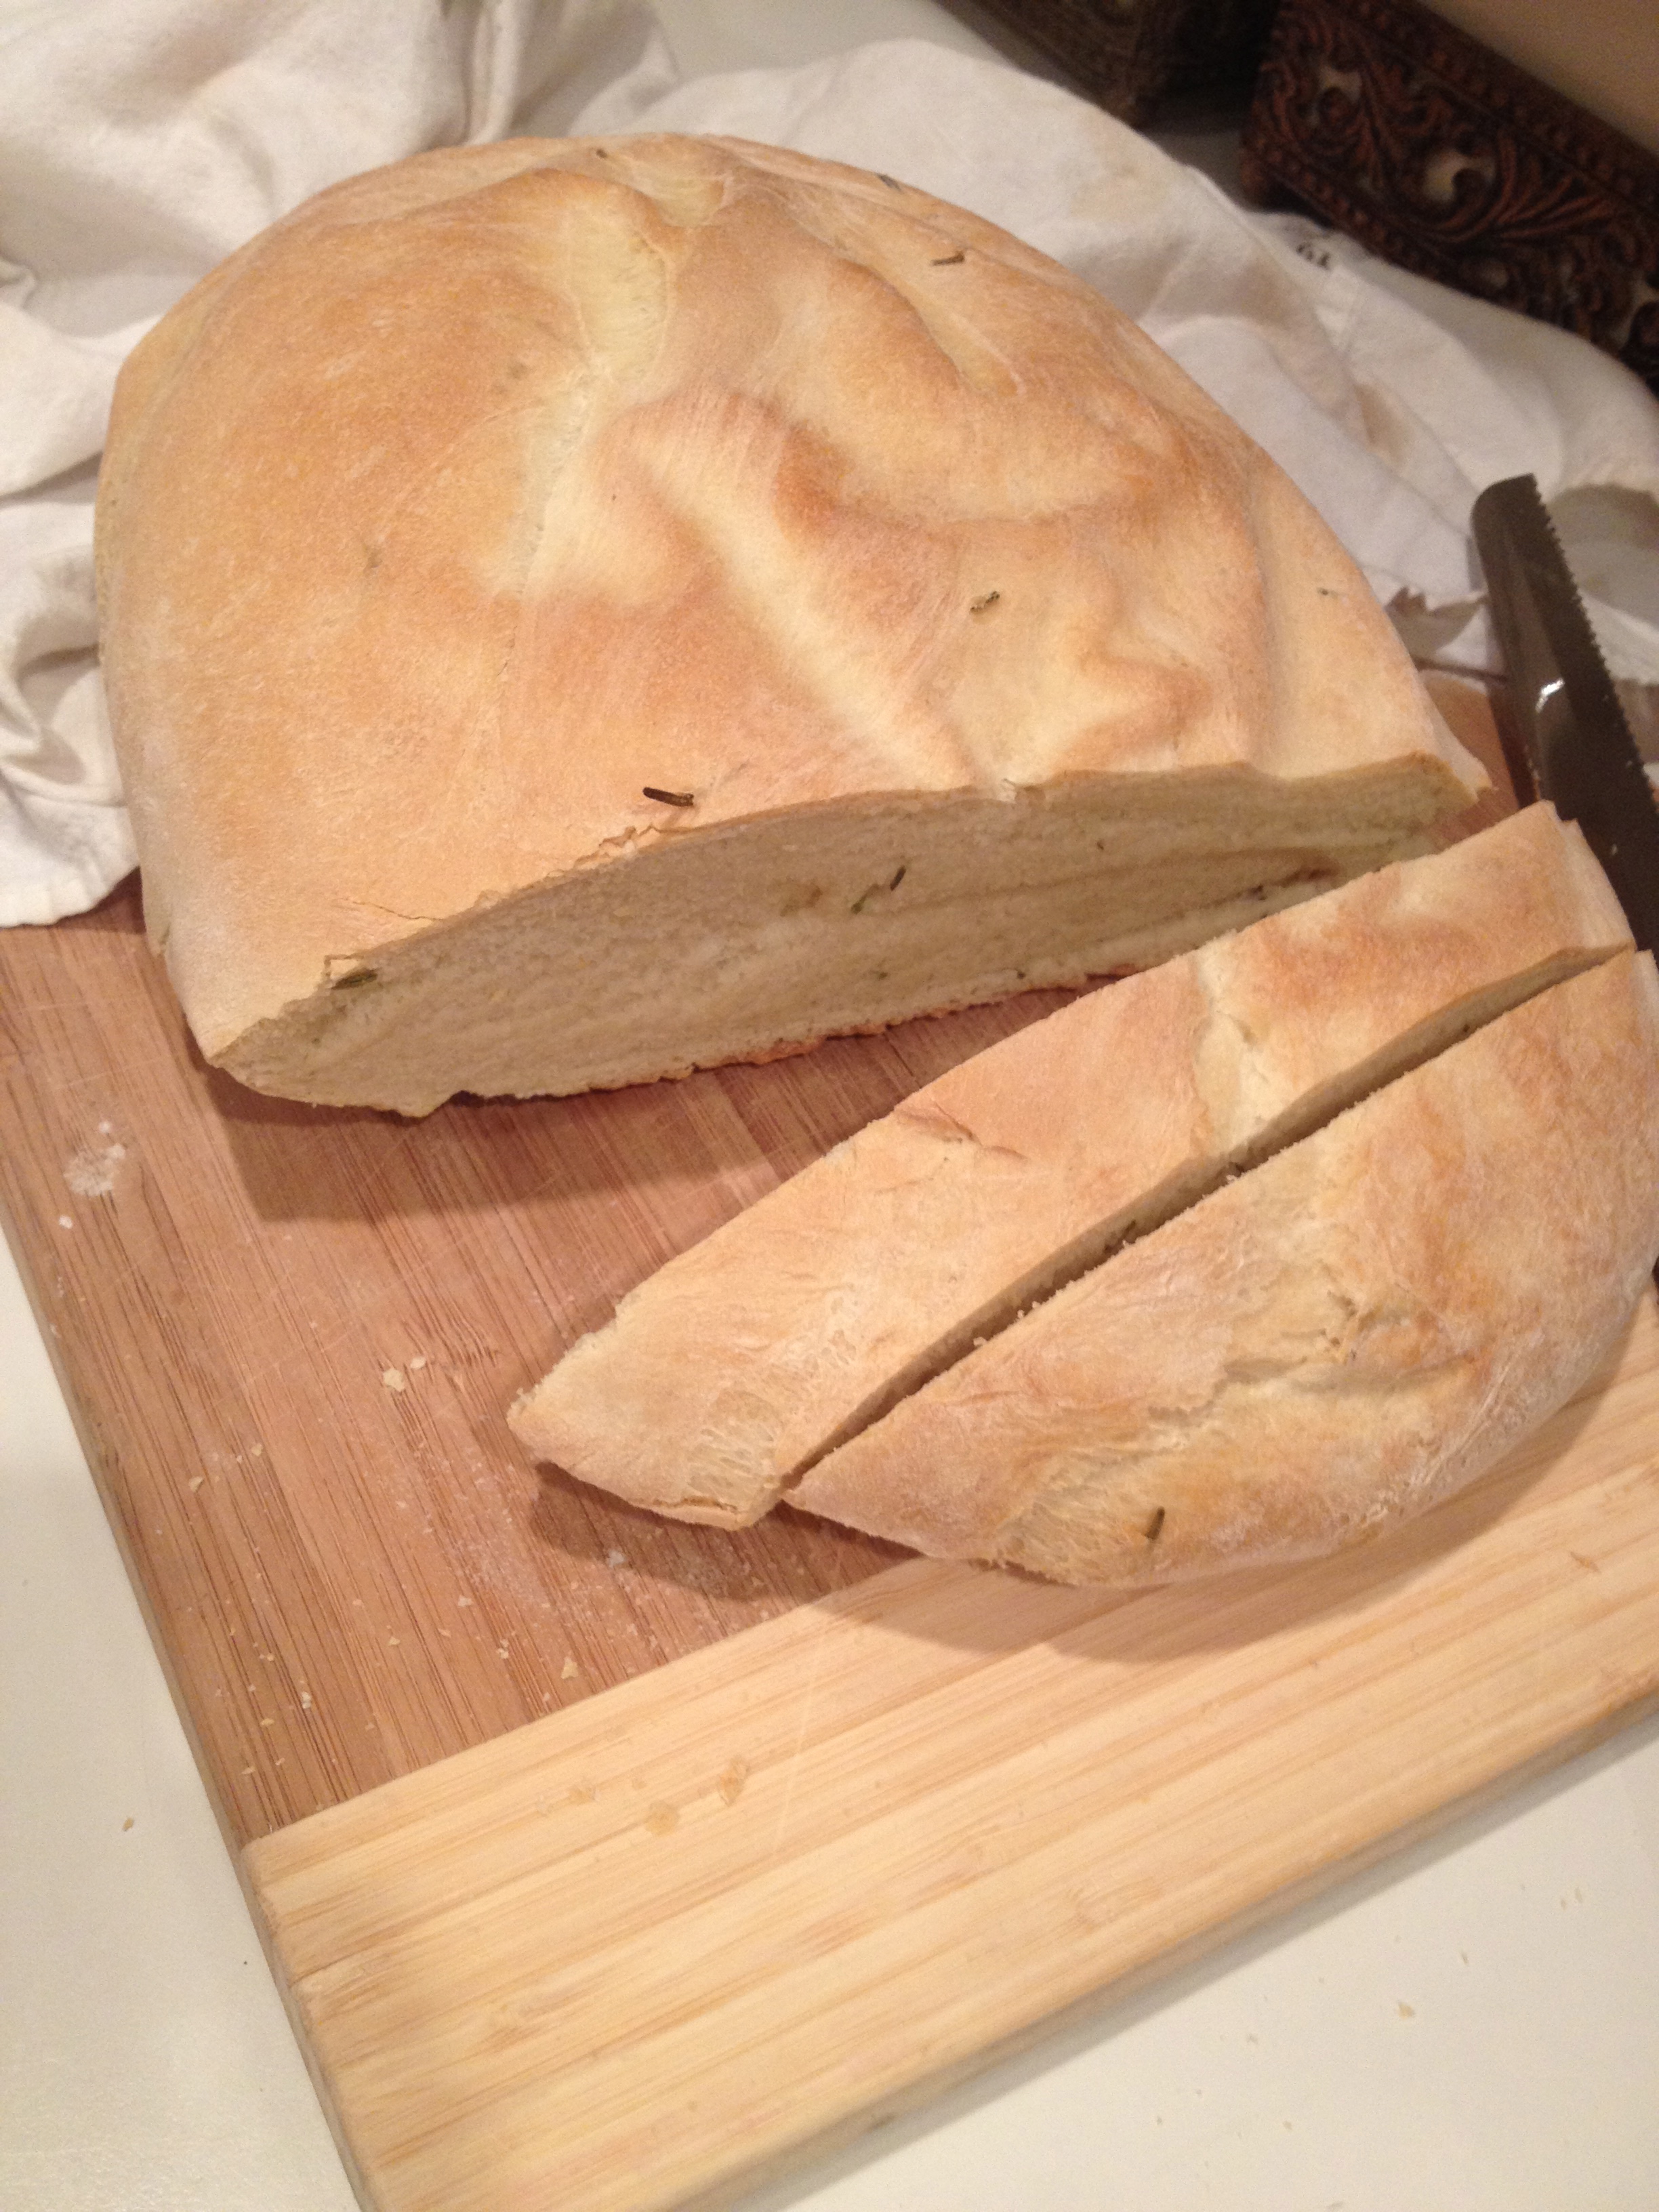
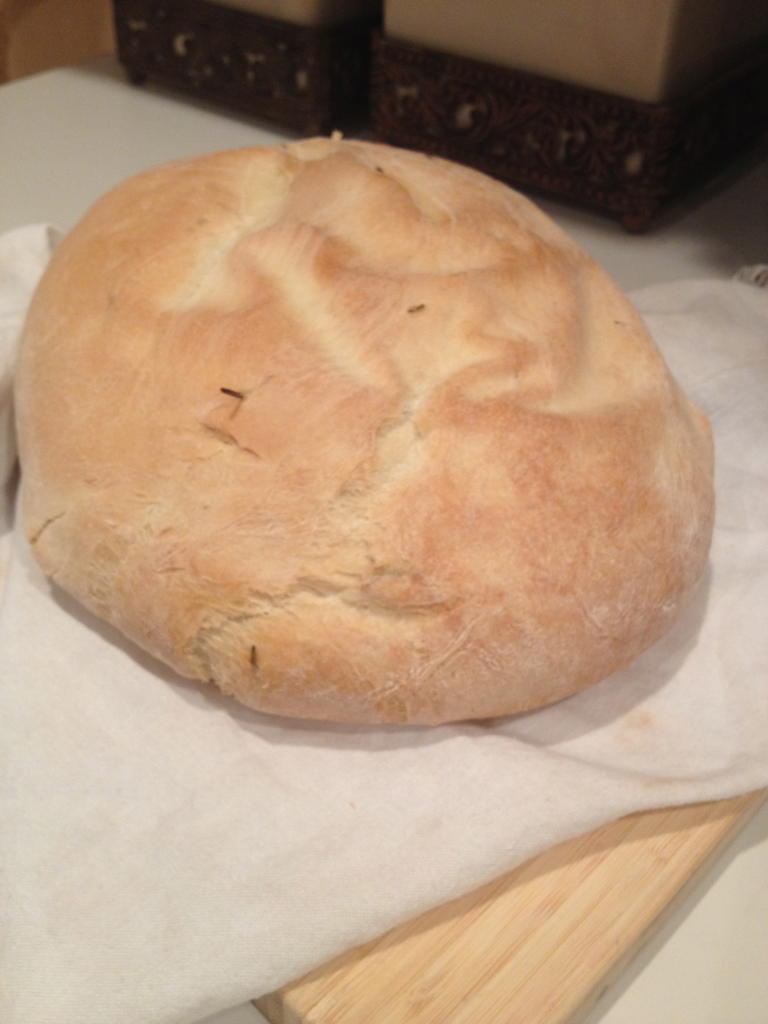
Well this will probably be the SHORTEST post I ever do! Why???? Because it is about BREAD, yummo BREAD and I certainly don’t have to tell a story about my “inspiration” for this wondrous food! Who doesn’t love bread and this is my favorite kind CIABATTA or Italian “slipper bread”!

It’s the SIMPLEST recipe and with ALL the soups and stews being made right now, this is totally perfect! Also since it is holiday season and we are eating a ton of carbs anyway, this is so complementary to the Thanksgiving or Christmas table packed full of potatoes, dressing, and pie!!! Balance this out with some bread and butter and Whammo, carb HEAVEN!

Now don’t mistake me that you can’t make this year around because you can…it is SO good dipped in olive oil and pepper, made into a panini, or grilled and doused with garlic, olive oil, and salt then served with pasta or any other dish.

If you have a bread maker, even better because you put in ingredients, turn on to dough setting and your done with that part….if you don’t have a bread maker, no worries, this recipe explains how to make by hand.

Super Easy Ciabatta Bread
 
Print
Prep time
1 hour 20 mins
Cook time
25 mins
Total time
1 hour 45 mins
 
Author: Michelle Michelotti-Martinez
Recipe type: Bread
Cuisine: Italian
Ingredients
  • 
1½ cups warm water
  • 1½ teaspoons salt
  • 
1 teaspoon white sugar
  • 1 tablespoon olive oil
  • 
3¼ cups bread flour
  • 1½ teaspoons yeast
  • Rosemary or any other herb, roasted garlic, or sautéed onions, optional
Instructions
  1. In a mixer, mix together the flour, yeast, salt, and sugar (and herbs or other additions if choose). Pour in the warm water, and beat for 5 solid minutes. If you have a dough hook, use it and knead the mixture for an additional five minutes, until the dough is well combined, otherwise use beater blade.
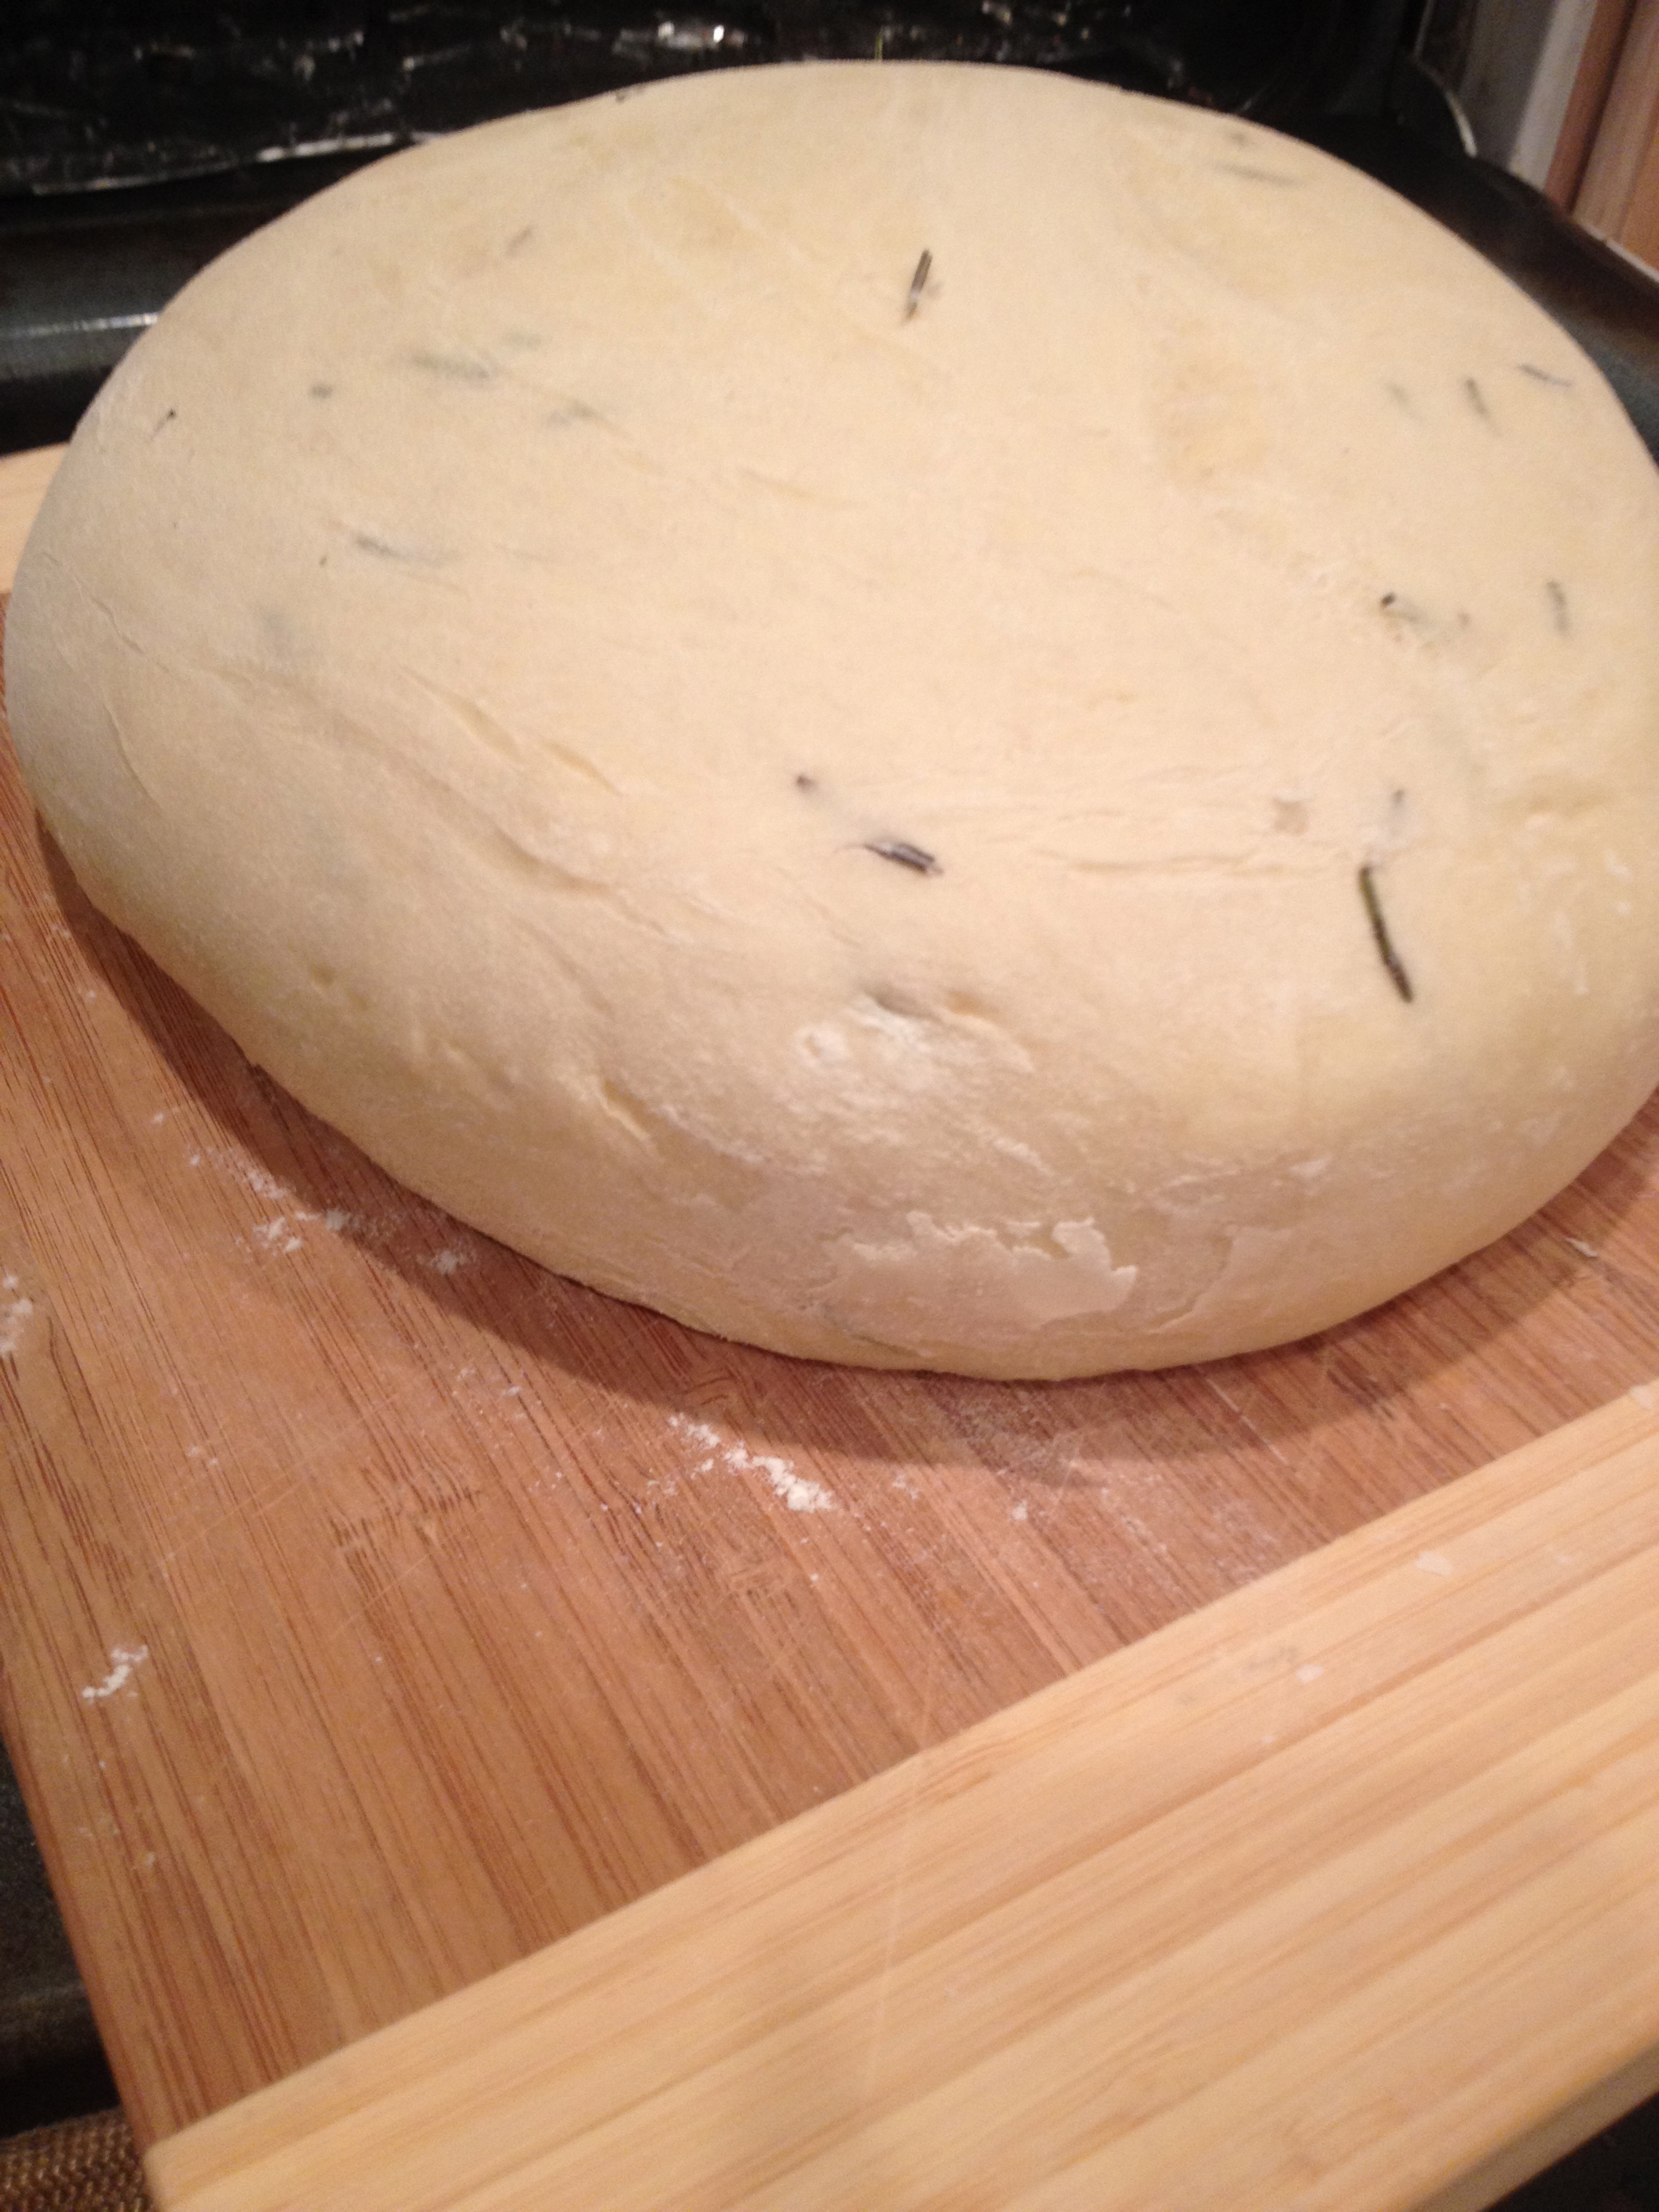
  2. When the dough is well combined, flour your hands, put in the bowl, and pull parts of the dough up and fold it back down into the bowl. Do this for another 5 minutes. This will push air bubbles into the dough and create nice holes when it bakes which is signature for ciabatta. Dough will be "wet" and that is perfect.
  3. If you have a wooden cutting board or a regular cutting board, put on some flour and turn dough over. Knead a couple times so not too "sticky" and cover with a big glass bowl for 15 minutes.
  4. Oil a large bowl, then plop the dough into that bowl. Drizzle your olive oil over the top of the dough, then cover the bowl in plastic wrap and cover with at towel. Place the bowl in a warm spot and allow it to rise for 2 hours.
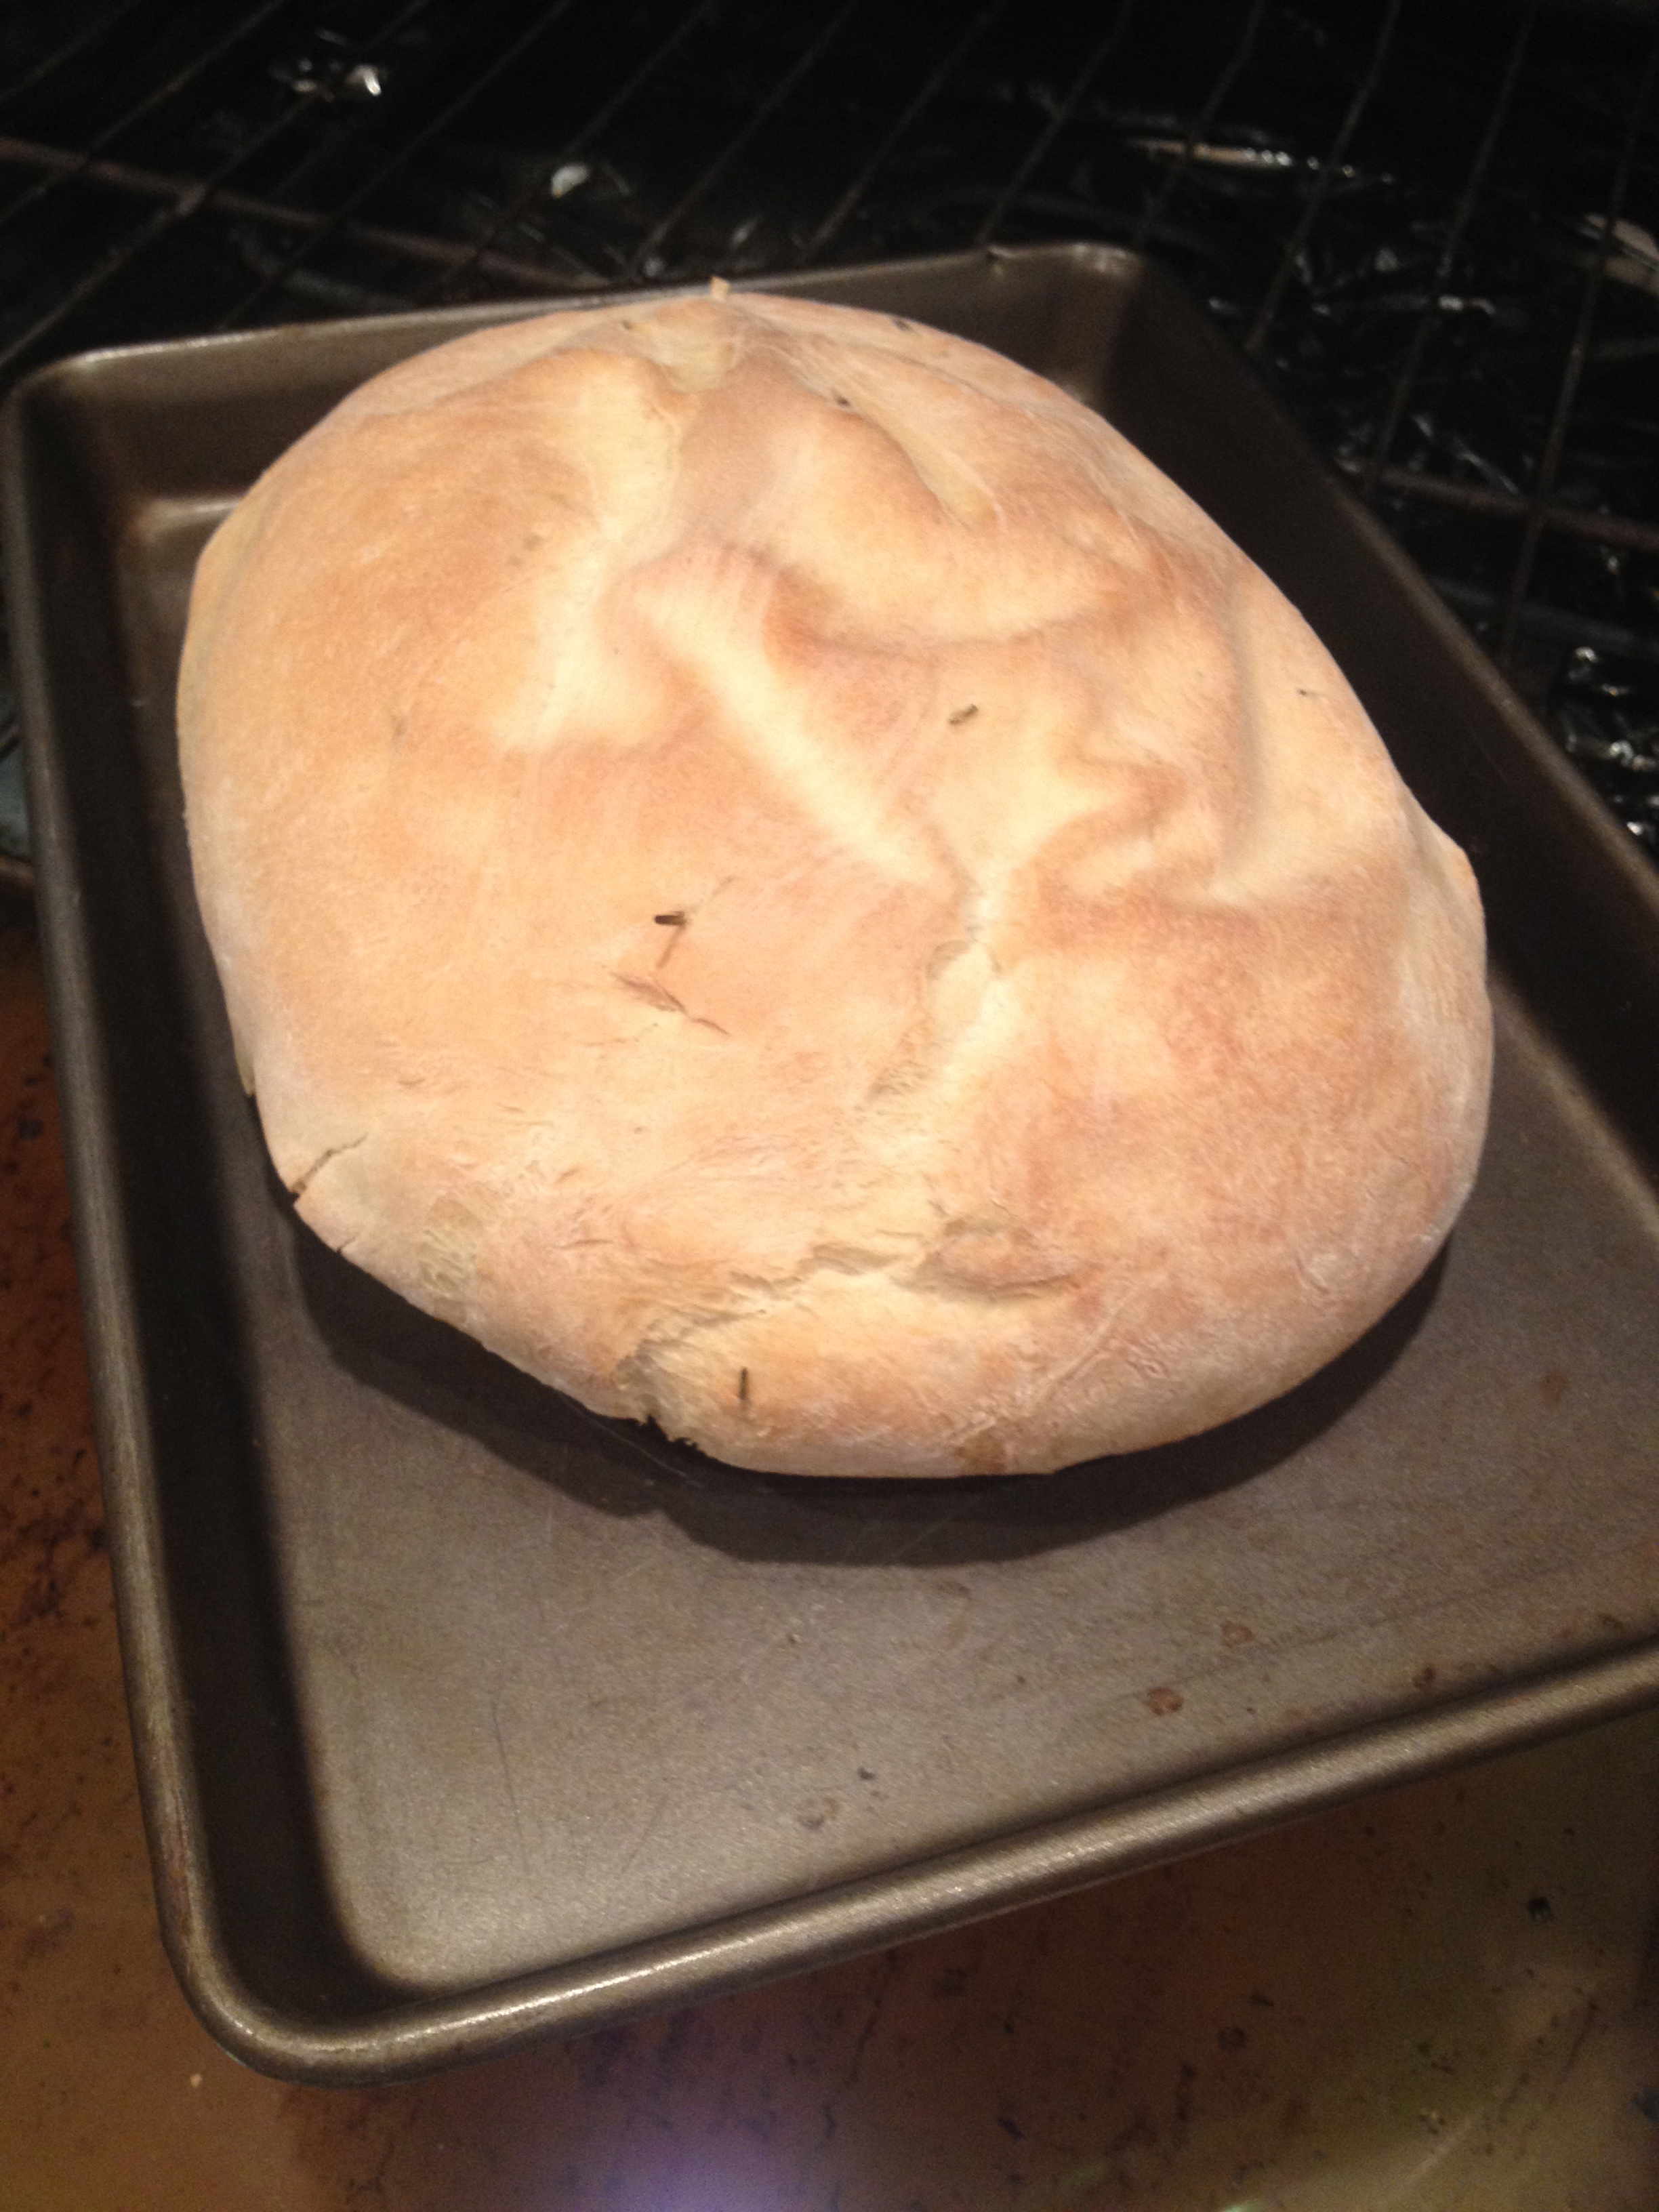
  5. Lightly flour a baking sheet, line it with parchment paper, or use a non-stick sheet. Form into an oval shape and place onto prepared sheets, lightly dust with flour. Cover with a cloth and let rise in a draft-free place for approximately 45 minutes.
  6. Preheat oven to 425 degrees F (220 degrees C).
  7. Place loaf in the oven, positioned on the middle rack. Bake until golden brown, 25 to 30 minutes.
3.2.2885

IMG_5436

IMG_5438

IMG_5458


Filed Under: Breads Tagged With: bread, ciabatta, flour, salt, sugar, water, yeast

Beef Oxtail and Short Rib Soup with Root Vegetables and Barley

November 20, 2014 by Michelle Michelotti-Martinez

IMG_5470

Oh the memories are pouring in! I completely ADORE homemade beef oxtail and short rib soup. It is SUCH a soul-filled meal for me and during these cold months, I CRAVE it!!

My grandmother, Mau (that’s what we called her), ALWAYS had a pot of her oxtail soup cooking on the stove every Sunday. Back then, I didn’t understand why she started this soup at 10 am but now as I have perfected it over the years, if you plan on eating it the same day, you have to start it early……the broth needs to build for AT LEAST 5 hours and there is a great deal of time spent skimming the foam off the top to get that clear, yummy broth.

THE SMELL of that soup cooking all day is permanently LOCKED into my senses! It filled the air with all the root veggies and barley she added in. It didn’t hurt that she had a homemade loaf of bread baking at the same time…what a coincidence….oh the simple things!!!!

We went over every Sunday, about 5, and my grandpa was always lounging in his recliner chair, watching some silly TV show, I think probably Archie Bunker, but we RAN through the front door and straight to the kitchen and up to the stove where that old pot was stock full of this soup! Like a bunch of hungry cats, we pounced to the table and sat, acting so ravished as if we hadn’t eaten in 3 days….she complained how we were driving her a bit crazy but looking back, she couldn’t have gotten a better complement and she knew it, but she still had to fret.

I have a copy of her handwritten recipe but I think on purpose she left a few things off, mostly the “secret” of cooking the oxtails and short ribs for hours. There is just some scribbles about veggies and a few instructions but I treasure that recipe and have called on her to fill me with the cooking tricks only she knew. I think after several years, I got it, finally.

So here’s to you Mau, I think you would be proud.

Beef Oxtail and Short Rib Soup with Root Vegetables and Barley
 
Print
Prep time
30 mins
Cook time
7 hours
Total time
7 hours 30 mins
 
This is sincerely my favorite soup of ALL time! I promise it is worth the time to leave it simmer to create that delicious broth.
Author: Michelle Michelotti-Martinez
Recipe type: Soup
Cuisine: American
Serves: 8-10 servings
Ingredients
  • 2 lbs of beef oxtails
  • 2 lbs of beef short ribs, ask butcher to cut in half
  • 2 lbs of beef stew meat
  • 1 sweet onion, diced
  • 4 cloves garlic, diced
  • 6 carrots, peeled and sliced
  • 6 celery stocks, peeled and sliced
  • 2 sweet potatoes, peeled and cubed, ½ inch
  • 1 celery root, peeled and cubed, ½ inch
  • 2 rutabagas, peeled and cubed, ½ inch
  • 2 turnips, peeled and cubed, ½ inch
  • 1 small butternut squash, peeled and cubed, ½ inch
  • 3 bay leaves
  • sea salt and freshly ground pepper
  • olive oil
Instructions
  1. In a large dutch oven over medium heat, add about 2 T olive oil. In batches sear the oxtail until browned on all sides, remove and put on plate. Repeat with short ribs. Salt and pepper during searing.
  2. Add another 2 T olive oil and add beef stew meat. Sear and season with salt and pepper, remove and put on plate.
  3. Add another 2 T olive oil and add onion, garlic, celery, and carrots, Season with salt and pepper and cook until just getting soft. Add back ALL meats and bay leaves and fill pot with water about ⅔ full. Turn up to get to a rolling boil and put on cover (but leave a crack so that water doesn't boil over). Simmer for 5-6 hours skimming top of foam frequently.
  4. About 45 minutes before wanting to eat, cook barley as per directions
  5. About 30 minutes before wanting to eat, add in all the root vegetables and simmer until just soft. Taste broth and add salt and pepper if needed.
  6. Spoon in a little barley into bottom of bowl and top with soup. Serve immediately with homemade bread!
  7. *This makes a lot of soup so can cut down recipe but we LOVE leftovers and gets better with time! Can freeze but just don't add barley to soup as it will thicken it.
3.2.2802


Filed Under: Soups and Stews Tagged With: barley, beef, butternut squash, carrots, celery, celery root, Garlic, onion, oxtail, rutabagas, short ribs, soup, sweet potato, turnips

Delicata Squash Boats with Pancetta, Porcini, and Fried Sage Risotto

November 13, 2014 by Michelle Michelotti-Martinez

squash boats 2

For me, risotto is one of those simple life pleasures. It’s a comfort food on a cold day or the perfect side dish to any grilled meat in the summer. The only trick with risotto is making sure it is “al dente” and not mushy hence the necessity to hover over the stove stirring and tasting consistently, adding liquid very slowly.

I was so lucky to learn to make risotto from my Italian aunt in the Piedmont area of Italy. I mean, that is risotto country so I better learn from the best or not carry a Northern Italian last name, simple as that, period.

We were on one of our jaunts to visit the family and I made the “casual” comment about loving risotto. Well, let me tell you, don’t ever make a “casual” comment about anything food related to an Italian relative. I had no idea what I had released.

First came the phone calls to the other family relatives “intensely” communicating something about “non hai fatto risotto per la famiglia? Mai????? Mama mia! Then the phone slams down and another call is made, same question but this time the phone slams down with “Ah Madonna!” And the list continues…..each time the same question and the ending disgust. Yikees, all I mentioned was that I liked risotto, I didn’t need any relatives killed over some cooked rice.

We sat quietly as my aunt stomped around, shooed her children to the small grocery store down the street, and mumbled obscenities to herself. At this point, I just wanted a drink.

After about 30 minutes the children arrived and my aunt gazed out into the room where I sat and said, “viene qui!” and I quickly obeyed and came into the kitchen.

What ensued next was a sheer blessing in disguise, an afternoon filled with loving determination to show me (and feed us) the perfect risotto dish. The instruction began with a description of every ingredient (the proper ones) to use to make risotto. The rice, the homemade stock, the onions, the wine, the butter, the parmigiano cheese, this is the base and from here, it’s personal choice what else one wishes to add. During our lesson, she chose veggies from her garden. I took notes like a mad woman and drank in all of her divine wisdom.

As the time progressed, I knew I was receiving something most people wished for, instruction from the true masters of Italian cuisine, the ones that hold the keys to generations before and the knowledge of all that is passed down through the kitchen and I was the lucky recipient.

I learned to use the perfect pot, to heat the stock, to sauté the onions first, (veggies here if desired), add the rice, then the wine, and then patience begins while the stock gets added, ½ cup at a time and stirred until absorbed and tasted. This continues until the perfect “bite” occurs and not a minute before. It is then pulled off the stove, butter added and then parmigiano stirred in……

The final dish is decadent, creamy and piping hot, my mouth was watering. The final demand, risotto HAS to be eaten right away, we were happy to follow command.

My aunt spooned it into a big bowl and topped with a little more parmigiano. I watched as the steam came off the rice and the cheese melted instantly. My mouth was watering. It didn’t take long to devour.

This recipe is an ode to my aunt who took that simple comment and taught me an art form. I will never forget that day and I always hear her instructions every time I recreate her masterpiece.

I decided to add porcini mushrooms, pancetta, and fried sage to her recipe and use roasted delicata squash from our garden to serve it in. It’s a 100% edible and makes for a great presentation.

fried sage


squash boats

risotto 2

Table

A SPECIAL THANKS TO MY NEW FOOD PHOTOGRAPHER, MY NIECE RACHEL! SHE ROCKS!!

Delicata Squash Boats with Pancetta, Porcini, and Fried Sage Risotto
 
Print
Prep time
25 mins
Cook time
50 mins
Total time
1 hour 15 mins
 
This recipe is an ode to my aunt who taught me an art form. I always hear her instructions every time I recreate her masterpiece. I decided to add porcini mushrooms, pancetta, and fried sage to her recipe and use roasted delicata squash from our garden to serve it in. It’s a 100% edible and makes for a great presentation.
Author: Michelle Michelotti-Martinez
Recipe type: Side Dish
Cuisine: Italian
Serves: 8-10
Ingredients
  • 4 delicata squash, cut in half, seeded, and roasted, can use acorn or other squash
  • 2 cups of carnaroli rice, can use arborio rice
  • 2 shallots, diced
  • 8 slices of pancetta, diced
  • 15 porcini mushooms, sliced thin, can use shitake mushrooms
  • 15 sage leaves, fried in a little truffle oil, 5 broken into pieces and others left whole
  • 7 cups of homemade chicken stock, can use canned
  • ½ cup pinot grigio wine
  • salt and pepper to taste
  • olive oil
  • 2 T butter
  • Freshly grated parmigiano cheese
Instructions
  1. Turn oven on to 350. Place cut squash, face down and roast til soft when fork is inserted. Set aside
  2. In a pot that is wider than it is tall, turn onto medium heat.
  3. Add 2 T olive oil and heat.
  4. Add shallot and pancetta and stir with wooden spoon until shallot is translucent.
  5. Add mushroom and stir.
  6. Add a little salt and pepper.
  7. Cook until mushroom begins to soften and add broken sage pieces.
  8. Add rice and stir.
  9. Add wine and stir til dissolved.
  10. Start adding stock, ½ cup at a time and stir til dissolved. Keep tasting until rice reaches "al dente"
  11. Pull off stove and add butter, stir
  12. Add ½ cup of parmigiano
  13. Spoon into each half of squash, top with some more cheese and one piece of whole sage leaf. Repeat til all squash are filled.
  14. Serve immediately
3.2.2802


Filed Under: Grains and Starchy Sides, Vegetables Tagged With: Chicken Broth, Delicata Squash, italian, Mushrooms, pancetta, Parmigiano, Porcini, rice, risotto, Sage, Shallots, White Wine

Classic Valencia Paella

November 7, 2014 by Michelle Michelotti-Martinez

IMG_4493

Madrid Spain is one of my favorite cities in the world. Cosmopolitan and full of history, outstanding museums and sites, and INCREDIBLE FOOD (the male flamenco dancers are pretty amazing too but we will leave that for another post :)!!!

The coolest thing about the Spanish is that they start their day at about 10, stop for lunch around 1, siesta from 2-4, work from 4-8, and then their evening begins. They adore being out and about, young and old, it doesn’t matter. It is SO refreshing to see kids playing in the streets while the parents visit and take in a meal or a stroll. I totally dig it.

Typically, they don’t just hit a restaurant for dinner although, that may be slowly changing with the influx of tourism but instead, start out by “tapa-hopping”. This is so awesome….they go to a local tapa bar, order a sangria or drink of choice, pick a tapa or two (small appetizers), share with friends and then off to the next spot. This goes on till about 10 or 11 when it comes time to gather at a restaurant for the main course. After this, dancing till 2 or 3……gotta love it!

On my first night in Madrid, we decided to try this ritual; I mean, “When in Rome, do as the Romans do, right?” Plus we are suckers for trying whatever is new and part of the culture. Anyway, we made it through with flying colors for the first 4-tapa stops and I am thinking “seriously, this rocks, I must have been a Spaniard in my last life!” Partying for 6 hours every night? What????

Time came for the main course and our hotel concierge led us to the direction of paella, the infamous rice dish of Spain. We pranced off to the hot spot only to be stopped about a block away with a line of giddy and hungry patrons. We asked the group in front of us if this was “normal” or should we try another place less busy? They looked at one another and giggled, I am sure thinking….AMERICANS, and answered back that all of Madrid comes out at night so hunker down and grab another sangria! NICE!! I can follow directions…

Another 2 sangrias and we finally made it into the restaurant to be seated at a cozy table bustling with laughter and pan after pan of mouth-watering paella. We were salivating!

We perused the menu consisting of 50+ varieties of paella, each one made to order, and realized we probably still were at least an hour away from chow time and it was nearing midnight. It wasn’t helping that the flowing glasses of sangria throughout the tapa bars and in line were finally catching up to me and my eyes were getting so heavy that it felt like someone was standing on the lids. Great, I see it now, the paella comes and I fall face first into it, what a rock star partier. Pathetic.

I managed to somehow stay awake and sober up and when the paella was presented to us, we were ready to devour! We stayed classic and ordered the Valencia paella, laced with chorizo, chicken, seafood, veggies, and topped with huge mussels and clams. Not only did it look delicious it was a culinary art piece. It was colorful and carefully crafted and each piece of food was meticulously placed in a methodical order, it was amazing…no wonder it took an hour, it was worth it and we hadn’t even taken a bite. We look at each other and decided if it tastes as good as it looks, we are moving in.

It did and more. We finished it all, it was 2am and dancing would have to wait.

IMG_4496

Classic Valencia Paella
 
Print
Prep time
1 hour 30 mins
Cook time
1 hour
Total time
2 hours 30 mins
 
This is one of my all time favorite dishes to cook for a party along with a bunch of tapas and the evening can carry on as though we are on the streets of Spain. Cava On!
Author: Michelle Michelotti-Martinez
Recipe type: Entree
Cuisine: Spanish
Serves: 10
Ingredients
  • 10 cup Paella Pan
  • 6 cups chicken broth
  • ½ ounce saffron (about 8 threads)
  • ½ tsp sea salt
  • ⅛ tsp black pepper
  • 2 red bell peppers
  • ¼ cup olive oil
  • 10 skinless chicken thighs cut in thirds
  • ¾ lb pound Spanish chorizo sausage
  • 1½ pounds med-sized shrimp (raw)
  • 1 pound sea scallops cut in thirds
  • 3 cloves garlic chopped
  • 1 med sweet onion chopped
  • ½ tsp turmeric
  • 2 cups arborio or bomba rice
  • ½ cup white wine (Sauvignon blanc preferred)
  • 4 med ripe tomatoes (cut in half, grate, and discard the skin)
  • 2 tsp sweet paprika
  • 25 mussels or clams
  • ½ cup peas, fresh or frozen
  • Lemon wedges for garnish
Instructions
  1. Heat chicken stock on stove in large pot with saffron, salt and pepper. Steep on low heat until adding it to paella.
  2. Roast peppers under broiler until charred on all sides, remove and put in plastic bag to steam, about 5 to 10 minutes. Remove and gently peel, remove seeds and veins. Slice in strips and set aside.
  3. In paella pan, either on stove, barbecue, or paella burner, add olive oil until somewhat hot. Add chicken and cook until 80 percent done. Add a little salt and pepper to start building flavor. Remove and cover. Add sausage in same oil until flavor is distiller into oil. Remove and save. Add shrimp and cook until there is color. Remove and cover. Add scallops and cook till translucent. Add a little oil if needed.
  4. In same oil add garlic for about 20 seconds and then onion. Add a little salt and pepper. Stir until translucent.
  5. Take measured rice and create well, add turmeric and spread over onion and garlic. Add grated tomato and paprika and stir. Now this is all being flavored with ingredients that went into oil, flavor will flow into rice as paella cooks. Cook this for 3 minutes. Add wine and stir. Raise temp underneath pan for a couple of minutes and then add stock, stir. Turn heat down until liquid has mixed well with other ingredients.
  6. Start putting in chicken and mussels or clams, spread evenly. Add sausage, shrimp, and scallops the same way.
  7. Observe at rate liquid is absorbing the rice, if too watery at beginning, fine. You want low simmer so paella cooks evenly.
  8. Cover with foil and simmer for about 45 minutes. DON'T STIR!
Notes
ADDITIONAL TIPS:
DRY VS MOIST
The paella can stay moist for about 20 minutes, if left too long on fire, it will dry. A lot of Spaniards like it crusty on bottom and some soupy, you choose.
FINISHING TOUCHES
Just 5 minutes before done, put on bell peppers and peas. Place decoratively for color. Place on table and eat out of pan or buffet style and serve with lemon wedges
PREPARATION
The French have a wonderful saying, mise en place, meaning to have everything in place and chopped, cleaned, and ready.
SEAFOOD
Keep clams or mussels closed and cold before using them by immediately running them under cold water and washing them when you return from store. Use a wire mesh colander. Place a large plate underneath and put in fridge with a wet cloth over them, this keeps them moist and breathing. You want the shells closed, they will open during cooking. If they don't, throw them away.
SUBSTITUTIONS
You may substitute other shellfish and various vegetables to match to your liking be creative!!!
SHOPPING TIPS:
Shopping can be done 2 days ahead for all ingredients except for chicken and seafood, purchase these the same day you cook paella. It is essential to use arborio or bomba rice, other types don't hold up to cooking.
3.2.2802

Filed Under: Entrees, Fish and Seafood Tagged With: bell peppers, chicken, clams, mussels, paella, peas, rice, saffron, seafood, spanish, valencia

  • « Previous Page
  • Page 1
  • …
  • Page 13
  • Page 14
  • Page 15
  • Page 16
  • Page 17
  • Page 18
  • Next Page »

Primary Sidebar

Meet Michelle and Enrique

Eatentions is a way of being with our food experience. It is a thought-filled process starting with connection to source all the way through the finished creation. We like to call it "from root to experience". Its the entire thing, its that conscious. Thank you for popping by and welcome to our life.

Let’s Connect!

Archives

Categories


My Favorites

Arancini|Eatentions

Arancini

Torta Caprese

Torta Caprese

Lemon Pasta with Broiled Salmon and Charred Lemon|eatentions

Lemon Pasta with Broiled Salmon and Charred Lemon

Footer

Instagram

Instagram has returned invalid data.

Follow Me!

Connect With Us

  • Email
  • Facebook
  • Instagram
  • Pinterest
  • RSS
  • Twitter

We believe in celebrating amazing people, delicious food, great conversation, sustainability and experience. For us,our lives have always been about love, family, friends and sharing all things together. Connecting with people through food, sharing stories and supporting one another to live our dreams and our purpose is what inspires us daily.

My Favorites

Arancini|Eatentions
Torta Caprese

Copyright © 2026 · Foodie Pro & The Genesis Framework