• Skip to primary navigation
  • Skip to content
  • Skip to primary sidebar
  • Skip to footer

Eatentions

Organic * Local * Sustainable

  • Home
  • About Us
  • Recipes
  • Culinary Socials
  • CSM – Community Sourced Meals
  • Contact
  • Nav Social Menu

    • Facebook
    • Instagram
    • Pinterest
    • RSS
    • Snapchat
    • Twitter

Michelle Michelotti-Martinez

Almond Olive Oil Cake with Brown Butter Glaze

May 12, 2015 by Michelle Michelotti-Martinez

Almond Olive Oil Cake with Brown Butter Glaze 2

Almond Olive Oil Cake with Brown Butter Glaze 1

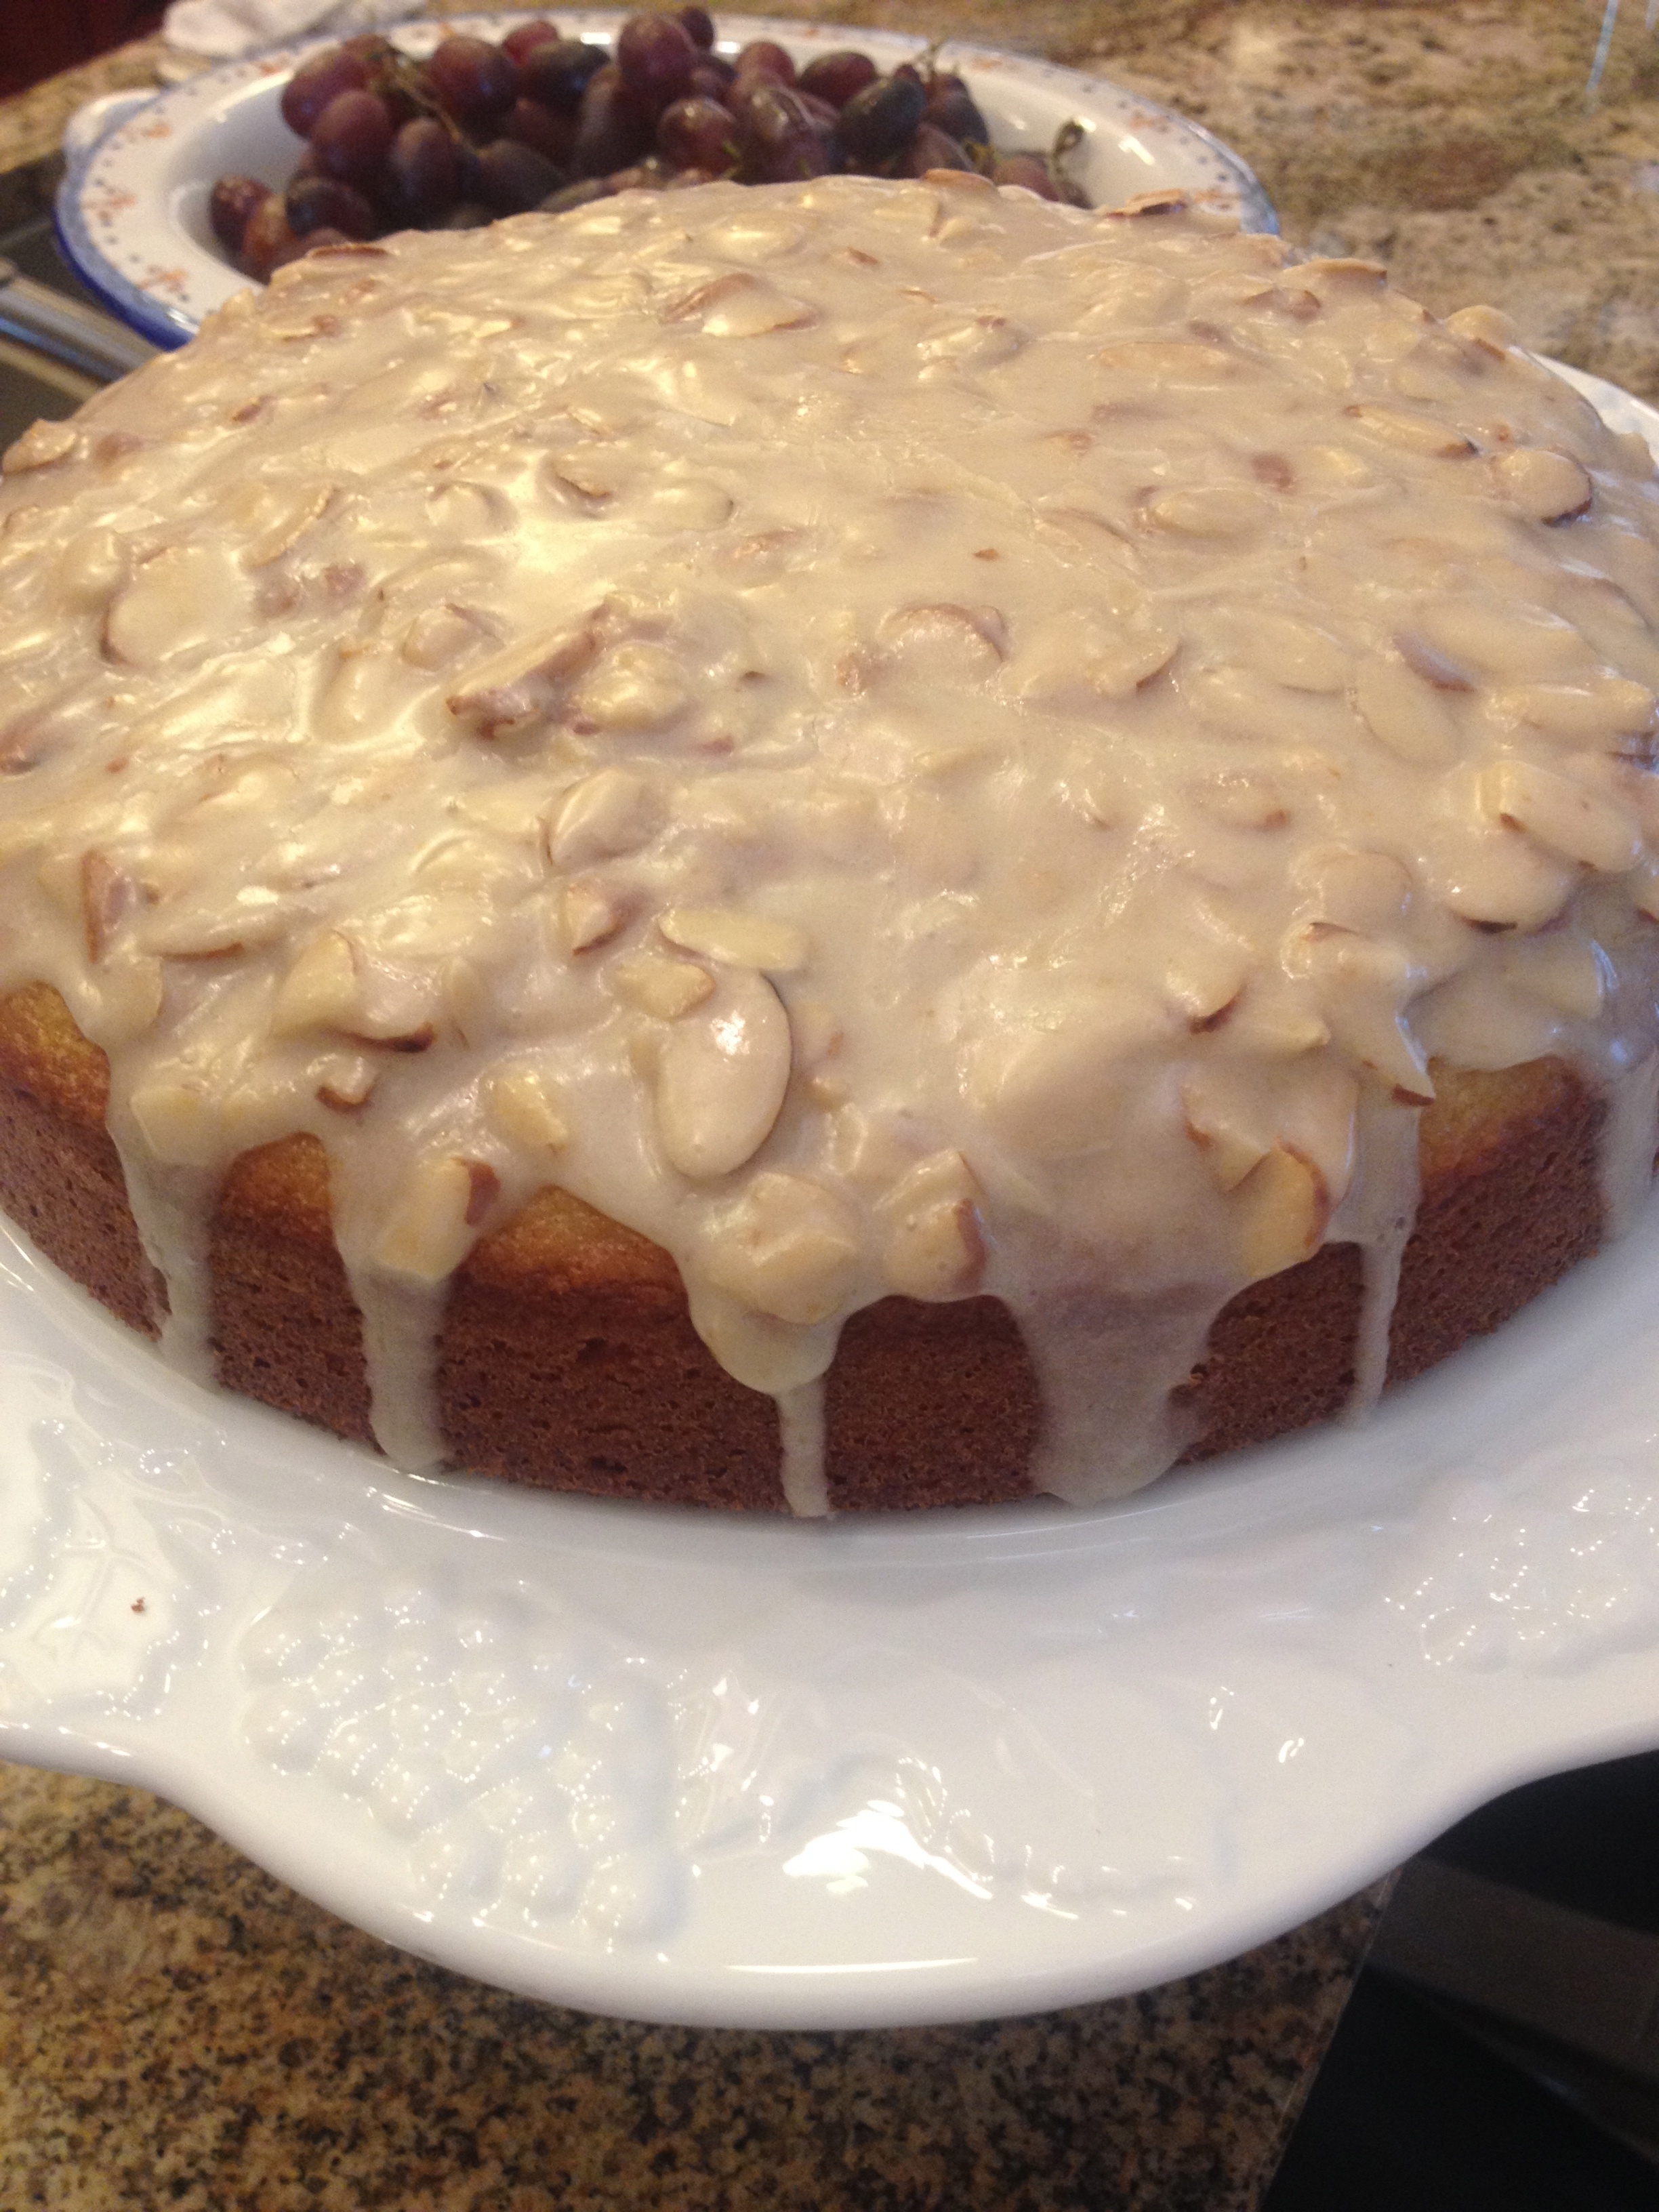
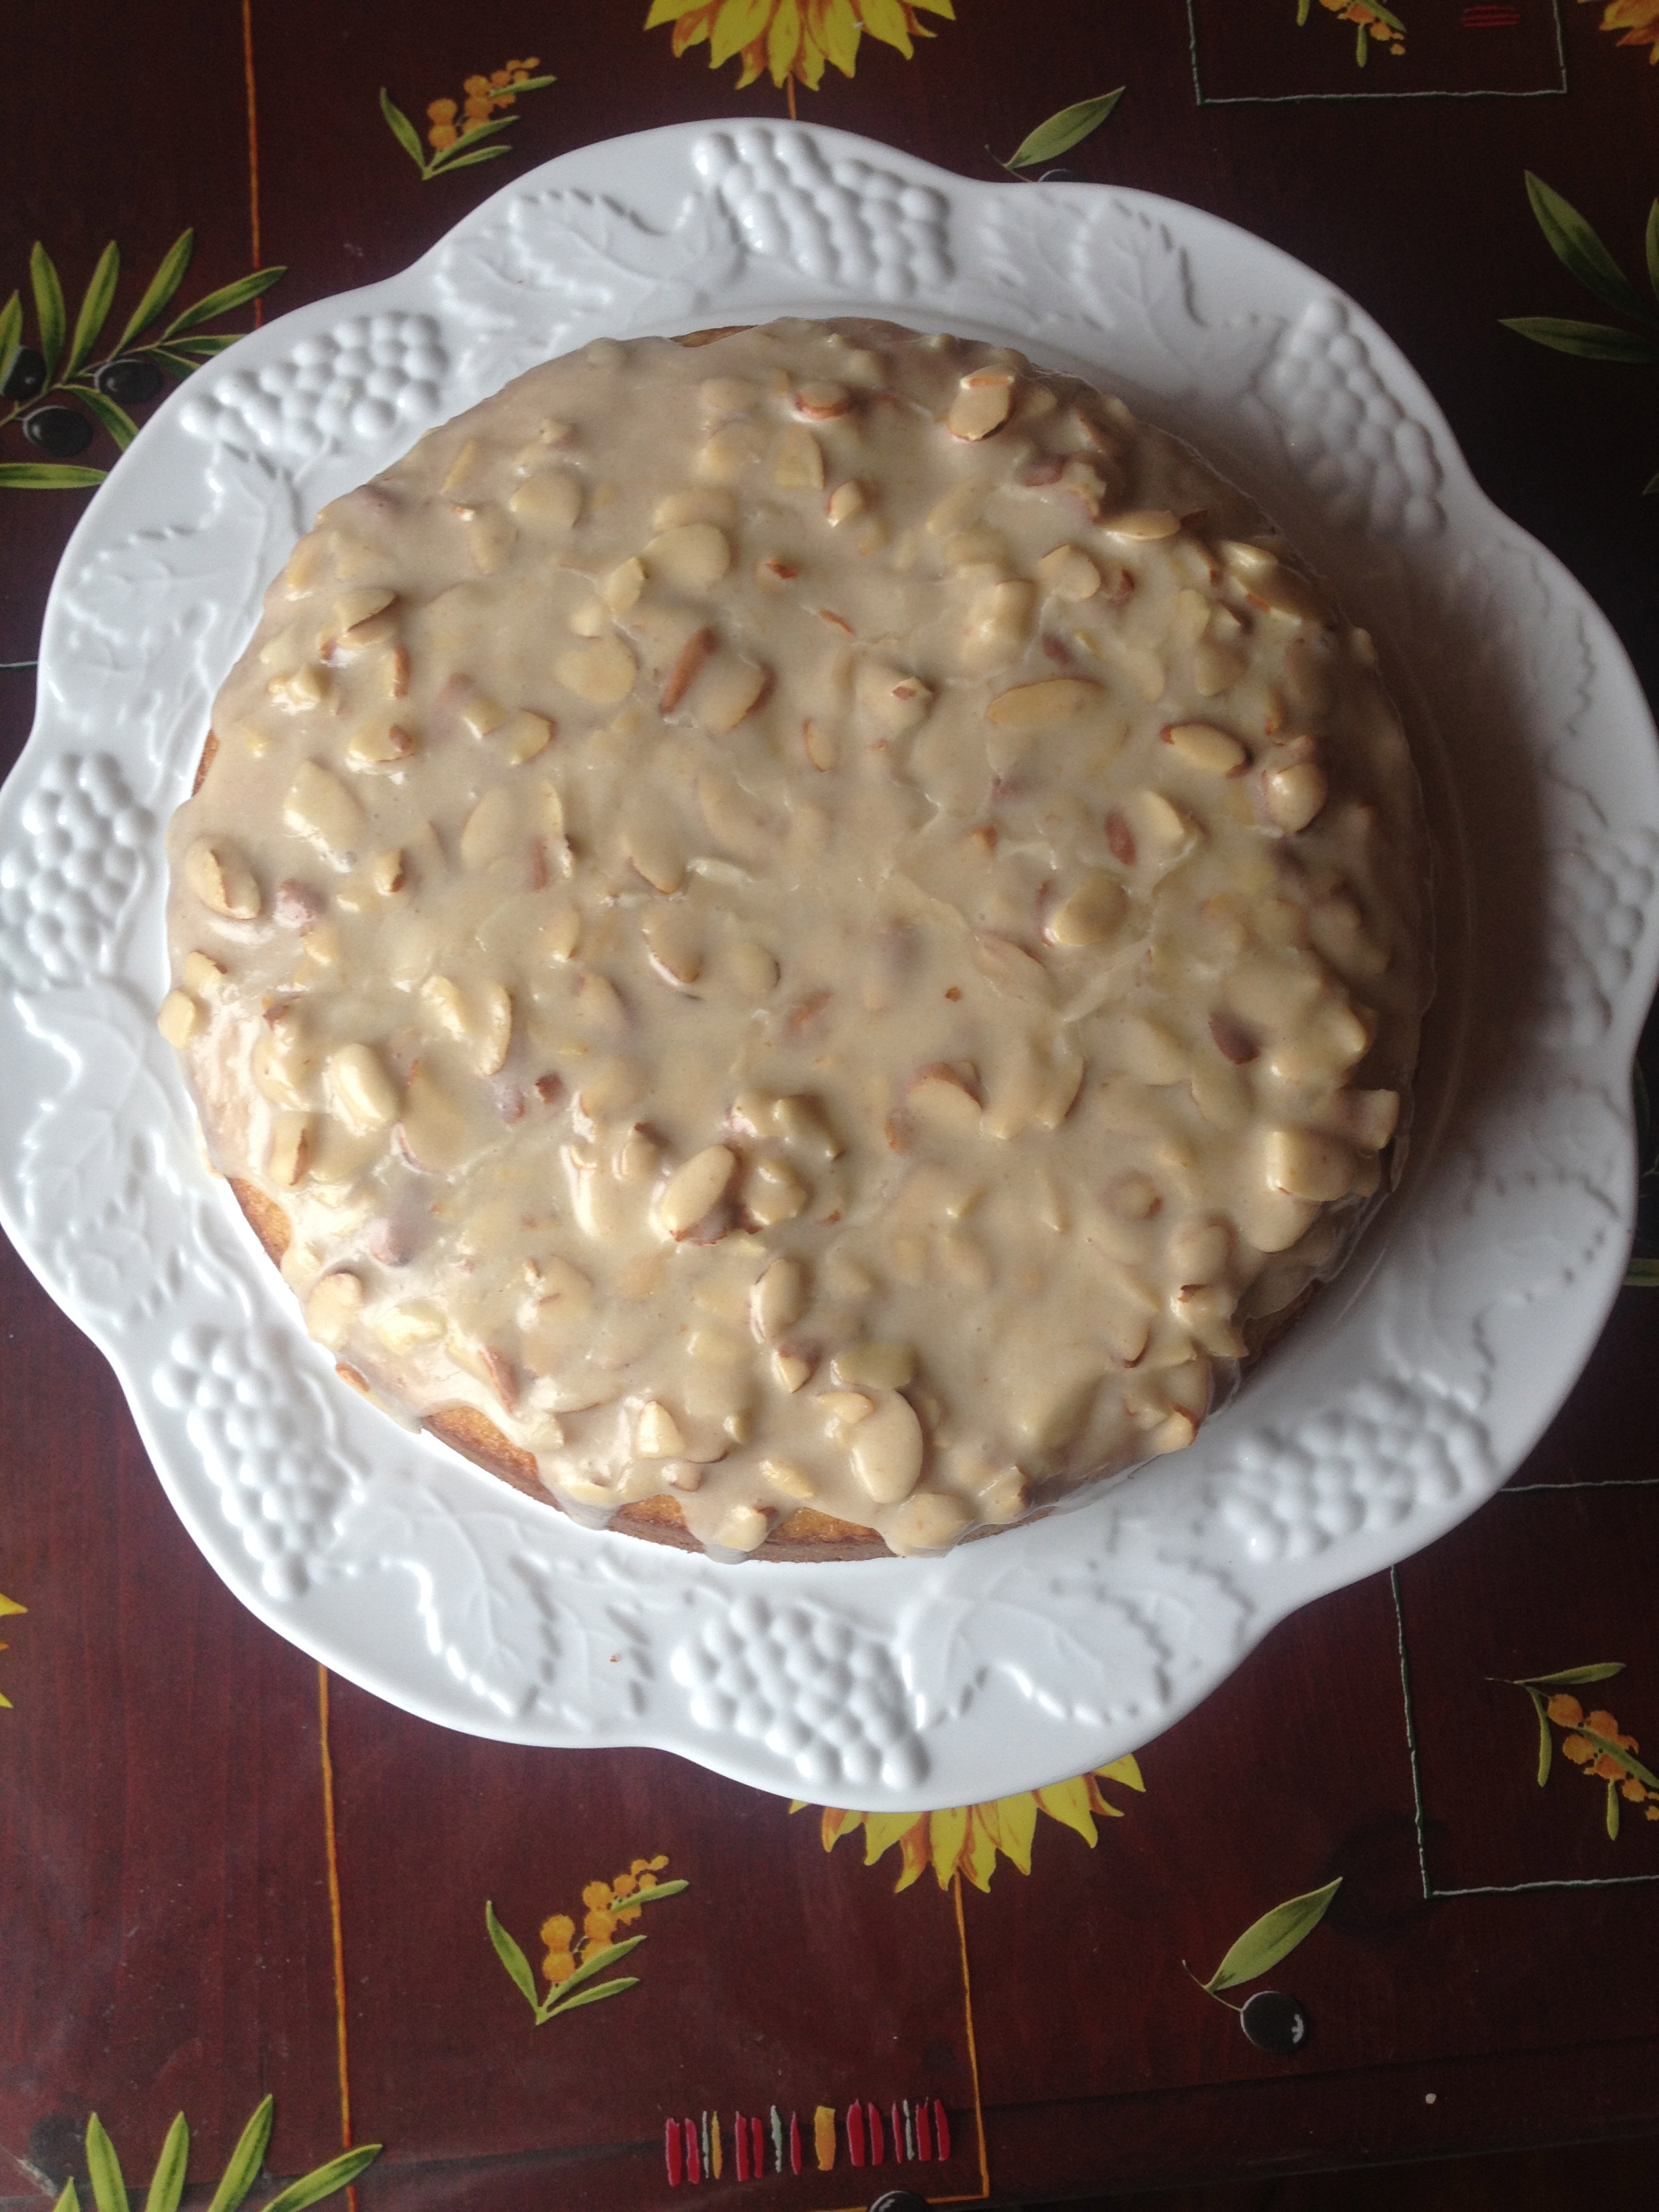
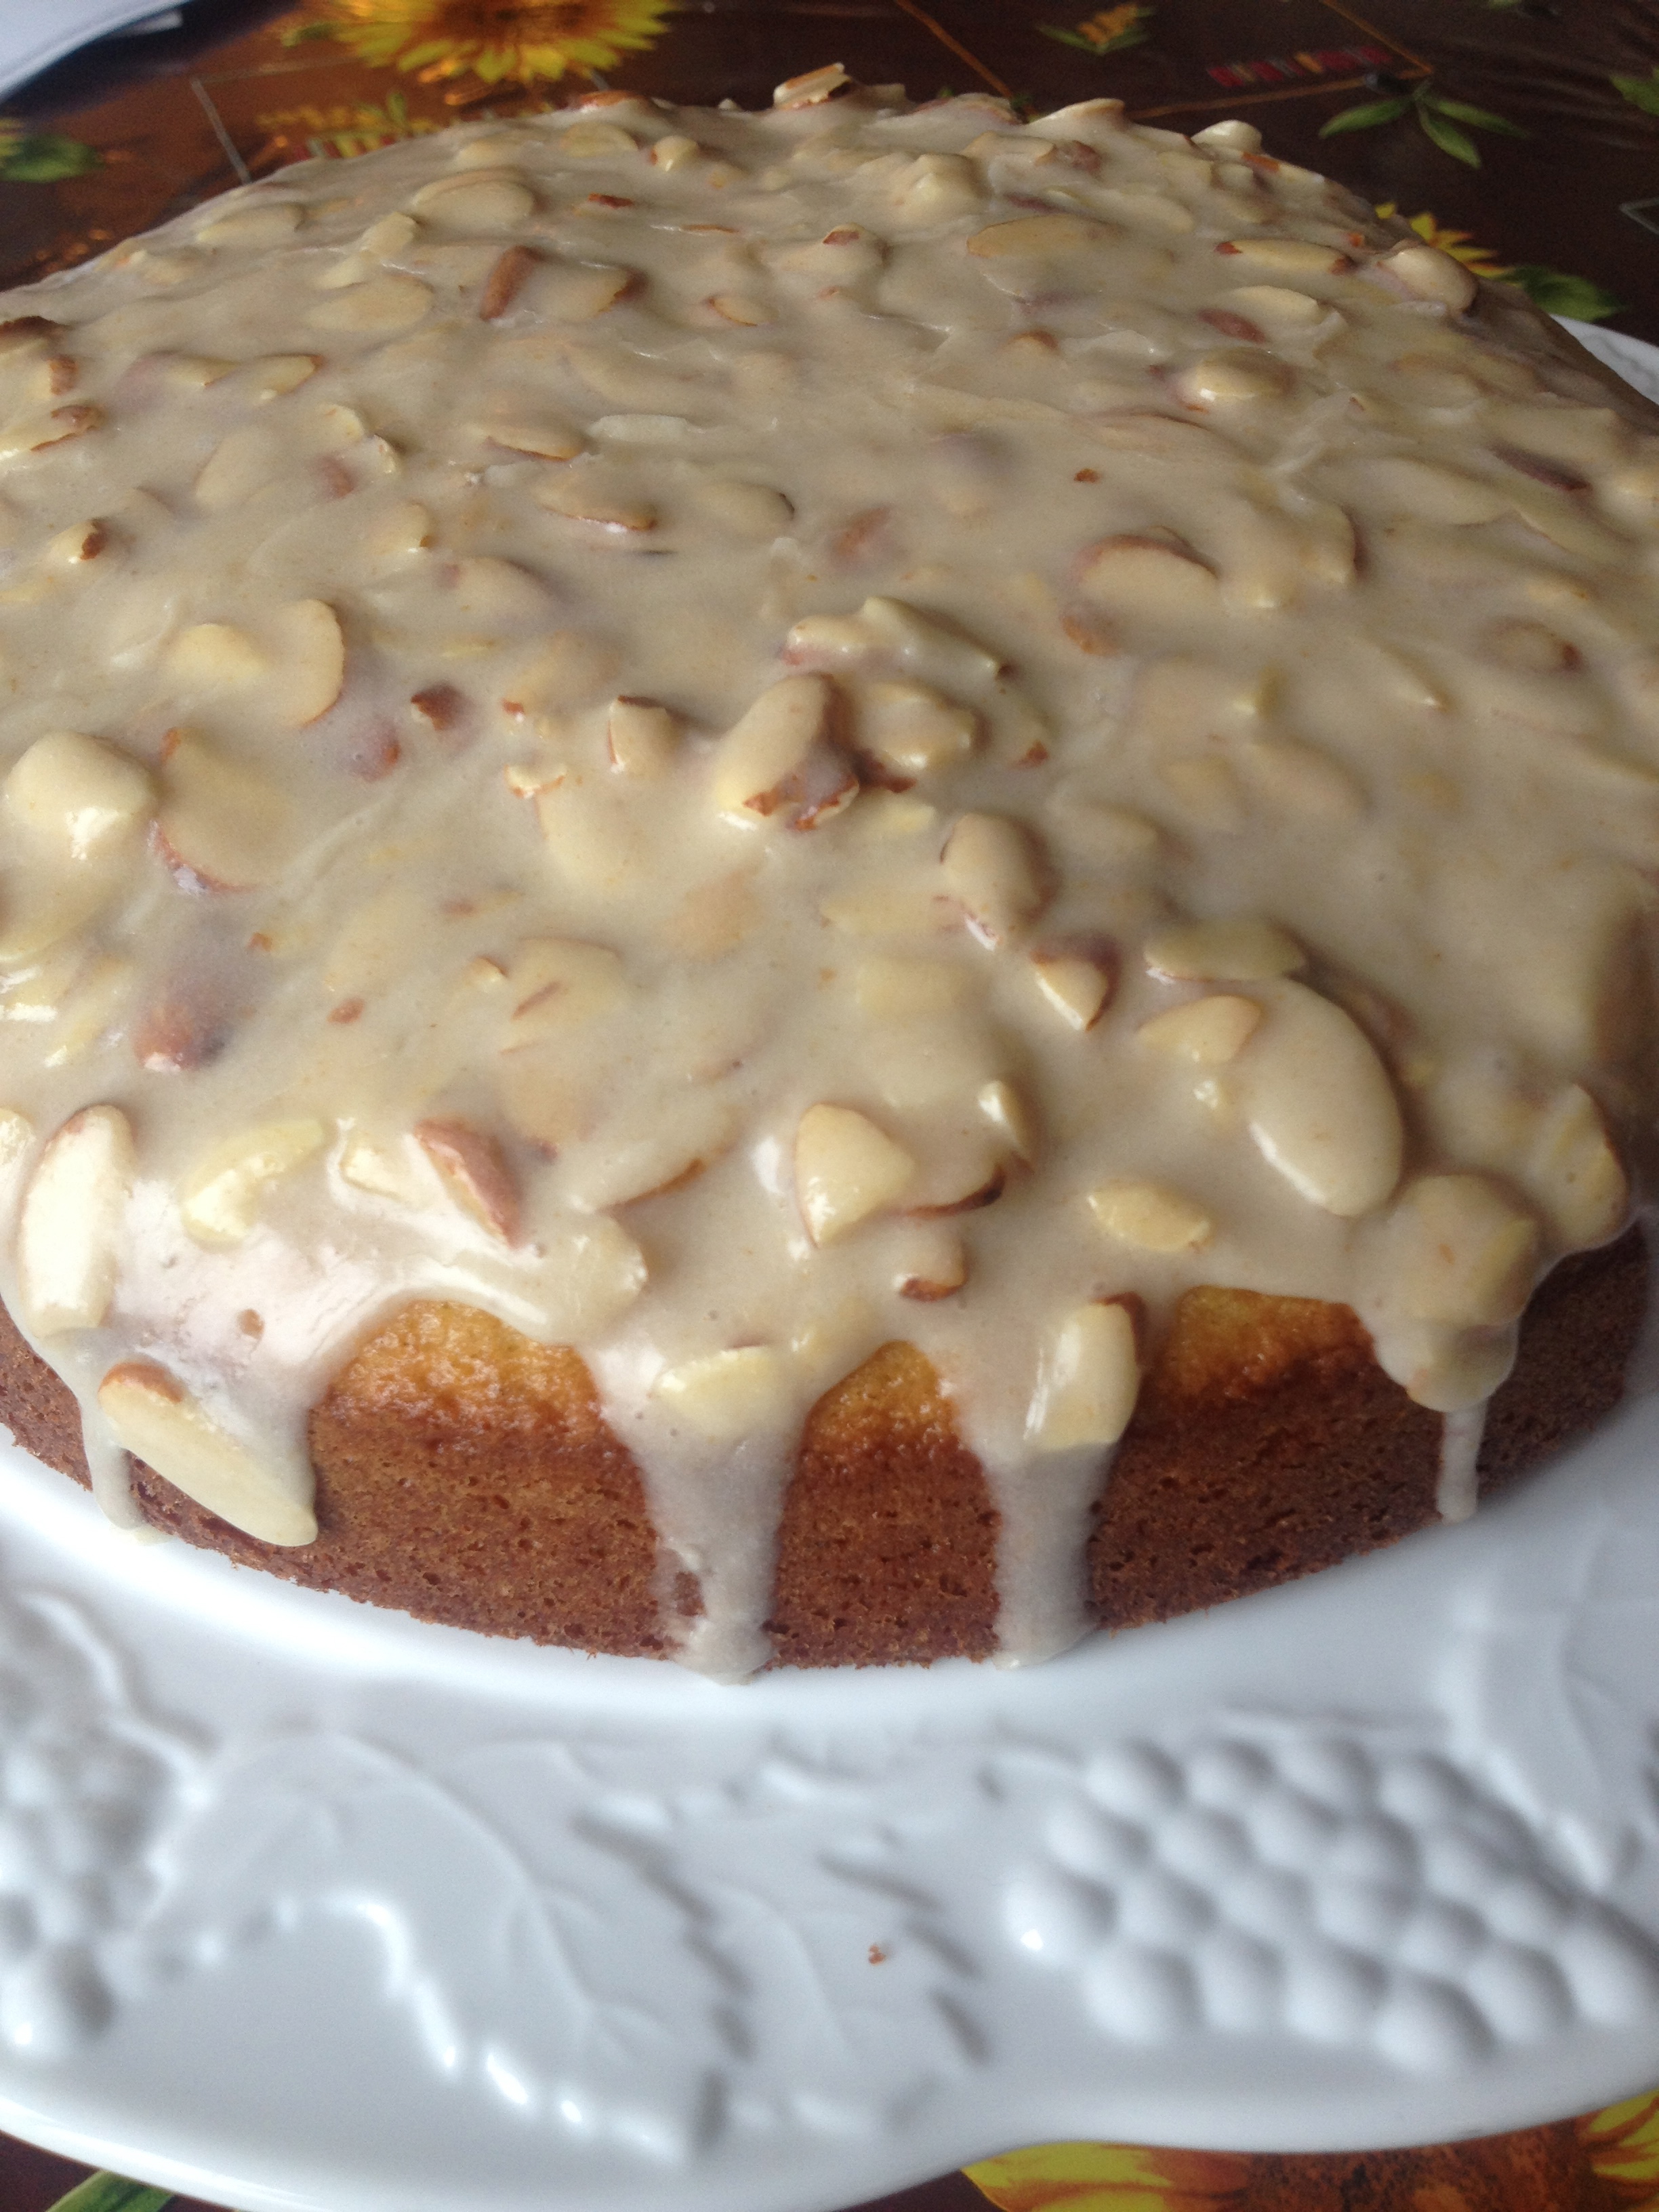
Olive oil cake is probably my most favorite of all, it’s moist and dense and the texture is divine….now add some almond and a brown butter glaze and that is as close to dessert heaven as it gets in my book!

When I first saw olive oil cake on the menu in Italy, I thought it would be an overwhelming amount of oil coupled with a strong taste that I wasn’t sure of but ……could I have been more wrong? Why and how could I doubt the masters of my favorite cuisine? For a moment I did, at least until I trusted the waiter and placed my order with a vin santo to wash it down.

It arrived and as classically true to Italian sweets, it was a simple cake and presented on a ceramic dish with a sprig of rosemary along the side. I thought to myself, this is fairly non-descript but I sliced through it with my fork and in went the first bite (I honestly wasn’t expecting much) and then came the myriad of flavors, olive oil, orange, and almond. The simplicity of the preparation allowed all those familiar pairings to come together perfectly. I followed it up with a sip of the divine vin santo and just allowed my senses to dance. It was a beautiful surprise and one that lingered with me throughout my vacation.

Because of that first encounter, I often make olive oil cake and recently came across this recipe of almond olive oil cake with brown butter glaze and KNEW I needed to experiment. The end product delivered and met my expectation of divinity….and best of all my mouth got to dance again just like that first evening we met back in Italy.

5.0 from 1 reviews
Almond Olive Oil Cake with Brown Butter Glaze
 
Print
Prep time
10 mins
Cook time
40 mins
Total time
50 mins
 
Author: Michelle Michelotti-Martinez adapted from Blogging Over Thyme
Recipe type: Dessert
Serves: 8
Ingredients
  • Almond Olive Oil Cake:
  • 1 cup all-purpose flour
  • ½ cup almond meal
  • 1½ tsp. baking powder
  • ½ tsp. salt
  • 3 large eggs room temperature
  • ¾ cup sugar
  • ½ cup extra virgin olive oil
  • ¼ tsp almond extract
  • ½ tsp vanilla
  • ½ cup milk or orange juice
  • zest of one orange
  • Brown Butter Glaze:
  • 2 T unsalted butter
  • 1 cup powdered sugar
  • 3 T milk
  • few drops of lemon juice
  • ½ cup honey glazed almond sliced or blanched sliced almonds
Instructions
  1. Prepare Cake:
  2. Preheat oven to 350
  3. Grease and flour a 8 inch cake pan or springform pan
  4. In a bowl, mix together the flour, almond meal, baking powder, and salt
  5. In a mixer, put in eggs and sugar and mix well. Pour in the olive oil and mix until combined and add milk (or orange juice), zest, and both extracts.
  6. Slowly add the dry ingredients to the wet ingredients, until combined.
  7. Pour cake batter into cake pan and bake for 30-40 minutes (until toothpick comes out clean)
  8. Allow cake to cool on rack for 10 minutes before taking out of pan and then allow to cool completely
  9. Brown Butter Glaze:
  10. Heat butter in small saucepan over medium heat. Cook butter, until it is golden brown in color. Remove from heat immediately (it will continue to darken), set aside and cool to room temperature
  11. In a separate bowl, mix together powdered sugar and milk. Add cooled butter and lemon and stir. Stir in almonds.
  12. Place rack over lined baking sheet and pour and spread glaze evenly on top allowing it to drizzle over the side. Let glaze set before serving
3.3.3070

Almond Olive Oil Cake with Brown Butter Glaze

Filed Under: Delectable Desserts Tagged With: almond, brown butter, cake, glaze, olive oil, orange

Homemade Cinnamon Sticks

April 21, 2015 by Michelle Michelotti-Martinez

Cinnamon Sticks 4

Cinnamon Sticks 6

Cinnamon Sticks 1

I am sure by now you can tell that I love tradition and this very special family recipe takes me down memory lane as far back as I can recall. These homemade cinnamon sticks adorned our memories and palettes for years and years growing up and were a quintessential treat that my great grandmother and grandmother would always make us upon visiting. Now that I know the time and energy that went into them, I wonder how they felt when we gorged down the entire pan in less than 10 mintues……now that I think about it, that was probably the BEST complement they received.

The tradition for these cinnamon sticks continued at our house at Easter time. They were perfect Easter morning as they baked and smelled the house of butter, cinnamon, and sugar while we ran around and hunted our Easter eggs and tore into our Easter baskets. You would think the sugar high from all the candy would have sufficed but we all knew our favorite treat was really the cinnamon sticks waiting on the table.

With the cinnamon sticks, mom served up hard-boiled eggs and homemade sausages sent down from the same grandmother who made the cinnamon sticks. They arrived right before Easter and paired a perfect savory sweet combination.

I look back and think about all the hard work, love, time that went in JUST for that Easter meal and treasure every moment and savor every memory. The joy now is the recreation and the honor of a bygone time and a revamp of old traditions. It really is what we have to pass down…….and it makes for the BEST table side conversation.

Cinnamon Sticks 2

5.0 from 1 reviews
Homemade Cinnamon Sticks
 
Print
Prep time
24 hours
Cook time
25 mins
Total time
24 hours 25 mins
 
This is an OLD family recipe from my Austrian great grandmother. It is a tradition of ours on Easter Sunday and they are SO good!!! I honestly don't know why we make them once a year only but with how many we eat, probably ALL we can afford!
Author: Michelle Michelotti-Martinez
Recipe type: Breads
Serves: lots!
Ingredients
  • Day before baking make dough:
  • 3½ tsp active dry yeast
  • ½ cup warm water
  • 1 cup scalded milk
  • ¾ cup butter, softened
  • ½ cup sugar
  • 1 cup potatoes, mashed through sieve
  • 2 fresh eggs
  • 1 tsp salt
  • 7 cups unbleached white flour
  • For topping:
  • 2 sticks butter
  • cinnamon and sugar mixed, equal parts
Instructions
  1. Dissolve yeast in warm water.
  2. Cool milk to lukewarm and add yeast water.
  3. In a mixer with mixing attachment, cream butter, sugar, mash potatoes, and eggs. Switch to a dough hook.
  4. Add salt and flour together and start with flour and add a little to butter mixture then add a little water. Alternate between flour and water but start and end with flour. As soon as mixture is pulling from side of bowl and wrapping around dough hook.
  5. Grease a large bowl with butter and add dough. Cover with towel and let rise in warm place til double in size. Punch down and cover with plastic wrap and leave overnight. (I leave out but can put in fridge but bring to room temperature)
  6. Morning of baking:
  7. Punch down dough and in a 9x13 pan, start with a little bit of dough and roll into a log shape, about 4 inches long by 1 inch thick. Dip into butter and then roll into sugar/cinnamon mixture and put in pan. Repeat this with all the dough and alternating sides you place them inside pan as you will make 2 rows. As you put them next to each other, just "push" a little against each other to pack in a little bit. Pan won't be totally full which is fine as they will rise again in oven
  8. Preheat oven to 400 degrees. Put a pan underneath 9x13 as it will spill over with sugar mixture. Bake for 25 minutes and check to see if they are done. They will be soft but easily pull apart.
  9. Serve immediately with butter. Best HOT and out of oven!
3.2.2929


Filed Under: Breads Tagged With: Butter, cinnamon, rolls, sticks, sugar

Schiacciata all’uva (Tuscan grape foccacia)

April 9, 2015 by Michelle Michelotti-Martinez

Grape Foccacia Schiacciata

I posted a picture of schiacciata all’ uva on my Facebook page the other day and realized how GORGEOUS this focaccia is so, time to share on my blog and tie it to a great memory of a cooking school in Tuscany.

It was a gift from the hubby on my 40th birthday, a 4-day cooking school in Tuscany. After all I needed something to sustain the blow of going into the 4 decade of life!

We booked the adventure for the fall of the following year, this is my favorite time to travel to Europe or anywhere for that matter, and the class existed of us and my dad. It was PERFECT and Elena was the quintessential master chef!

Each day encompassed the lesson of a 4-course Italian extravaganza, all inclusive of eating our delicious preparations accompanied by the wine made at the farm. Good thing the wine flowed with lunch and not before as I doubt any of us would have made it through the instruction of course 1 much less course 4!

It was simply one of the BEST experiences of my life! Elena would reel off instructions in Italian, forgetting I was the only one who understood her, and when the boys stood with a blank stare her response was “beh….VAI”! She didn’t understand why they weren’t jumping to her command so I would quickly “shoo” them away with the instructions she spoke and a smile would make its way to Elena’s face; I knew it was part of the entire package.

As we learned, prepped, and cooked, Elena would explain all the reasons for the dishes, the history, the ingredients, and occasion. Each one had a special cooking vessel and serving dish/platter, all which were handed down to her from those who passed on the secrets…..it was magnificent.

Day 3 of the venture was no different than the first except that the dessert we prepared  became a fast favorite of mine, the schiacciata all’uva. Not only was it delicious but also it was balanced so perfectly between savory with a dash of sweet and served with a beautiful Vin Santo dessert wine. This is one of the many reasons I love Italian food, the desserts are balanced and NOT sweet which leaves me so satisfied.

The schiacciata all’uva was made with grapes from the farm vineyard but throughout the year, could be substituted with blueberries, cranberries, raspberries, whatever you like but since I am in love with the traditional version, I freeze grapes from my sister’s vines and enjoy all year long.

So here’s to the memory of Elena, the 4-day cooking school, and the birthing of the 4th decade of my life….

Grape Foccacia Schiacciata 7

Grape Foccacia Schiacciata 12


Grape Foccacia Schiacciata 11

Grape Foccacia Schiacciata 1

5.0 from 1 reviews
Schiacciata all'uva (Tuscan grape foccacia)
 
Print
Prep time
2 hours
Cook time
40 mins
Total time
2 hours 40 mins
 
The schiacciata alluvia can be made with grapes from the farm vineyard but throughout the year, could be substituted with blueberries, cranberries, raspberries, whatever you like but since I am in love with the traditional version, I freeze grapes from my sister’s vines and enjoy all year long.
Author: Michelle Michelotti-Martinez adapted from Elena
Recipe type: Dessert
Cuisine: Italian
Serves: 8
Ingredients
  • 3 cups unbleached all-purpose flour
  • 1½ cups lukewarm water
  • 1½ tsp dried yeast
  • 1 tsp salt
  • a bunch (about 250 gr) of fresh concord or other sweet red grapes
  • 5-6 tablespoons caster or raw sugar
  • 3-4 tablespoons of extra virgin olive oil
Instructions
  1. For The Dough:
  2. Prepare the dough for the schiacciata, this should be done the night before you need to bake it.
  3. In a stand mixer fitted with dough hook, combine 1½ cup flour, yeast, and 1 cup water and mix on low until combined. This is a called a sponge. Cover the sponge with rest of flour, salt, and 2 T of olive oil, mix well and then slowly add the ½ cup water. You want the dough to be sticky so if you need more water, add bit by bit.
  4. Once dough comes together, turn mixer on high and let it go until it is smooth and elastic, leaving sides clean and hook covered. This will probably take about 5 minutes.
  5. Coat a large bowl with oil and put dough in and rub a bit more oil on top of dough. Cover with plastic wrap and put in a warm place and let rise. I let it go all night and if your more comfortable, put in fridge overnight.
  6. Assembling the Schiacciata:
  7. Turn oven to 350
  8. Wash and pat dry the grapes and separate them from the stem, no need to deseed them, Tuscans eat them with the seeds and all.
  9. When the dough has risen, line a rectangular baking pan with some baking paper
  10. Take the dough out of the bowl with well-floured hands as (if it is successful), it will be very sticky! Divide the dough into two balls, one slightly larger than the other. Roll out the larger ball on a well-floured surface roughly to the size of your pan, no more than 1cm thick. Lay the dough in the pan, pushing the dough to the corners and sides with your fingers if necessary.
  11. Divide about two thirds of the grapes and scatter them on top of the first dough layer and sprinkle half of the sugar over, with a drizzle of olive oil.
  12. Roll out the second ball of dough to the size of the pan and cover the grapes with this second layer of dough, rolling up the edges of the bottom layer of dough from underneath to the top, to close the schiacciata. Gently, with your fingers, push down on the surface of the dough to create little ‘craters’ all over.
  13. Cover the top with the rest of the grapes and sprinkle the remaining sugar over the top. Drizzle with olive oil and bake for about 35-40 minutes or until the dough becomes golden and crunchy on top and the grapes are oozing and cooked.
  14. Allow to cool completely. When ready to serve, cut into squares and dust generously with icing sugar, if using. This is best served and eaten the day of baking, or at the most the next day.
3.2.2929


Filed Under: Breads, Delectable Desserts Tagged With: bread, Foccacia, grape, schiacciata all'uva, tuscan

Smokey Pork Ragu with Creamy Polenta

April 1, 2015 by Michelle Michelotti-Martinez

Smokey Pork Polenta

I can still remember the first time I REALLY had GOOD polenta; I mean AWESOME polenta. Maybe it was the fact we were in Italy, high in the mountains, at our original family hometown in a restaurant operated by a close relative and 8 courses of the most MAGNIFICENT food I had ever tasted or maybe I just developed a certain affiliation for the “staple food” my family was raised on, I don’t know. Honestly, I believe it was the former……that quaint, rustic, family restaurant up in the mountains where all of our cares were left behind……in fact I know it was there.

During one of those 8 courses, my mother had asked to try polenta. She hadn’t really “loved” the dish and since we were not only in polenta “country” but also with our family, she decided it was time to retry the beloved dish.

When it came time for the polenta course, out came a large, copper pot, well used and piping hot; the pot itself was a masterpiece as I can’t imagine how old it was and the stories it could tell but inside was the beautiful yellow creamy polenta bubbling with local cheeses melted on top and a layer of a smoky pork ragu. The smell itself could have filled me but I wasn’t in a million years going to pass on a huge helping of this especially after I learned the “polenta process” of both time and ingredients. It isn’t a dish that can be prepared in a 20 minute meal, at least if it’s done right, that is for sure.

The chef filled our bowls with the deliciousness and while doing so explained his venture on finding the special cheeses that morning along with the local pork meat. He was inspired to create the ragu as it was not quite cold enough for the hearty Bolognese sauce of winter but just brisk enough to want something of a similar comfort. This was the most intriguing sauce I had ever eaten because while it sounded so rich, I actually found it balanced so perfectly and the “smoky” flavor from the wood oven infiltrated the meat with such a beautiful flavor. Between this and the nuisances of the cheeses, my palate was bursting with the sexiest of food profiles and each layer brought a new sensation.

This memory still lingers along with the other 7 courses we ate that memorable evening and upon returning home, I decided I had to attempt to recreate the polenta and pork dish. This wasn’t an easy task especially because the ingredients aren’t an exact equal but the wonderful choices we have allowed the food profile to take on its own characteristics which didn’t disappoint….so here is my take on the “perfect polenta comfort dish”, I hope you enjoy it as much as I do!

Recently, we decided to have a table polenta party and served 3 different sauces for guests to choose from; we poured the polenta down the middle of a covered table and served the sauces along side. It was a total blast and the ragu was one of the choices to top off the polenta…..if you haven’t hosted a table polenta party, I highly recommend it, your guests and you will have the time of your lives and maybe you will transport for awhile to that restaurant up in the mountains of our Italian hometown….

5.0 from 1 reviews
Smokey Pork Ragu
 
Print
Prep time
15 mins
Cook time
3 hours 30 mins
Total time
3 hours 45 mins
 
Author: Michelle Michelotti-Martinez
Recipe type: Main
Cuisine: Italian
Serves: 10-12
Ingredients
  • For Smokey Pork Ragu:
  • One 4-pound piece of boneless pork shoulder
  • Smoked sea salt
  • 2 tablespoons olive oil
  • 1 Granny Smith apple, cut into 1-inch dice
  • 1 medium onion, cut into 1-inch dice
  • 1 carrot, cut into 1-inch dice
  • 1 celery rib, cut into 1-inch dice
  • 2 garlic cloves, crushed
  • 3 thyme sprigs
  • ½ cup tomato paste
  • 1 cup dry white wine
  • 4 cups chicken stock or low-sodium broth
  • ⅓ cup Champagne vinegar
  • 3 tablespoons honey
  • 3 tablespoons mascarpone cheese
  • Freshly ground pepper
  • 1 tablespoon chopped flat-leaf parsley
  • Extra-virgin olive oil, for drizzling
  • For Creamy Polenta:
  • Ingredients
  • 6 cups chicken stock
  • 2 cups whole milk
  • ¾ teaspoon salt
  • Pinch ground white pepper
  • 2 cups polenta
  • ½ cup freshly grated Fontina or Telme
  • ½ cup freshly grated Parmesan, plus extra for dusting
Instructions
  1. For Smokey Pork Ragu:
  2. Preheat the oven to 300°. Season the pork with 1½ tablespoons of smoked salt. In a medium, enameled cast-iron casserole, heat the canola oil until shimmering. Add the pork and cook over moderately high heat, turning, until browned on all sides, 15 minutes. Transfer the pork to a plate.
  3. Add the apple, onion, carrot, celery, garlic and thyme to the casserole and cook over moderate heat until beginning to brown, about 6 minutes. Add the tomato paste and cook, stirring, until it deepens in color, about 2 minutes. Add the wine and bring to a boil. Add the chicken stock, vinegar and honey and bring to a simmer. Add the pork, cover and transfer the casserole to the oven. Braise the pork for about 3 hours, turning once halfway through, until very tender.
  4. Transfer the pork to a plate. Strain the sauce into a large bowl, gently pressing on the solids. Pour the sauce back into the pot. Using 2 forks, shred the pork; discard any large pieces of fat. Transfer the shredded pork to the sauce and stir in the mascarpone. Season the sauce with smoked salt and pepper. Cover and keep warm.
  5. For Creamy Polenta:
  6. In a heavy saucepan, combine the stock and milk, and bring to a boil. Add the salt. Whisk in the polenta and cook over low heat for about 30 minutes, stirring often, until the grains are soft. Fold in the cheeses. Serve immediately or reserve.
  7. To encourage polenta to come cleanly out of the pan, cook over medium heat. Run a spatula or wooden spoon around the sides of the pan to clean off the polenta. Do not stir, but wait and watch for a few seconds until a large bubble begins to form and pushes the polenta upward. Pour immediately into a warm dish.
  8. The polenta can be made ahead and reheated: add ¼ to ½ cupstock, cover the dish, and reheat over low heat. Whisk well before serving. Grate a dusting of Parmesan over the top just before serving.
3.3.3074


Filed Under: Meat and Poultry Tagged With: polenta, pork, pork shoulder, ragu, smokey

  • « Previous Page
  • Page 1
  • …
  • Page 8
  • Page 9
  • Page 10
  • Page 11
  • Page 12
  • …
  • Page 18
  • Next Page »

Primary Sidebar

Meet Michelle and Enrique

Eatentions is a way of being with our food experience. It is a thought-filled process starting with connection to source all the way through the finished creation. We like to call it "from root to experience". Its the entire thing, its that conscious. Thank you for popping by and welcome to our life.

Let’s Connect!

Archives

Categories


My Favorites

Arancini|Eatentions

Arancini

Torta Caprese

Torta Caprese

Lemon Pasta with Broiled Salmon and Charred Lemon|eatentions

Lemon Pasta with Broiled Salmon and Charred Lemon

Footer

Instagram

Instagram has returned invalid data.

Follow Me!

Connect With Us

  • Email
  • Facebook
  • Instagram
  • Pinterest
  • RSS
  • Twitter

We believe in celebrating amazing people, delicious food, great conversation, sustainability and experience. For us,our lives have always been about love, family, friends and sharing all things together. Connecting with people through food, sharing stories and supporting one another to live our dreams and our purpose is what inspires us daily.

My Favorites

Arancini|Eatentions
Torta Caprese

Copyright © 2026 · Foodie Pro & The Genesis Framework